3130
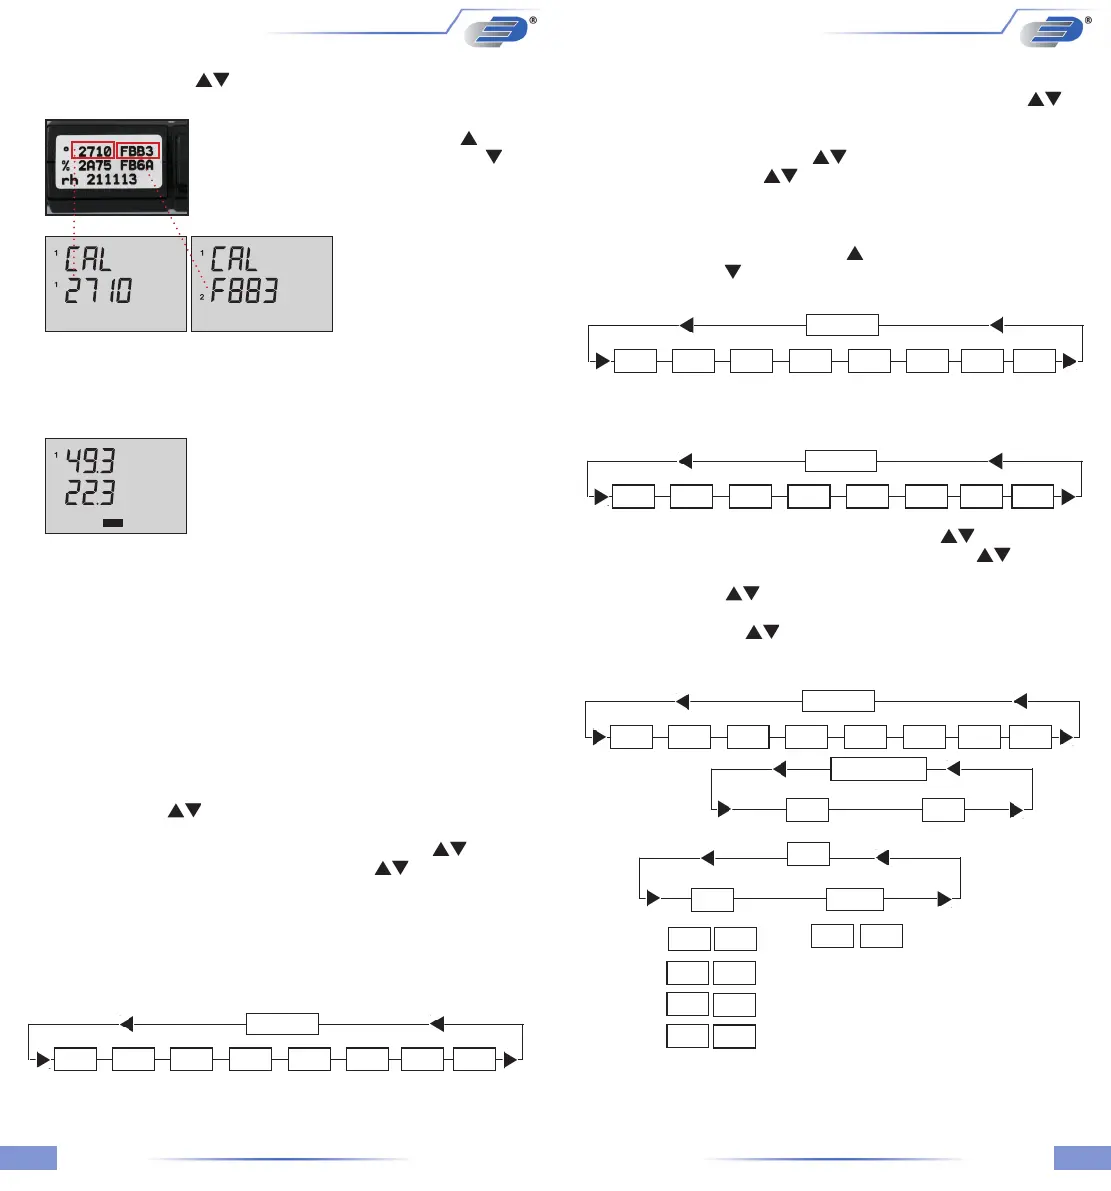
Calibration by code / oP1
Use the up and down keys ( ) to select oP1. Push (ENTER/MENUE) to conrm.
On the bottom of the display appears a very small 1, after this number a
four-digit number (Hex-Code/0..F) is displayed.
For changing the number use the up key ( ). For
stepping to the next number use the down key ( ).
If the requested number is complete then push
(ENTER/MENUE) to conrm. Now on the bottom of
the display appears a very small 2, after this number
a second four-digit number is
displayed. For changing the
number please follow the ma-
nual as before. Push (ESC)
to be back in the measuring
mode.
Note: After conrming oP1 by pushing (ENTER/MENUE) the function oP1
(calibration by code) is activated, even though you leave the menu by pressing
(ESC).
Display-indication with active calibration code (oP1):
The CAL -segment and the small 1 on the left indicates
to the user that oP1 is activated.
Physical calibration / oP2 only with rH
See page 28
Note: The temperature of the combination sensor (humidity + temperature) is
displayed in line 2, for example, if channel 2 is deactivated. The temperature of
the combination sensor can only be corrected using the number calibration (oP1).
oP2 cannot be selected for this. If oP1 is selected for the temperature correction
of the combination sensor, „CAL“ is not shown in the display.
CAL
%
°C
MENUE
Lo6Unit L in 2 CAL ChnI ArEAProb bLE
1.4.5 Channel activation (only 2-channel instruments) / (Chnl)
Chnl = channel
To activate or deactivate a measuring channel push (ENTER/MENUE). Use the
up and down keys ( ) to select Chnl. Push again (ENTER/MENUE). On
the left corner of the display appears a small 1, which indicates the selected
channel. For changing the channel use the up and down keys ( ). Push
(ENTER/MENUE) to conrm. Use the up and down keys ( ) again to activate
on or deactivate off the requested measuring channel and push (ENTER/MENUE)
to conrm. Push (ESC) to be back in the measuring mode.
Short-Cut: Press 2 seconds the HOLD/MAX/MIN-Button for activate or deactivate
channel 2.
Note: As a minimum one channel is active!
1.4.6 Enter Area for volume ow (ArEA)
To enter the area dimensions is only able with instruments for measuring airow.
Push [ENTER/MENUE] and use the up and down keys (
)
to select ArEA. Push (ENTER/MENUE) to conrm. On the left corner of the
display appears a small 1, which indicates the selected channel. For changing the
channel use the up and down keys ( ) . Push (ENTER/MENUE) to conrm.
Use the up and down keys ( ) to select the dimension unit:
cm = Centimeter2
m = Meter2
Push (ENTER/MENUE) to conrm. On the display bottom appears: 00.00
For changing the number use the up key ( ) . For stepping to the next number
use the key down ( ). If the requested dimension is complete then push
(ENTER/MENUE) to conrm.
MENUE
Lo6Unit L in 2 CAL ChnI ArEAProb bLE
1.4.7 Memory Setup (Lo6)
Only instrument with extension –LOG (e.g. P755-LOG) have got an internal
memory.
Push (ENTER/MENUE) and use the up and down keys (
) to select Lo6.
Push (ENTER/MENUE) to conrm. Use the up and down keys ( ) again to
start (on) or Stop (off) the logger. Push (ENTER/ MENUE) to conrm. Use the
up and down keys ( ) again to select between automatic storage (Auto)
or manually operated storage (SPot). Push (ENTER/MENUE) to conrm. Use
the up and down keys ( ) again to select between to add on data (Add)
and creating a new le (nLo6). Push (ENTER/ MENUE) to conrm. By selected
automatic storage at the end you have to select the time interval:
MENUE
Lo6Unit L in 2 CAL ChnI ArEAProb bLE
nur -LOG
Geräte
By selected manually operated storage you are able to save the measurement
by pressing ESC by each time.
1 S 1 second
2 S 2 Seconds
5 S 5 Seconds
10 S 10 Seconds
20 S 20 Seconds
30 S 30 Seconds
1 M 1 minute
2 M 2 Minutes
5 M 5 Minutes
10 M 10 Minutes
20 M 20 Minutes
Lo6
on
oFF
Add
nLo6
1 S
2 S
5 S...
nLo6
Add
1 S
2 S
5 S...
AUTo
SPoT
on
MENUE
Lo6Unit L in 2 CAL ChnI ArEAProb bLE
only -LOG
Geräte
Push [ENTER/MENUE] to conrm. Push [ESC] to be back in the measuring
mode. Manual storing [Spot]. Press the key [ESC] to store manually the
measuring values.
 Loading...