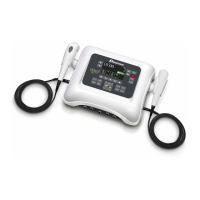
Dynatron® 850plus & 550plus
IFC & PREMOD - Treatment Instructions
26
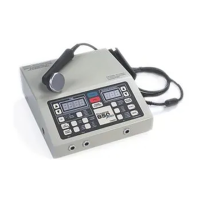
POWER-INTENSITY
TIME
START
STOP
HI VOLT
+
-
PREMOD
IFC
BIPHASIC
CO-CONT
NORMAL
RECIP
.5 RAMP
1.0 RAMP
1.5 RAMP
2.0 RAMP
HIGH
LOW
TARGET
SWEEP
CH 1 CH 2
MICRO
+
-
RUSSIAN
COMBO
SOUND
1 MHz
2 MHz
3 MHz
10/10
10/30
10/50
CONT
10%
20%
50%
CONT
HV
TARGET
PAUSE
WIDTH
RATE
FREQ
TIME
SOUND
MICRO
HV
2
1
FUNCTION
The upper limit of the range is shown here. In
this example, this is the upper limit of the
default HIGH frequency range.
The lower limit in the sweep range is shown
here. In this example, this is the lower limit
of the default HIGH frequency range.
Press this toggle key to select FREQ. The "Time" and "Intensity" displays then show the lower
and upper settings for the range you have selected (High or Low). In the example above, 80
Hz is the lower limit for the range and 150 Hz is the higher limit for the range. Use the arrow
keys beside each display to change either or both of these frequencies, if desired.
NOTE: By setting both displays to the same value, you can deliver a treatment at a single
frequency rather than sweep through a range of frequencies. For example, set both the upper
and the lower limits at "100" for a 100 Hz treatment.
Use these arrow
keys to change
the lower limit of
the range.
Use these arrow
keys to change
the upper limit of
the range.
Use this toggle key
to select the HIGH
or LOW range.
CH
Modify frequency ranges in Interferential or Premodulated treatments.
4. Choose HIGH, LOW, HIGH/LOW alternating, or HIGH/LOW consecutive.
Press the HIGH/LOW toggle key one or more times to select the high frequency range,
the low frequency range, or both. The lights next to the toggle key show what you have
selected. Select from the following options:
a. High only. Toggle until only the High light is on.
b. Low only. Toggle until only the Low light is on.
c. High/Low Alternating. Toggle until both High and Low lights are on, only one of
these is flashing. When the treatment has started, the device alternates between the
two modes at intervals of approximately 30 seconds each beginning with Low.
d. High/Low Consecutive. Toggle again; both High and Low are flashing. During the
first half of the treatment time the High frequency range is delivered. During the
second half of the treatment time the Low frequency range is delivered. NOTE:
Make any desired changes to the treatment time before
selecting Consecutive.
Treatment time changes made after selecting Consecutive will cause the treatment to
revert to an alternating treatment (option c. above).
Once the treatment has started, the frequency range (High or Low) being delivered at a
given time is indicated by the flashing High or Low light.
5. Increase INTENSITY.
Set the intensity by pressing the Intensity UP arrow key. When you increase intensity,
current to the patient begins. Intensity can be decreased by pressing the Down arrow key.
NOTE: For devices having software greater than Rev. 1.01, the conductance bar graph is