26
EN
EBS Ink-Jet Systeme 20111028#4.2
EN
clicking the , bearing in
mind that an O.K. message
should be displayed in the trans-
mission status window each time
a file is saved.
See also the note in section How to
Transfer/Save Text Files to/in the
Printer.
Printing
Printing a Text File Saved in the
Printer
See figure
.
1. Switch the printer on.
2. Press and then release button
18,
PRINT
ON/OFF
- lamp 17 starts light-
ing. If ink pressure in the ink con-
tainer is insufficient, a micro
compressor starts to add some
air. Wait until the micro compres-
sor stops working.
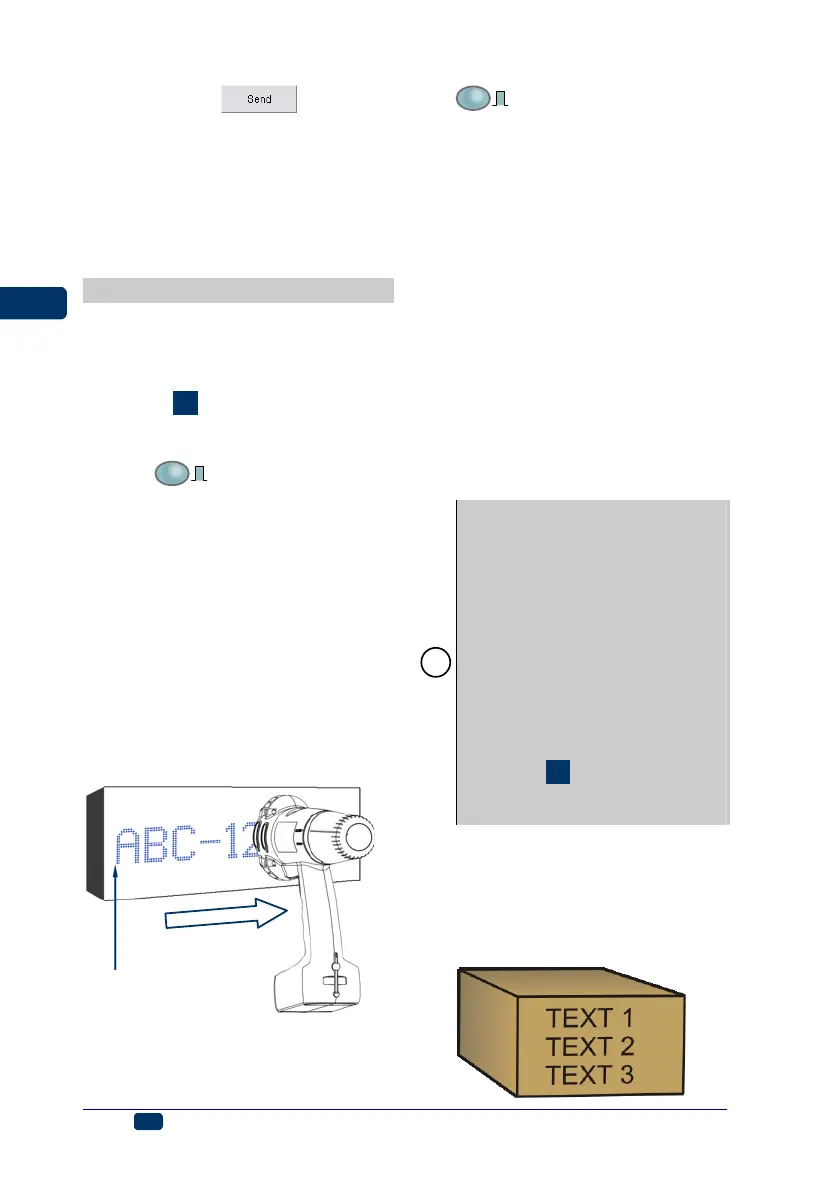
3. Move the head of the printer to
an object to be labelled to ensure
that drive rolls 1 and 3 touch the
surface of the object.
4. Press print release button 5 (the
release button) and move the
printer along the object ensuring
that the drive rolls roll at a uni-
form speed.
here printing is released
with the release button
the printer moves along the object
5. Make successive prints by press-
ing release button 5.
6. After all prints have been made
press and then release button 18,
PRINT
ON/OFF
. Lamp 17 goes out. If the
Stop printing method parame-
ter is set to Complete & stop
and you press button 18, lamp 17
will flash. This means that you
have pressed release button 5
but not finished printing. In such
a case you can finish printing or
abandon printing by pressing but-
ton 18 once again. If the Stop
printing method parameter is
set to Immediate stop the printer
will not remind you about the un-
finished printing.
The Stop printing method
parameter is available in the
Advance tab sheet after the
Adv. options box has been
ticked.
!
If the printer has been idle for longer
than about 30 minutes, the nozzle
outlets might become covered with
dry ink. Before you start printing
make a trial printing or use the rinse-
the-nozzles function for a while in
order to clear the nozzles - see
Rinse the nozzles.
If you label objects whose height is
smaller than 60 mm (the distance
between the rolls is 60 mm), make
sure that at least lower roll 3 (de-
signed for synchronising printing)
touches the object being labelled -
see figure
H
. The rule does not
apply if printing is synchronised by
the internal generator.
Line Printing
Line printing is used to print a few
texts manually in a fast way:
• on consecutive lines as shown in
the figure below: