Emaldo Power Core User Manual
Important
• Secure the wall-mounted bracket with M6 expansion bolts provided. If its length or
quantity cannot meet the installation requirements, please provide M6 stainless steel
expansion bolts for yourselves.
• In order to prevent dust from entering human respiratory tract or falling into eyes during
drilling, operators shall wear protective glasses and dust masks.
• Dust inside and outside all holes shall be removed by the dust collector, and then the hole
spacing shall be measured. For holes with large errors, relocation and drilling shall be
carried out.
• After bolts, spring washers and flat washers are unscrewed, the upper end surface of the
expansion pipe must be level with the cement wall surface or the floor without protruding
out of the cement wall surface and the floor; otherwise, the engineering installation parts
cannot be placed evenly on the wall surface.
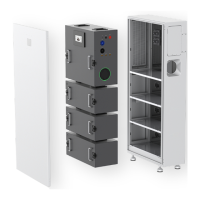
Step 1
A line marking template is used to determine the
drilling location, level the hole location with a
leveling instrument, and mark it with a marker.
Step 2
An electric drill is used to drill installation holes for
M6 bolt at the marked points.
Step 3
Align the cabinet with the installation holes, tap the
expansion bolts into the holes on the wall with a
hammer, install the nuts (including elastic flat
washers), and tighten the nuts with a wrench.
Note:
If no battery expansion cabinets are installed when
installing Emaldo Power Core, it is recommended to
install Emaldo Power Core on the right side, so that
more battery cabinets can be expanded and installed
on the left side if needed in the future.
 Loading...