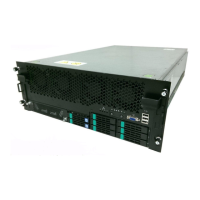
The system disk drives are identified by a label over them, as shown in Figure 32 on page
37 and Figure 33 on page 37.
The
VNXe3200 Hardware Information Guide
provides more details on all system LEDs.
Figure 32 2U 3.5" drive DPE front LEDs
Removing these drives will
make the array unusable
SPD
Removing these drives will
make the array unusable
SPD
Removing these drives will
make the array unusable
SPD
Removing these drives will
make the array unusable
SPD
1
2
3
4
5
6
Figure 33 2U 2.5" drive DPE front LEDs
Will Make the Array Unusable
Caution: Array Software on drives 0-3. Removing or relocating them
4
5
6
The array is powered up and ready to run the Connection Utility once the SP Fault/Status
LEDs show a blue with amber blinking sequence every three seconds. If the system is on
a network with a DNS server and DHCP, the management IP address can be assigned
automatically and those LEDs will be solid blue. Ensure that the power-up is complete
and that the system is ready before you continue.
Attach the bezels
Procedure
1. Locate the bezels for each installed component.
2. Attach the bezel that corresponds to each component as shown in Figure 34 on page
38.
Rack and install
Attach the bezels 37