8/16
Endress+Hauser
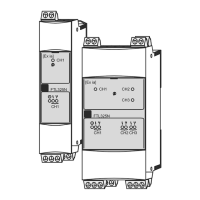
Kits CM42
- Push down both straps. Now the module
is vibration-proof locked at the mounting
rail.
• Re-assemble the input module (E):
- Insert the input module (E) into the
notches of the CPU module (B). Then
push the module down as far as it will go.
- Push down the straps to lock the module.
- Now reconnect the terminal strip of the
input module.
• Next reconnect extremely cautious and
without any force the flat ribbon cable with
the CPU module.
• At last reconnect the terminal strip (C) of
the CPU module. This powers and restarts
the instrument.
• Check the instrument for proper function.
• Use your DAT module to restore the
configuration of the instrument.
Otherwise the configuration must manually
be restored.
All spare CPU modules are equipped with S/W.
Therefore changes in the instrument's function-
ality are possible. In this case order an up-to-
date operating instruction via
>www.endress.com/liquiline-documentation<
Up-to-date drivers for HART, Profibus and FF
are available at the E+H-Homepage
(www.endress.com, see also rear side).
- Drücken Sie beide Laschen nach unten.
Dadurch wird das Modul in der Hutschiene
rüttelsicher fixiert.
•
Bauen Sie das Eingangsmodul (
E
) wieder ein:
- Führen Sie das Eingangsmodul in die
Nuten des CPU-Moduls (B) ein und schie-
ben Sie es dann bis zum Anschlag ein.
- Drücken Sie beide Laschen nach unten.
- Stecken Sie zuerst die Klemmleiste des
Eingangsmoduls wieder auf.
• Stecken Sie vorsichtig und ohne jeglichen
Kraftaufwand den Verbinder des Flachband-
kabels wieder am CPU-Modul ein.
• Stellen Sie zuletzt die Geräteversorgung
wieder her, indem Sie Klemmleiste (C) des
CPU-Moduls wieder aufstecken.
• Prüfen Sie die Funktion des Gerätes.
• Benutzen Sie Ihr DAT-Modul, um die
Gerätekonfiguration wiederherzustellen.
Andernfalls muss das Gerät von Hand neu
konfiguriert werden.
CPU-Module werden mit Software ausgeliefert.
Dadurch können sich funktionelle Änderungen
ergeben. Bestellen Sie ggf. eine neue Betriebs-
anleitung unter
>www.endress.com/liquiline-documentation<
Aktuelle Treiber für HART, Profibus und FF
können von der E+H-Homepage bezogen werden
(www.endress.com, siehe auch Rückseite).
7. Austausch des Deckels
mit Displaymodul
Der Knopf des Navigators darf keinesfalls
abgezogen werden! Als Ersatzteil erhalten Sie
deshalb immer einen kompletten Deckel mit
Display und Navigator.
• Öffnen Sie den Deckel (siehe Kapitel 4).
• Unterbrechen Sie die Geräteversorgung
(z. B., indem Sie am CPU-Modul die Klemm-
leiste mit Klemmen 133+134 bzw. mit
Klemmen 997+998 abziehen).
7. Exchange of the lid
with display module
It's not allowed to pull off the navigator knob!
Therefore the spare part kit always contains
the complete lid with hinge, display and
navigator.
• Open the lid (see chapter 4).
• Interrupt the supply of the instrument (e.g.
by unplugging the terminal strip with the
numbers 133+134 respectively 997+998
from the CPU module).
 Loading...