[3.2 — Connections]
© FLIR Systems AB – Publ. No. 557 369 – Ed. A
7
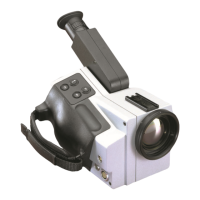
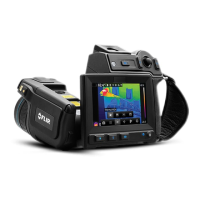
The joystick [5] has various functions. At the start up of the camera the joystick is
in the default mode controlling focus (up/down) and zoom (left/right). In the menu
mode you use the joystick to select the appropriate function and to increase or
decrease various parameter settings.
The green (on/off) button [6] is used to switch the power of the camera on and
off. Press the button to switch the camera on. Keep down the button for more than
2 seconds to switch the camera off.
The focus of the viewfinder [7]can be adjusted by turning the adjustment ring
either clockwise or counter-clockwise.
For further information on the direct access buttons, see “User interface” on page
14.
3.2 Connections
There are three connectors on the camera:
• 12 VDC connector: For connection to the power cable from battery belt or
power supply. This connector also provides S-VHS signals (or on some camera
models 14-bit digital signals) and remote control signals when the optional 5
metres (16.4 ft) extension cable is used.
• Headset connector: For connection to a headset to make voice comments to
stored images.
• Video connector: For connection to large monitors or standard VHS-video
equipment for viewing or recording.
[1] Video connector
[2] 12 VDC connector
[3] Headset connector
(Overleaf)
 Loading...