144 145
EN
Adjusting the support level
You can use the on-board computer to con gure
the level of support provided by the e-bike drive
when you are pedalling. The support level can be
adjusted at any time, including during your jour-
ney.
Certain versions have a preset support
level that cannot be changed. Certain
models may also have fewer support
levels to choose from than are shown
here.
As a maximum, the following support levels are
available:
• «OFF»: motor support is switched off; the e-
bike is operated like a normal bicycle through
pedalling alone. The pushing aid cannot be ac-
tivated in this support level.
• «ECO»: effective support with optimum ef -
ciency for maximum range
• «TOUR»: consistent levels of support for tours
with large ranges
• «SPORT»: powerful support for active riding
on hilly terrain and in city traf c
• «TURBO»: maximum support up to high ped-
alling frequencies for active riding
To increase the support level, brie y
press the
«+» 6 button on the on-board computer until the
desired support level appears on the display i.
Press
the «–» 5 button to decrease the sup-
port level.
Switch bicycle lighting on/off
For models where the headlight is powered by the
e-bike system, you can switch on the front and
rear lights simultaneously by pressing the «+»
button for a couple of seconds
. Hold down
«+» button to switch off the bicycle lights.
When the lights are switched on, the lighting sym-
bol h is displayed.
Switching the bicycle lighting on and off does not
affect the display backlight.
Indicators and settings on the on-board com-
puter:
speed and distance indicators
The speedometer display a always shows the
current speed.
In the standard con guration, the display i always
shows the last setting. If you repeatedly press the
«–» button for a couple of seconds
, the travel
distance «TRIP», total kilometres «TOTAL» and
battery range «RANGE» are displayed in succes-
sion. (Brie y pressing
pressing the «–» button
decreases the support level!)
To reset the travel distance «TRIP», press and
hold
the «+» and «–» buttons simultaneously.
First, «RESET» appears on the display. Continue
to hold down both buttons to reset the travel dis-
tance «TRIP» to “0”.
To change the displayed values from kilometres
to miles, hold down
und kurz die Ein-Aus-Taste
1 drücken
the on/off button 1.
The version information for the subsystems can
be checked for maintenance purposes. With the
system switched off, press the «–» and «+» but-
tons simultaneously, then press the on/off button
1.
The USB socket is reserved for connection to di-
agnostic systems. It has no other function.
The USB connection must always be
fully closed with the protective cover
8.
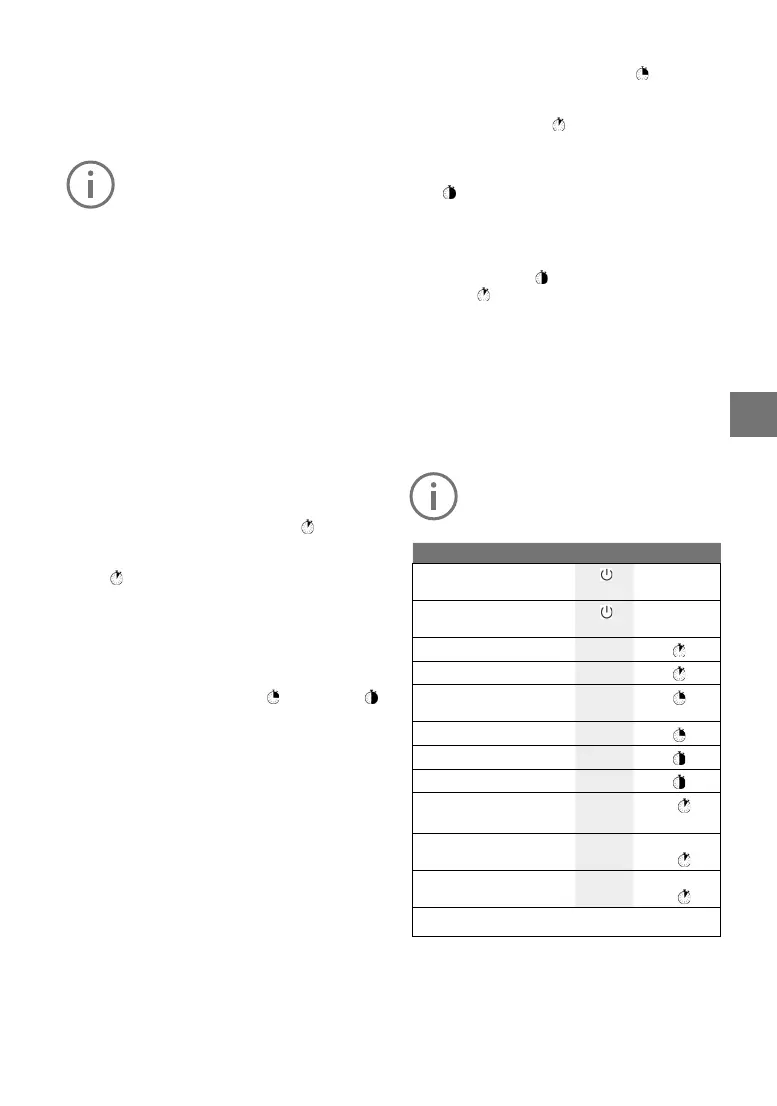
Action Buttons Duration
Switch on-board computer
on
Any
Switch on-board computer
on
Any
Increase support +
Decrease support –
Display «TRIP», «TOTAL»,
«RANGE», Support modes
–
Switch bicycle lighting on +
Switch bicycle lighting off +
Reset travel distance – +
Activate pushing aid
Deactivate pushing aid
WALK
+
1.
2. Any
Switch from kilometres
to miles
– 1. Hold down
2.
Version information
1) 2)
+ 1. Hold down
2.
1) The e-bike system must be switched off.
2) The information is displayed as ticker text