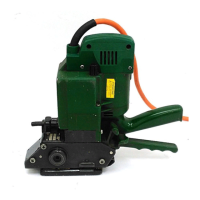
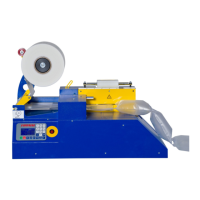
The FROMM P300 is an electrical plastic strapping tool designed for strapping packages. It is a high-performance tool that automatically tensions, seals by friction welding, and separates plastic straps.
Function Description
The P300 tool is used to apply plastic strapping around packages. The strapping is manually fed around the package or in combination with a strap feeder. Once the straps are inserted into the tool, the P300 automatically performs the tensioning, friction welding, and cutting operations. The tensioning force and welding time can be adjusted to suit different strap qualities and package requirements.
Important Technical Specifications
- Strap Qualities: The tool is designed for PET (Polyester) and PP (Polypropylene) plastic strapping.
- Strap Dimensions: It accommodates strap widths from 10 to 16 mm (0.4 to 0.8 inches) and thicknesses from 0.4 to 0.8 mm (0.016 to 0.031 inches). Specific strap dimensions are indicated by the last two digits of the item number on the tool's label, which also specify strap thickness and quality.
- Tensioning Force: Maximum tensioning force is 1600 N (360 lbs). This value is dependent on the strap quality.
- Tensioning Speed: Approximately 170 mm/s.
- Joint Strength: Approximately 75% of the tensile strength of the plastic strap.
- Sound Information: The A-weighted equivalent continuous sound level at the operator's workplace is typically 82 dB (A), determined according to DIN 45 635 T3 (11.85).
- Vibration Information: The weighted effective value of acceleration is typically less than 4.1 m/s², determined according to DIN EN 28 662 T1 (01.93).
- Dimensions (without suspension bracket):
- Tool Length: 290 mm (11.4 inches)
- Tool Width: 90 mm (3.5 inches)
- Tool Height: 250 mm (9.8 inches)
- Package Length: 360 mm (14.2 inches)
- Package Width: 400 mm (15.8 inches)
- Package Height: 110 mm (4.3 inches)
- Weight: Tool: 3.9 kg (8.6 lbs), Package: 0.8 kg (1.8 lbs).
- Electrical Data: The first two digits of the item number define the electrical data and specifications. The tool must be connected to a power line with the original plug/cord, and the supply voltage and frequency must match the label indications. A helix cable with a plug (item-No. N5. 2122) can be ordered for specific tool item numbers (e.g., 43.11.., 43.18.., 43.94.., 43.95.., 43.96..).
Usage Features
- General Safety: Users must read all instructions to avoid electric shock, fire, or serious injury. The work area should be clean and well-lit, and the tool should not be operated in explosive atmospheres. Children and bystanders must be kept away. Electrical safety includes matching plugs to outlets, avoiding body contact with earthed surfaces, protecting the cord from heat/oil/moving parts, and using outdoor-suitable extension cords when operating outdoors. Personal safety emphasizes alertness, wearing eye protection, avoiding accidental starting, removing adjusting keys/wrenches before operation, maintaining proper footing, and dressing appropriately.
- Appropriate Use: The P300 is exclusively designed for strapping packages with plastic strapping. Any different or exceeded use, such as running idle without strap, is not appropriate. Adherence to all operational, control, and maintenance instructions is crucial. Electromagnetic fields may affect device function, requiring relocation or customer service contact.
- Strap Feeding: The strap is fed around the package as illustrated, ensuring proper alignment. Only plastic strap recommended by the local sales representative and intended for the tool's specific sizes (as per the chart of types) should be used.
- Strap Insertion: To insert the strap, the grip lever is pulled up firmly with the right hand, and two straps are inserted well-aligned into the strap guide with the left hand before releasing the grip lever.
- Tensioning: Tensioning is initiated by pressing and releasing the switching lever. The desired strap tension can be preselected using the rotary knob; turning it clockwise increases tension, counter-clockwise decreases it. Tensioning can be interrupted and restarted at any time. For constant tension, the tool should be set to maximum tension until the motor stalls. If maximum tension is not required, releasing the switching lever before the motor stalls stops the cycle.
- Sealing/Welding: The switching lever is pressed forward firmly and released immediately. The strap is automatically welded by friction and then cut. Welding times vary depending on strap size and quality and can be adjusted using a screw-driver with a small blade on the rotary potentiometer under the cover. Clockwise rotation increases welding time, counter-clockwise decreases it. The tool must be disconnected from the power supply when adjusting welding time.
- Tool Removal: To prevent seal breakage, the seal should be allowed to cool for approximately 2 seconds after welding. The grip lever is then pulled up, and the tool is pushed to the right to remove it from the strap.
- Suspension Bracket (Optional): The tool can be equipped with a suspension bracket (item-no. P30.1407) for suspension on a balancer. Installation involves removing a screw and nut, slipping the bracket onto the bolt, aligning holes, and securing with the screw.
- Wearing Plate (Optional): A wearing plate complete (item-No. P30.1411) can be installed to protect the base from excessive wear on abrasive package surfaces (e.g., bricks, concrete blocks). Installation involves removing screws N1.1305 and pin N2.2110, then attaching the wearing plate with three screws N1.2210 and pin N2.2138.
Maintenance Features
- Joint Control: Users are responsible for reviewing the quality of the joints made by the tool. Familiarity with seal control and adjustment (described in the manual) is essential. Misformed joints can compromise load security and cause injury.
- Strap Dispensing: Strap should only be dispensed from a specifically designed dispenser. The strap end should be tucked back into the dispenser when not in use. Strap should never be used for pulling or lifting loads.
- Cleaning: Tension parts should be regularly cleaned from strap abrasion using compressed air. Mechanical tools should not be used for cleaning. When cleaning the tool housing, water or solvents should be avoided.
- Service and Repair: All servicing and repair work must be carried out by authorized service centers only. If the tool malfunctions, it should not be disassembled but sent fully assembled to the local service center in its original packing. FROMM recommends servicing the P300 by an authorized service shop after 12 months if used one shift per day, or after a shorter period if used two or more shifts per day.
- Warranty: FROMM Holding AG warrants its strapping tools and machine heads for 24 months from installation (or 30 months from shipment to distributor). The warranty covers deficiencies from poor manufacturing or faulty materials but excludes wearing parts, improper installation/handling/maintenance, use without safety devices, disregard of manual directions, arbitrary modifications, deficient control/repair of wearing parts, and use of non-recommended consumable products.