when operated as instructed in this manual. Re
Symptom Remedy
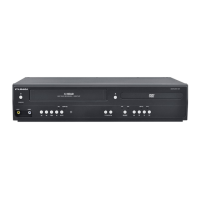
DVD • VCR
No
is connected to an AC outlet
the power plug is connected to an AC outlet
You have to be within 23 feet
e or disc is in this unit.
the Remote Control is sendin
be received. Change the position and direction of the unit
this unit is in the DVD or VCR mode. I
. Turn Power back On and immediatel
press the DVD or VCR Eject Button
repeate
VCR
Cannot record a TV pro
his unit does not have a tuner to receive TV broadcastin
& OTR (One -touch Timer Recordin
ake sure the timer program is set correctl
needed, cover the hole with ta
er to “Auto Head Cleaning” (page 27)
Adjust tracking control for a better picture b
Connect the video cable firml
Change the movie rating, re
Handle a disc with special care so that it does not have
erprints, scratches, or dusts on
i
the audio component.
• Correct t
Sound on TV or remove Mute
to the TV or amplifier that supports DTS, then the audio will be output as DTS. It is onl
here are some cases where pictures ma
distorted, and those are not a sign o
stop for a moment, this is not a malfunction
or audio or subtitles on the DVD
s contain sequences recorded from different camera angles
isc Menu.
“INVALID ENTRY” appears on t
Some functions are not available in specific modes, but this is not a malfunction. Read the description in this manual
TROUBLESHOOTING
Troubleshooting Guide
E8R6AUHDV220FX5OMv1.indd26 2014/10/0615:42:22