Part # 1382683 (01/08)Page 18
Burner Gas / Air Adjustment
Variation in eld condition and/ or rough handling of the
equipment in transit may create the need for adjustment to
the primary burner air. Check operation and adjust as below
to provide a sharp blue ame at full rate, (valve open fully, or
thermostat calling for maximum gas ow).
On the burner, locate the air shutter, (at the end where the
burner orice enters). Loosen the locknut so that the air
shutter turns freely. Turn on the gas to the burner. Rotate the
air shutter to obtain the following:
a. Open, (Star), Burner – 1/2”, (13mm, stable, sharp inner
blue cones.
b. Hot tops & Griddles – 5/16”, (8mm) stable, sharp inner
blue cones.
c. Oven Burners – If the ames are soft, unstable, or
show yellow tipping, increase the amount of air by
opening the air shutter.
NOTE: The ame safety valve is a protective device which
allow gas to ow to the burner only when the pilot is burning,
(used on all models except H/P 280 Series)
A too loose or too tight connection of the thermocouple nut
to the automatic pilot valve can prevent the thermocouple
from activating the valve. The nut should be drawn up nger
tight, then tightened an additional 1/4-turn ONLY with a
wrench.
It is recommended that an automatic pilot test kit be used
to check the thermocouple and hood assembly of the safety
valve. A visual examination of the thermocouple lead should
be made to conrm that there are no cracks.
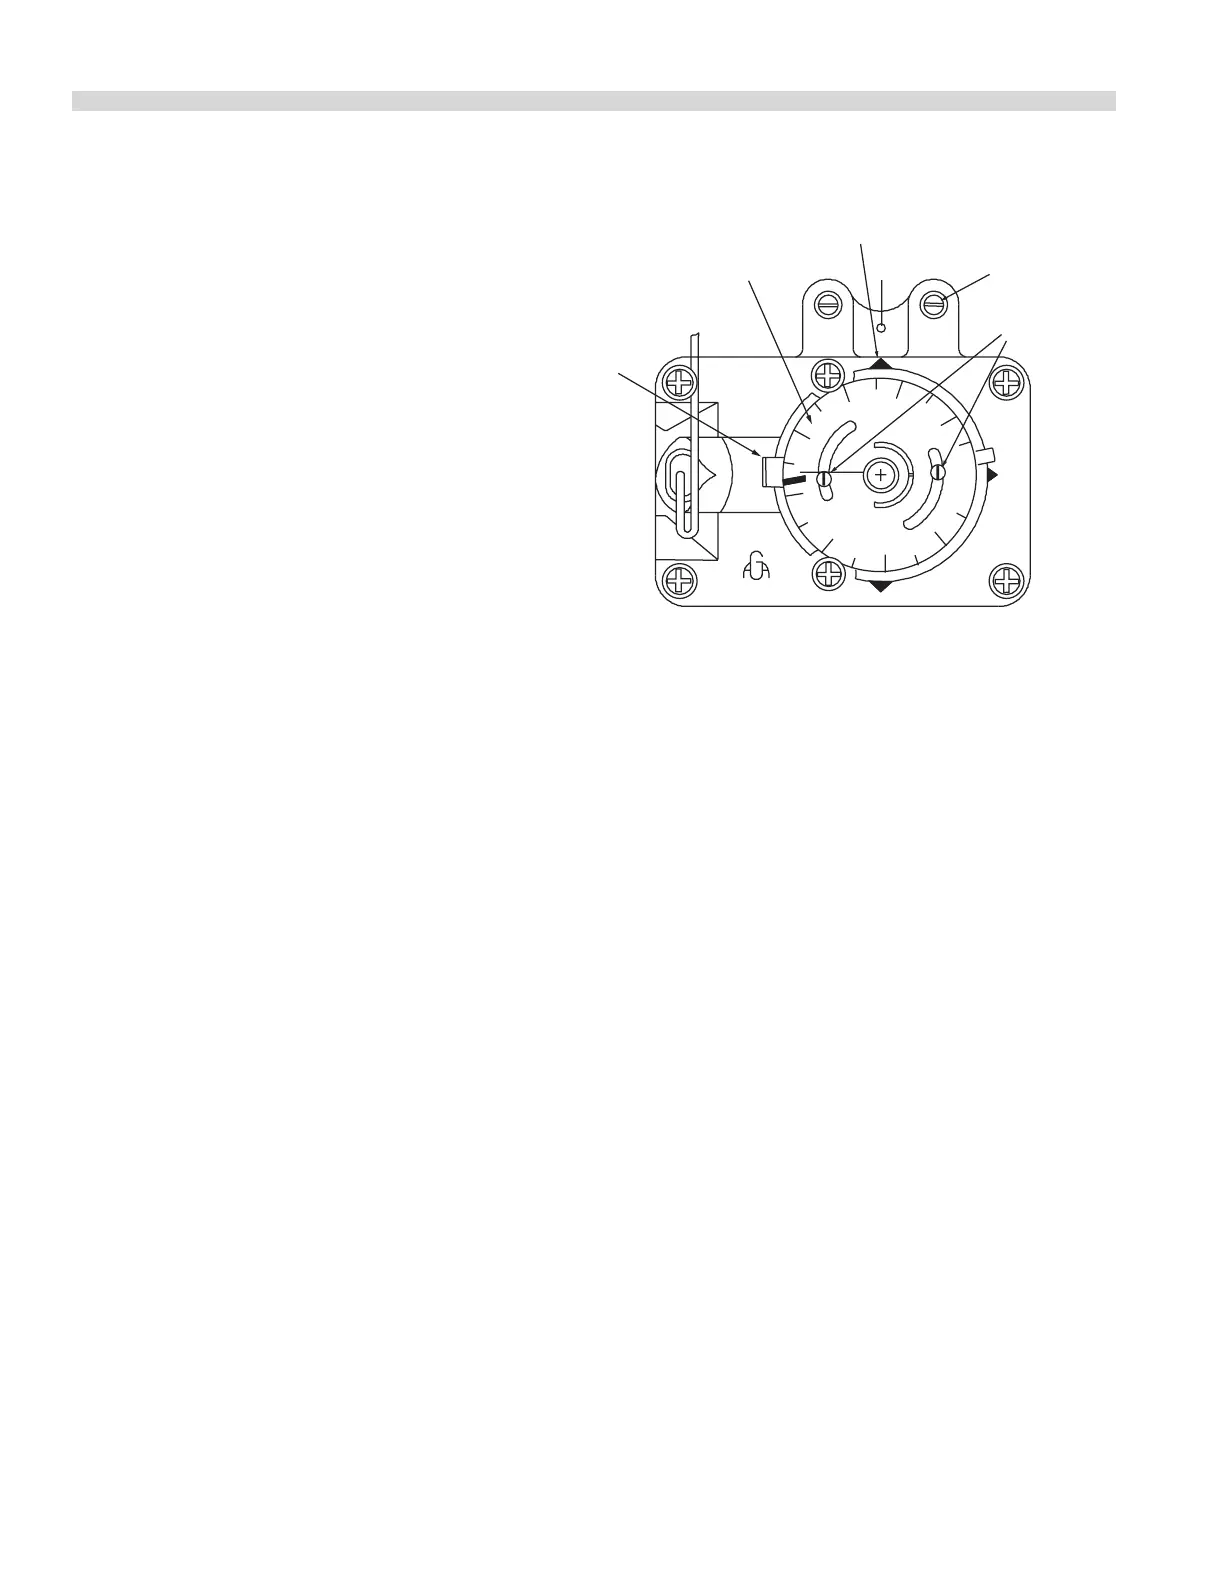
FDO Heavy Duty Oven control
The model FDO oven thermostat is a precision-made
instrument, carefully set at the factory to accurately control
oven temperatures from 150° to 500°F, (66° to 260°C). All
adjustments are accessible from the front of the appliance
after moving the dial. To remove the dial, grasp the outer
edges and pull straight out.
By-Pass Adjustment
The Robertshaw FDO snap/throttle thermostat requires that
the by-pass ame be properly adjusted. To adjust proceed as
follows:
ADJUSTMENTS Continued
4
5
0
5
0
0
5
5
0
1
5
0
3
0
0
2
5
0
3
0
0
3
5
0
4
0
0
Calibration
Lock Screws
By-pass Flame
Adjuster
Indicator Mark
Calibration
Plate
Dial
Stop
MODEL
FDO
1. Ensure pilot ame is lit and adjusted.
2. Turn oven temperature control to 200°F, (93°C), and allow
the oven to heat for three minutes.
3. Turn, the oven temperature control to the lowest
position, then turn slowly counter-clockwise until the
audible “click” is heard.
4. Making sure the oven temperature control dial is not
disturbed, turn the by-pass ame adjusting screw
clockwise to decrease, or counter-clockwise to increase
the ame on the burner to the lowest possible stable
ame. When properly adjusted, the by-pass ames will
cover the entire length of the burner.
Calibration Instructions
Field calibration is seldom necessary and should not
be resorted to unless experience with cooking results
undoubtedly indicate that the control is not maintaining
the temperature for which the dial is set. To check oven
temperatures when calibrating, use only a reliable mercury
thermometer, or preferably an oven pyrometer. To check
calibration, proceed as follows:
1. Place the thermocouple of the test instrument or reliable
mercury thermometer in the center of the oven.
2. Turn the oven temperature control knob to 400°F, (204°C),
and allow the oven to cycle at least three times.