– 50 –
Diagnostics and Service Information
Control Voltage
WARNING: Components are electrically HOT on
the
control when voltage is connected to
the
range. To prevent
electrical shock, use extreme caution when diagnosing the oven with the outer covers removed and the power on.
Note:
• Voltage must be present across terminals L1 to N for the control to operate.
• Temperature/Mode Selection is necessary for the operation of the relay contacts.
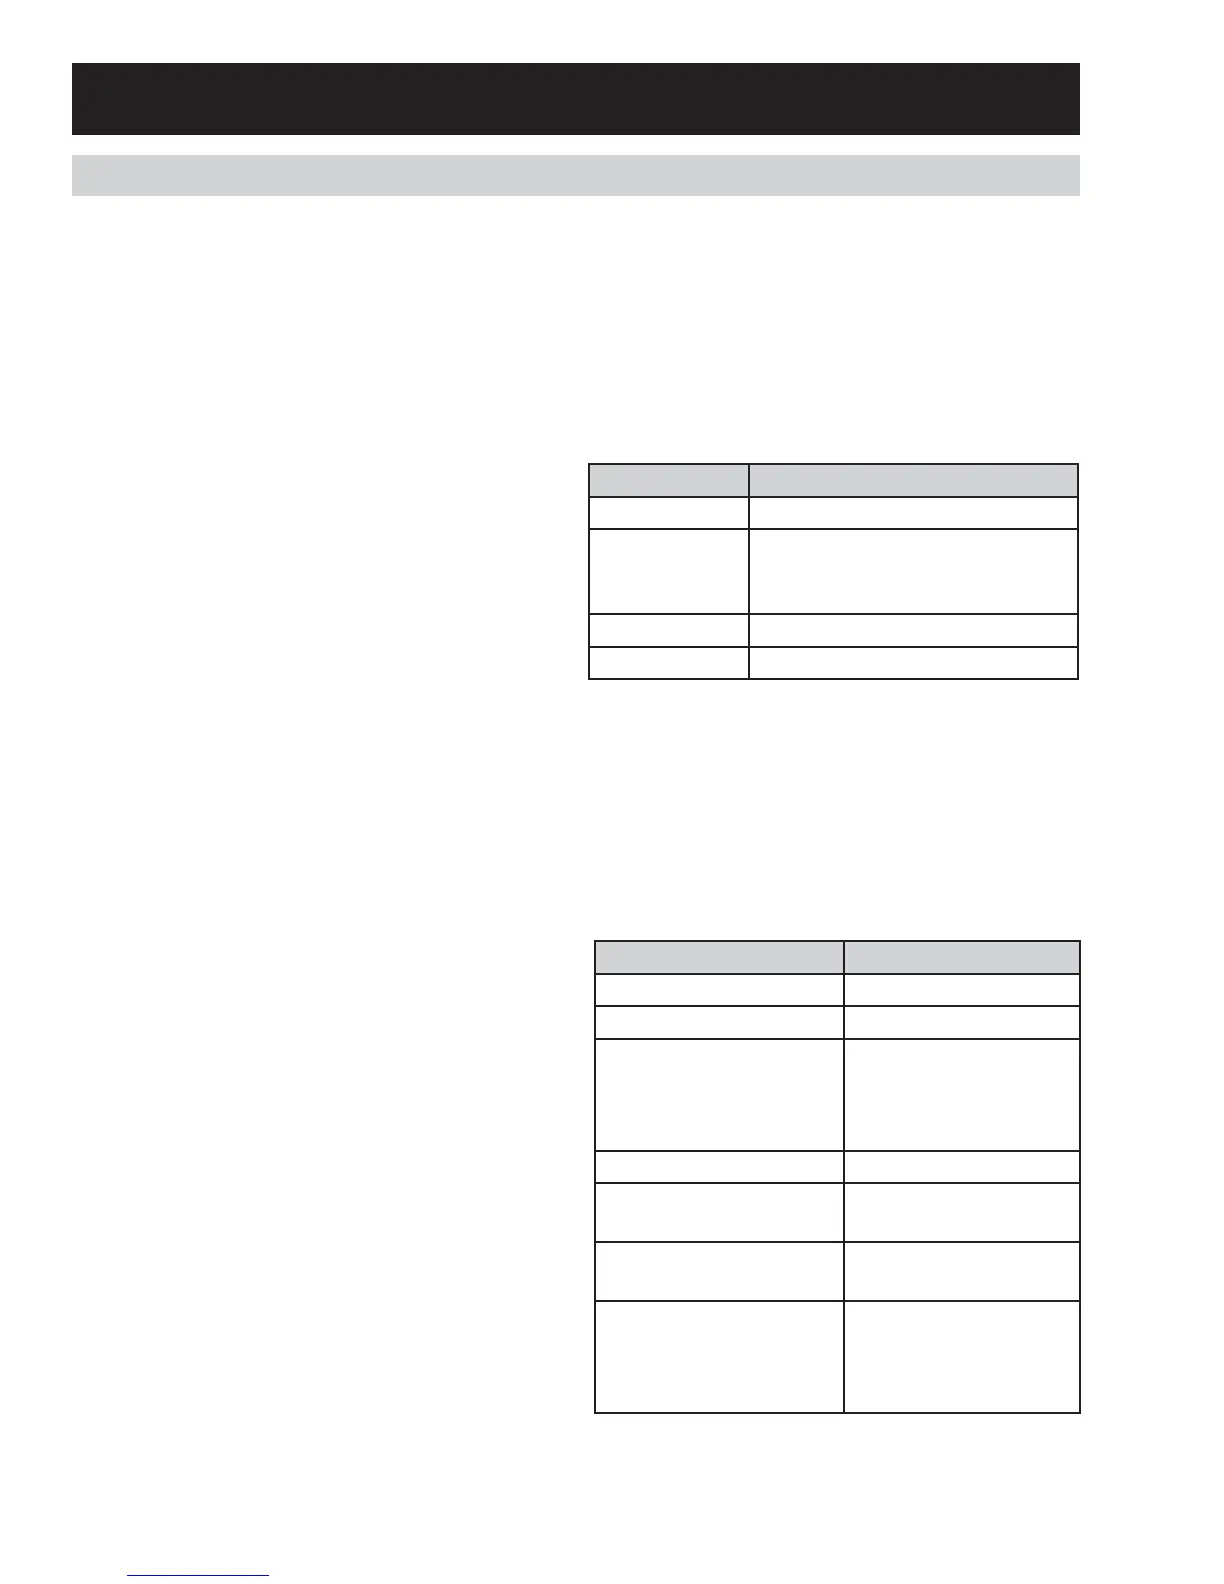
Models JKS10, JKP30, & JKP35
TERMINALS VOLTAGE
L1 to N 120 VAC all the time
DLB to Bake
DLB to Broil
120 Volts when oven is not calling
for heat (DBL relay contacts
closed).
*L1 to J4 pin 7 120 VAC when light is off
AUX1 to N 120 VAC locking or unlocking
*If the oven light is not working, make the following
checks:
• Check the oven light bulb to verify it works.
• the light comes on when the door is opened. Check
for 120 VAC from J4 7 and J4 5 terminals to L1. If 120
VAC is not present, press the oven door switch in and
release it several times, leaving the oven door open.
Recheck for 120 VAC from J4 7 and J4 5 terminals to
L1 with the oven door open. If 120 VAC is not present,
replace the oven door switch.
• Close the oven door. Check for 120 VAC from J4 7 and J4 5 terminals to L1. If 120 VAC is present but the
light does not turn on, the light bulb is bad or there is a loose connection in the wire harness. If 0 VAC, press
Oven Light key on the key panel and retry. If still 0 VAC, check the key panel. If the key panel is OK, replace
the control. (If you hear a relay click when the Oven Light key on the control panel is pressed, the key panel
is working.)
Model JKP55
TERMINALS VOLTAGE
L1 to N 120 VAC all the time
N to COM, COM 0,C 120 VAC all the time
L1-1 & 2-Bake 1 & 2
L1-1 & 2-Broil 1 & 2
120 Volts when oven
is not calling for heat
(DBL relay contacts
open).
L1-1 & 2-L2 1 & 2 240 VAC all the time
L1 to CON J6 term 1 & 3 120 Volts when light is
on.
L1 to MDL 1 & 2 120 Volts locking or
unlocking
L1 to CON J6 term 6 120 Volts when cooling
fan is not running.
0 VAC when cooling fan
is running.
*If the oven light is not working, make the following
checks:
• Check the oven light bulb.
• The light is to come on when door is opened.
Voltage across the light socket terminals should
read 120 VAC. If 0 volts, check the jamb switch and
the wiring.
• The light is to come on when the control light pad
is pressed. K502 or K503 should click. Voltage from
L1 to J6-3 (upper) or L1 to J6-1 (lower) should read
120 VAC. If 0 volts, check the oven light keypad
using the ohmmeter test. If the keypad is good,
replace the control.
(Continued Next Page)
 Loading...