6.0 - SHOCK SENSOR ADJUSTMENT 7.0 - EXAMPLE OF SHOCK SENSOR ADJUSTMENT
To understand better the shock sensor adjustment procedure, please find
here below an example where the sensor will be adjusted into third level:
If such a button is pushed the second time after 2 seconds, the procedure
will be stopped.
Verify that the shock sensor has not been disabled during the
programmation step by the installer.
Entering the programming procedure resets the functions to Gemini
default setting.
The system has a built-in shock sensor, whose sensibility can be adjusted into
5 levels: from the 1st, the lowest to the fifth the highest.
The system is supplied with the lowest one.
Please follow the procedure here below to change the sensibility adjustment:
D
D , push the button Nr.2 of the remote twice in to seconds.
!
!
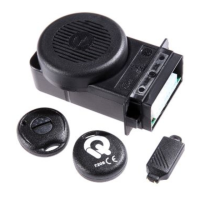
isable the alarm with a remote control or an electronic key.
Turn the ignition key into “ON” position; the status LED stays on for one
second.
uring this time
!
NOTE
!
!
!
!
!
!
The alarm will confirm with two LED flashes and the two acoustic signals
with acute tone that the shock sensor adjustment procedure is entered.
At the beginning the sensibility of the alarm is adjusted into minimum level.
Push the button No. 2 of the remote to increase the sensibility (4 times
maximum to reach the highest level); a LED flashing and a short acoustic
signal with acute tone occur, each time the button is pushed.
As soon as the sensor is adjusted, turn the ignition key to “OFF” position.
If the adjustment corresponds to the highest level, the system will leave the
procedure automatically.
In both cases, when the procedure is stopped, a flashing LED and a short
acoustic signal with acute tone occur.
CAUTION
CAUTION
While the system is disarmed, turn the ignition key into “ON” position.
The LED will light for about 1”.
Meanwhile, push the button No. 2 of the remote and push it again in two
seconds.
The alarm will confirm with two LED flashes and the two acoustic signals
with acute tone that the shock sensor adjustment procedure is entered.
Push twice the button Nr.2 of the transmitter.
A LED flashing and an acoustic signal correspond to each pressure.
Turn the ignition key of the vehicle in “OFF” position.
The alarm confirm the end of the procedure by an optical signal of the
LED and an acoustic signal of the control unit.