Do you have a question about the GeoVision GV-VS2401 and is the answer not in the manual?
Lists features of various GV-Video Server models.
Explains Power over Ethernet support for specific GV-Video Server models and usage notes.
Describes GPS function support and interface types for specific GV-Video Server models.
Identifies and explains the various components of the GV-Video Server models.
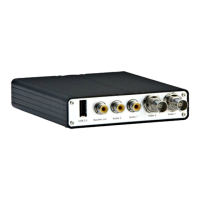
Details the front panel components and their functions for various GV-Video Server models.
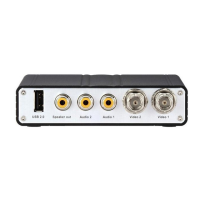
Details the rear panel components and their functions for various GV-Video Server models.
Basic connections to install the GV-Video Server on a network.
Steps to find the IP address of the GV-Video Server using utility software.
How to assign a static IP address or configure network settings via the web interface.
Refers to sections for basic configurations like date/time, login, and network settings.
Steps to access surveillance images via a web browser using IP address or domain name.
Describes controls and functions within the live video view window.
Accessing functions like information, video, audio, I/O, and alarms from the live view control panel.
Configuring alerts for input triggers and motion detection with live video and captured images.
Enabling two-way audio communication and adjusting audio volume settings.
Accessing remote configuration options, including firmware upgrades over the network.
How to access the PTZ control panel and its functions for camera movement.
Displaying a visual PTZ control panel on the image for camera manipulation.
Real-time graphic display of camera, I/O status, and forcing output triggers.
Automating electronic devices by clicking their image, e.g., turning lights on.
Manages video image settings, multicast, motion detection, privacy mask, and tampering alarms.
Configures compression, broadcasting method, and privacy mask for video streams.
Configures detection areas and sensitivity for motion-based alarms.
Blocks sensitive areas from view in live and recorded video clips.
Detects camera tampering (movement, cover, focus) and generates alarms.
Steps to enable and configure the recording function for video/audio.
Methods to play back recorded video files using USB or network.
How to play back files from USB storage by installing ExtFS driver.
How to play back files using the Remote ViewLog function over TCP/IP.
Procedures for updating the GV-Video Server firmware via web interface or utility.
Steps to upgrade firmware using the GV-Video Server's web interface.
Upgrading firmware for multiple GV-Video Servers using the IP Device Utility.
Backing up and restoring GV-Video Server configurations using IP Device Utility.
Procedures for exporting and saving GV-Video Server configuration settings.
Procedures for importing and applying saved configuration settings.
Tracking vehicle location using GPS module and Google Maps.
Resetting GV-Video Server to its original factory default values.
Steps to integrate GV-Video Server cameras into GV-DVR/NVR systems.
Steps to integrate GV-Video Server cameras into GV-VMS software.
Monitoring and managing cameras and I/O devices connected to the GV-Video Server via Center V2.
Monitoring cameras and I/O devices via Vital Sign Monitor under low bandwidth.
| Model | GV-VS2401 |
|---|---|
| Video Compression | H.264, MJPEG |
| Power Supply | Redundant power supply (optional) |
| Network Interface | 10/100 Ethernet |
| Operating System | Linux |
| Max. Resolution | 12MP |
| Max. Frame Rate | 30 fps |
| Audio Compression | G.711, G.726 |
| Audio Input/Output | 1 Input, 1 Output |
| Ethernet | 10/100 Base-T |
| Protocols | TCP/IP, HTTP, HTTPS, RTSP |
| Local Storage | Supports up to 8 HDDs (SATA) |
| Operating Temperature | 0°C to 50°C |
| CPU | Intel |
| Storage | Supports up to 8 HDDs (SATA) |