49
Touch Screen: Slide the screen from
the left to the right to make the mode
interface appears, click the “Wireless”
icon to enter wireless mode. Then slide
from the left to the right to return to the
main interface.
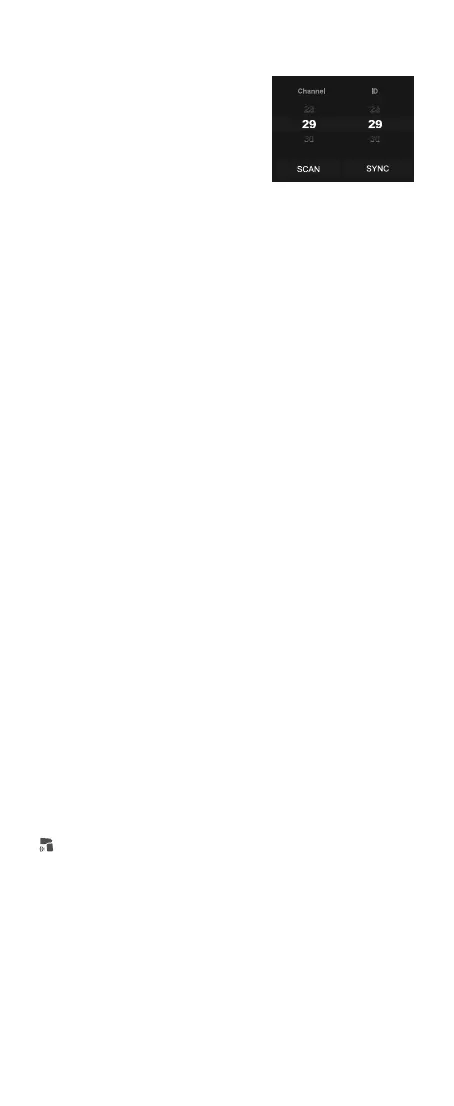
Wireless Settings
You can scan the spare channel to avoid the interference of using the same
channel by others.
If there are other wireless flash systems nearby, you can change the
wireless channels to prevent signal interference. The wireless channels (01-
32) of the sender unit and the receiver unit(s) must be set to the same.
Touch Screen: Click the “SCAN” icon to start scanning, and the 8 spare
channels will be displayed, click your desired channel.
Touch Screen: Slide the “Channel” box to choose your desired channel.
Scan the Spare Channel
Channel Settings
Buttons and Select Dial: Press the
power switch button to make the mode
interface appears, rotate the select dial
and press the set button to choose and
enter wireless mode. Short press the
power switch button to return to the
main interface.
Buttons and Select Dial: Rotate the select dial to choose “SCAN” icon,
then press the set button to start scanning, and the 8 spare channels will
be displayed, rotate the select dial and press the set button to choose your
desired channel.
Buttons and Select Dial: Rotate the select dial to choose “Channel” box,
then press the set button to enter channel settings, rotate the select dial
and press the set button to choose your desired channel, nally press the
set button to exit.
Change the wireless ID to avoid interference for it can only be triggered after
the wireless IDs (OFF/01-99) of the sender unit and the receiver unit are set
to the same.
The wireless sync function helps the sender and receiver to quickly set the
same channel and ID.
Touch Screen: Click the “SYNC” icon on both V100 and Lux Master.
Preconditions:
1. Set V100 to sender mode and the “Sender” icon on the panel is yellow.
2. Assume retro camera flash Lux Master as the receiver.
Touch Screen: Slide the “ID” box to turn off the ID, or choose your desired ID.
ID Settings
Wireless Sync
Receiver Wireless Sync
Buttons and Select Dial: Rotate the select dial to choose “ID” box, then
press the set button to enter ID settings, rotate the select dial and press the
set button to choose your desired ID, nally press the set button to exit.
Buttons and Select Dial: Rotate the select dial on V100 to choose “SYNC”
icon, then press the set button. Rotate the select dial on Lux Master to
choose “SYNC” icon, then press the SET button.