307-615
8
OPERATION
Pressure Relief Procedure
To
reduce the risk of serious bodily injury
,
including
fluid
injection, splashing fluid or solvent in the eyes
or
on the skin, or injury from moving parts or electric
shock,
follow this procedure whenever you shut of
f
the
sprayer
, check or service any part of the spray
system, install, clean or change spray tips, and
whenever
you stop spraying.
1.
Engage the gun safety latch.
2.
Open the bypass valve.
3.
Depress the engine stop button.
4.
Close the fuel shutof
f valve.
5. Disengage the gun safety latch. Hold a metal
part
of the gun
firmly to the side of a grounded
metal pail, and trigger the gun to relieve pres-
sure.
6. Engage
the gun safety latch.
7. Open the pressure drain valve, having a con-
tainer ready to catch the drainage. Leave the
valve
open until you are ready to spray again.
If you suspect that the spray tip or hose is com-
pletely
clogged, or that pressure has not been fully
relieved
after following the steps above,
wrap a rag
around
the tip guard retaining nut or hose end cou
-
pling
and VER
Y SLOWL
Y loosen the part to
relieve
pressure gradually, then loosen completely . Now
clear
the tip or hose.
WARNING
1.
Prepare the Fluid
a. Prepare
the fluid according to the fluid
manufac
-
turer’s
recommendations.
b. Place
the pump
or suction tube into the fluid con
-
tainer.
2. Starting
the Sprayer
a. Open the bypass valve to make startup easier .
In
the open position, the valve lever is parallel to
the
body of the valve. See Fig 8. Close the
filter
drain
valve.
b. Turn the pressure control knob
counterclock-
wise
until all spring tension is relieved. Y ou will
be able to feel it. The sprayer is now set at the
lowest
pressure setting. T
urning the knob further
will
cause it to fall of
f.
c. Open
the fuel shutof
f valve
by screwing it out as
far
as it will go. See Fig 8.
d. If the engine is cold, close the choke by turning
the
lever to the ON position
(horizontal). See Fig
9.
e. Disengage the foot brace from the hitch and
lower
it. See FIg 8.
f. Brace
one foot against the foot brace and gently
pull the starter rope until you feel it engage, the
continue pulling all the way out and let it recoil
slowly into the starter. Then, holding the starter
rope firmly, rapidly pull the rope to start the en-
gine.
If it does not start after one or two attempts,
open
the choke a little (turn lever toward OFF po
-
sition). If the engine floods, open the choke all
the
way and continue pulling the rope.
WARNING
Always
hold the starter rope firmly while pulling or
recoiling
it to reduce
the chance of being hit and in
-
jured
by the rope or of jamming and damaging
the
starter
assembly
.
g. After the engine is warm, gradually open the
choke
lever (turn to OFF position)
and close the
bypass
valve. See Fig 8 and 9.
h.
Raise the foot brace and engage it in the hitch.
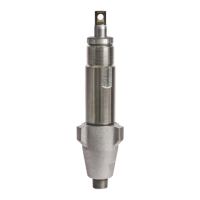
Fig 8
FUEL
SHUTOFF
VALVE
PRESSURE
CONTROL
KNOB
HITCH
BYPASS
VALVE
STOP BUTTON
AIR FILTER
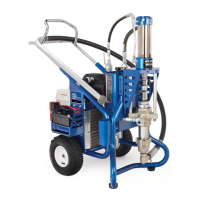
Fig
9
OFF
ON
TO CLOSE CHOKE,
TURN TO THE ON
POSITION
(HORIZONTAL)
CHOKE
AIR FILTER