308685 31
Field & Wiring Harness
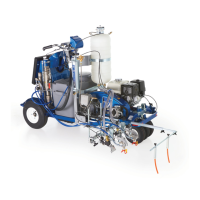
NOTE: Refer to Fig. 20.
1. Back out the four setscrews (30) holding the field
(53) to the clutch housing (1) approximately 3
turns.
2. Pull out the field. The field fits closely to the clutch
housing and must be removed carefully to prevent
jamming.
3. Pull the plastic caps (B) off the wire screws (74) in
both places on the field. Remove the screws and
remove the wire (A).
4. Skip ahead to Reassembly, page 32, Step 4 or
continue on page 31.
05839
Fig. 20
53
1
30
A
B
74
Clamp
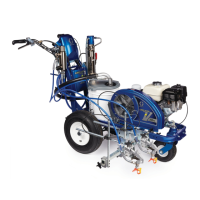
NOTE: The engine must be removed before the clamp
and clutch housing can be removed.
NOTE: A steering wheel puller and two 1/4–28 x 3 or
4 in. screws are required to remove the clamp.
NOTE: Refer to Fig. 21.
1. Loosen the two screws (56) on the clamp (55),
working through the slot at the bottom of the clutch
housing (1).
2. Install two screws (B) of the tool (A) in two of the
threaded holes in the clamp (55). Tighten the
screw (C) until the clamp comes off.
3. Skip ahead to Reassembly, page 32, Step 2, or
continue below.
05840
Fig. 21
1
55
56
C
B
A
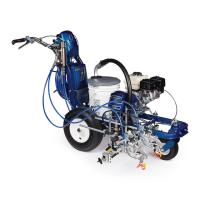
Clutch Housing
NOTE: The engine must be removed before the clamp
and clutch housing can be removed.
CAUTION
If the clutch housing is removed from the engine a
special alignment tool is required to reinstall it.
1. Fig. 22. Remove four capscrews (57) and lock-
washers (58) holding clutch housing (1) to engine.
2. Remove the engine key (29).
3. Pull off the clutch housing (1).
4. Skip ahead to Reassembly, page 32, Step 1.
05841A
Fig. 22
57
58
1
29