Boiler Installation
Information
18
4 Boiler Installation Information
Figure 4-1: Flue fan/solenoid valve plug
connection
Figure 4-2: Pellet feed auger fixing Figure 4-3: Auger plug connection
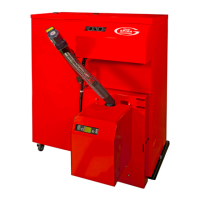
4.11 Pellet Hoppers
4.11.1 Single Boiler Installation
Position the pellet hopper on the same
firm level surface as the boiler, on either
the left-hand or right-hand side of the
boiler (depending on hopper type used),
with the top access door facing
forwards. Refer to Figure 2-1 or 2-2 as
required, for clearance dimensions.
4.11.2 Double boiler installation
Position the pellet hopper on the same
firm level surface as, and in between,
the two boilers, with the top access
door facing forwards. Refer to Figure
2-3 for clearance dimensions.
Failure to adhere to these
measurements can cause blockage of
the pellets in the pellet delivery hose or
can prevent access for servicing at a
later date. The hopper is supplied with
castors which allows the hopper be
moved during servicing. Once in the
correct position, engage the brakes on
the front casters to maintain this
position.
4.12 Pellet Feed Auger
4.12.1 Single Boiler Hoppers
The pellet feed auger is supplied
packed with the hopper but not factory-
fitted to it.
To fit, unpack the hopper and auger.
Remove the M5 screw fitted below the
auger opening on the front of the
hopper. Fit the end of the auger into
opening in the front of the hopper as far
as it will go and secure by fitting the M5
screw through the auger fixing flange
and tighten. See Figure 4-2.
4.12.2 Double Boiler Hoppers
Both augers on the ‘double boiler’
Intermediate hoppers are supplied
factory-fitted to the hopper.
To connect the hopper to the boiler, fit
one end of the pellet delivery hose onto
the pellet feed auger outlet and the
other end onto the burner feed tube.
The pellet delivery hose may need to be
cut if too long. A sachet of lubricant is
supplied in the accessories carton;
apply the lubricant to the joint to ensure
the pellet delivery hose is easily fitted.
Ensure the pellet delivery hose is not
kinked in any way.
Fit the 6-way plug (No.3), from the
pellet feed auger motor, into the
corresponding 6-way socket on the left
side of the burner. Ensure that the plug
is fully pushed home until the small
catch it clicks into place. See Figure
4-3. Refer to Section 8.3 for all boiler
plug connections.
Auger Fixing
Flange
Ensure the pellet delivery hose forms
an air tight seal at each end and that
the pellet delivery hose is not
damaged. Leakage of air could
cause increased temperature in the
pellet delivery hose and result in
the pellet feed tube (burn back)
thermostat operating and shutting
down the burner.
!
WARNING

 Loading...