EN - 40
2. Adjust the low side of deck:
a. Loosen jam nuts against deck-
leveling links.
b. Turn adjustment bolts clockwise.
c. Measure distance between the
ground and cutting edges of left and
right blades. Continue adjustment if
necessary.
d. Tighten jam nuts against deck-
leveling links.
Adjust Blade Pitch
IMPORTANT: Side-to-side deck heights
MUST remain even after completing pitch
adjustment.
NOTICE: Pitching the front of the blades
lower than the rear provides a balance
between cut quality and the power needed to
cut grass. Certain cutting conditions require
the deck rear to be pitched lower than the
front. Positioning the deck this way requires
more engine power but can provide better cut
quality.
1. Increase forward pitch:
a. Loosen jam nuts against all deck-
leveling links.
b. Turn front adjustment bolts
counterclockwise to lower deck front.
c. Turn rear adjustment bolts clockwise
to raise deck rear.
d. Check adjustment. See Check Blade
Level and Pitch on page 39.
e. Tighten jam nuts against deck-
leveling links.
2. Decrease forward pitch:
a. Loosen jam nuts against all deck-
leveling links.
b. Turn front adjustment bolts clockwise
to raise deck front.
c. Turn rear adjustment bolts
counterclockwise to lower deck rear.
d. Check adjustment. See Check Blade
Level and Pitch on page 39.
e. Tighten jam nuts against deck-
leveling links.
ADJUST CLUTCH
See Figure 61.
If clutch operates incorrectly or sounds
abnormal, check the gap at the three
inspection slots.
Check Clutch
1. Stop engine, remove key and wait for
moving parts to stop and for hot parts to
cool.
2. Measure gap between the armature and
rotor:
• A 0.4 – 0.5 mm (0.016 – 0.020") feeler
gauge should fit between the armature
and rotor and make slight contact with
each.
3. Repeat measurement for remaining
inspection slots.
4. If gap is within range, no adjustment is
needed.
Adjust Clutch
1. Loosen adjustment nut until a
0.5 mm (0.020") feeler gauge fits between
armature and rotor.
2. Tighten adjustment nut until armature and
rotor make slight contact with feeler
gauge.
3. Repeat at remaining inspection slots.
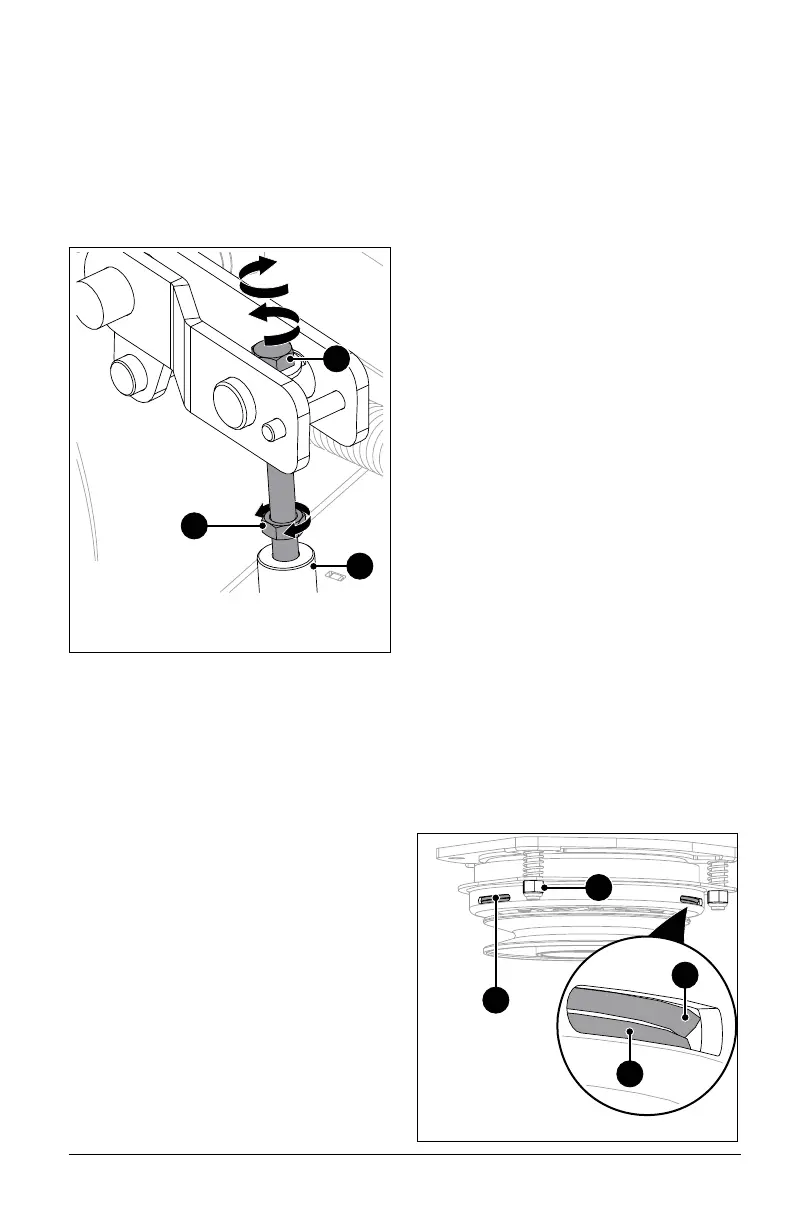
Figure 60
1. Adjustment Bolt
2. Jam Nut
3. Deck-Lift Link
1
2
3
Raise
Lower
Figure 61
1. Inspection Slot
2. Armature
3. Rotor
4. Gap Adjustment Nut
1
4
2
3
 Loading...