-14-
G0645 Benchtop Mortising Machine
AssemblyMounting
Mount the mortising machine to a workbench
through the two holes in the base.
The strongest mounting option is a "Through
Mount" where holes are drilled all the way through
the workbench, and hex bolts, washers, and hex
nuts are used to secure the mortising machine to
the workbench.
Figure 6. Example of a through mount setup.
Figure 7. Example of a direct mount setup.
Another option for mounting is a "Direct Mount"
where the machine is simply secured to the work-
bench with a lag screw.
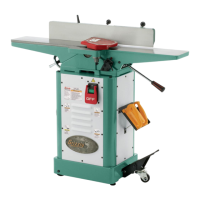
Figure 8. Hand lever installed.
Spring
Shoulder
Bolt
Hand Lever
Figure 9. Depth stop rod installed.
Depth
Stop
Rod
The included extension block will extend the col-
umn an additional 1
3
⁄4", so workpieces up to 6"
thick can be mortised. You will not be able to use
the fence adjustment knob when the extension
block is installed. If you do not want to install the
extension block, skip Steps 6-8
.
To assemble the Model G0645:
1. Secure the handle onto the hub using the
spring and shoulder bolt already attached to
the headstock, as shown in Figure
8.
2. Loosen the lock lever and insert the depth
stop rod into the hole on the headstock, as
shown in
Figure 9.
Hub
Lock Lever