16 ENG - Version 2.2 - P/N 04131.02
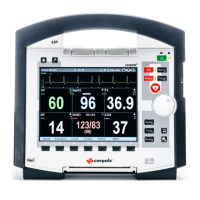
NIBP Measurement
Attaching the Cu
Attach the deated NIBP cu rmly to the
patient’s exposed upper arm at heart level. The
NIBP cu should not exert any pressure on the
blood vessels. The lower edge of the NIBP cu
should be positioned approx. 2 cm above the
crook of the arm. The marking "ARTERY" prin-
ted on the inside of the cu has to be aligned
centrally and with the arrow pointing down to
the elbow joint.
Individual Measurement
1. Softkey [NIBP]: Preparing a new individual measurement.
2. Softkey [Mode]: Selecting the patient type.
3. Softkey [Initial]: Adjusting the initial pressure.
4. Softkey [Start]: Starting a NIBP individual measurement.
Automatic Interval Measurement
1. Softkey [Auto]: Automatic interval measurement.
2. Softkey [Interv.]: Adjusting the required measurement
interval.
3. Softkey [Start]: Starting automatic interval measurement.
Note
To start an individual measurement while the automatic interval
measurement is active, press the softkey [Start].
Note
To move the NIBP user interface to the background, press the
softkey [Close]. The measurement will not be interrupted, it
stays active in the background.
Trend View
To call up the trend view, press the softkey [View].
 Loading...