SECTION 2, continued
23
2.6 Optional Air Purge
Air purge may be necessary if the analyzer is located in an environment with high
humidity and/or caustic vapors. The goal is to maintain a slight positive pressure
in the instrument with dry instrument air.
The air purge connection is located on the left side of the instrument enclosure.
To connect an air supply, remove the plug in the quick connect fitting using the
Quick Connect Release tool. Connect ¼-inch poly tubing by pushing the tubing
into the fitting. Two distinct “stops” will be felt as the tubing is correctly attached.
If the tubing is not properly seated, it will pop out when air pressure is applied.
Use only dry, oil-free instrument air at 15 scfh.
2.7 Sample Conditioning
All samples are “conditioned” using the single-sample, basic sample
conditioning kit shipped with each analyzer. The kit eliminates large particles
using a 40-mesh strainer.
The ball valve on the raw sample inlet line may be used to control the amount of
bypass flow that is delivered to the filter. For dirty water, high bypass will help
keep the strainer clean longer, or adjusted in any partially open position for
continuous bypass. Adjust the ball valve on the instrument supply line to control
the flow rate of filtered sample to the instrument.
Note: Installing the drain tee more
than 2 feet above the instrument can
result in excessive pressure which
may cause leaks.
Mount the centerline of the bypass drain tee two feet above the instrument, see
Figure 7. When properly mounted, the vacuum breaker design of the bypass drain
tee prevents negative sample pressure and establishes the needed positive sample
pressure for sample flow through the analyzer.
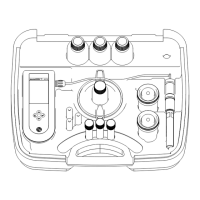
2.7.1 Assembling the Sample Conditioning Kit
Refer to the tips below and to the complete system diagram in Figure 7 to
assemble the components.
• Seal all threaded fittings with two wraps of Teflon
®
tape (provided).
• Two stops should be felt when installing tubing into the push-in fitting. The
first is when the tubing clears the gripper ring, and the second is when the
tubing bottoms out in the fitting. Improperly installed tubing will leak; take
care to push the tubing all the way in.
• Be sure to cut all tubing used in the push-in fittings with a sharp knife so the
ends are round, cleanly cut and not angled.
• The push-in fittings are designed for use with soft ¼-inch OD plastic tubing as
included in the kit. Tubing material such as PTFE or HDPE is recommended.
The push-in fitting will not grip hard plastic or metal tubing and the tubing
will slip out.
Note: To help grip the tubing, use rubber gloves or other material that grips and forcefully
push the tubing into the fitting. Two stops should be felt; otherwise the tubing will not be
fully inserted and will leak.
 Loading...