35 / 64
PL
SK
DE
EN
CS
HU
assembly onto the arm bracket by aligning it to two mounting holes on the left and right
sides of the housing respectively.
3. Install the left pulling line: install the left pulling line (fig. 41A) to the hole (fig. 41B) of
the handle as indicated in the diagram and lock its nut (fig. 41D) with the pad (fig. 41E)
of the left hand rail.
4. Install the right pulling line: Install the right pulling line to the hole (fig. 41C) of the handle.
5. Mount the Gear Engagement Link: Mount the gear engagement link along with regulating
spring gasket and the pin respectively onto the gear plate under gearbox and face-plate and
the shift fork arm of the housing according to (fig. 43).
6. Install the turn-about control handle of the sweeper head (fig. 44A): as indicated by figure
a, first insert the handle unit into the rotation anchor and then use one piece of hexagon
nipple, two pieces of SJ spacer and one piece of M10 nut to fasten it into place.
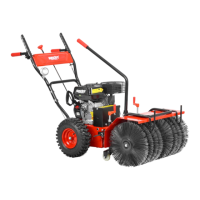
ASSEMBLY OF BRUSH (SWEEPER)
7. Remove the working unit with snow blower (fig. 8), if it is mounted.
8. Align the working unit with sweeper (fig. 9) and connect it to the body of the machine with
the wing bolt (fig. 10A).
9. Make sure that the cardan joint of sweeper is well connected to the drive shaft and tighten
up.
ASSEMBLY OF SNOW BLOWER
(SNOWBLOWER = OPTIONAL ACCESSORY)
1. Screw out the wing bolt on both sides of the machine (fig. 11A) and remove the working
unit with sweeper, if it is mounted.
2. Connect the working unit with snow blower to the body of the machine (fig. 12). Make
sure the snow blower is well connected to the drive shaft (fig. 13).
3. Ensure the snow blower with the wing bolt (fig. 14).
4. Mount the snow chute as shown (fig. 15) and connect the lever to control chute (fig. 16).
BEFORE STARTING
For your safety, and to maximize the service life of your equipment, it is very important to take
a few moments to check the engine condition before operating Be sure to take care of any
problem you find, or have your servicing dealer to correct it before you operate the engine.
WARNING! B
Improper maintenance to this engine, or failure to correct a problem before operation,
can cause a malfunction in which you can be seriously hurt or killed.
Always perform a preoperation inspection before each operation, and correct any
problem.
1. Fuel level
2. Oil level
3. Air cleaner (if equipped)
4. General inspection: Check for fluid leaks and loose or damaged parts
5. Check the equipment powered by this engine.