12
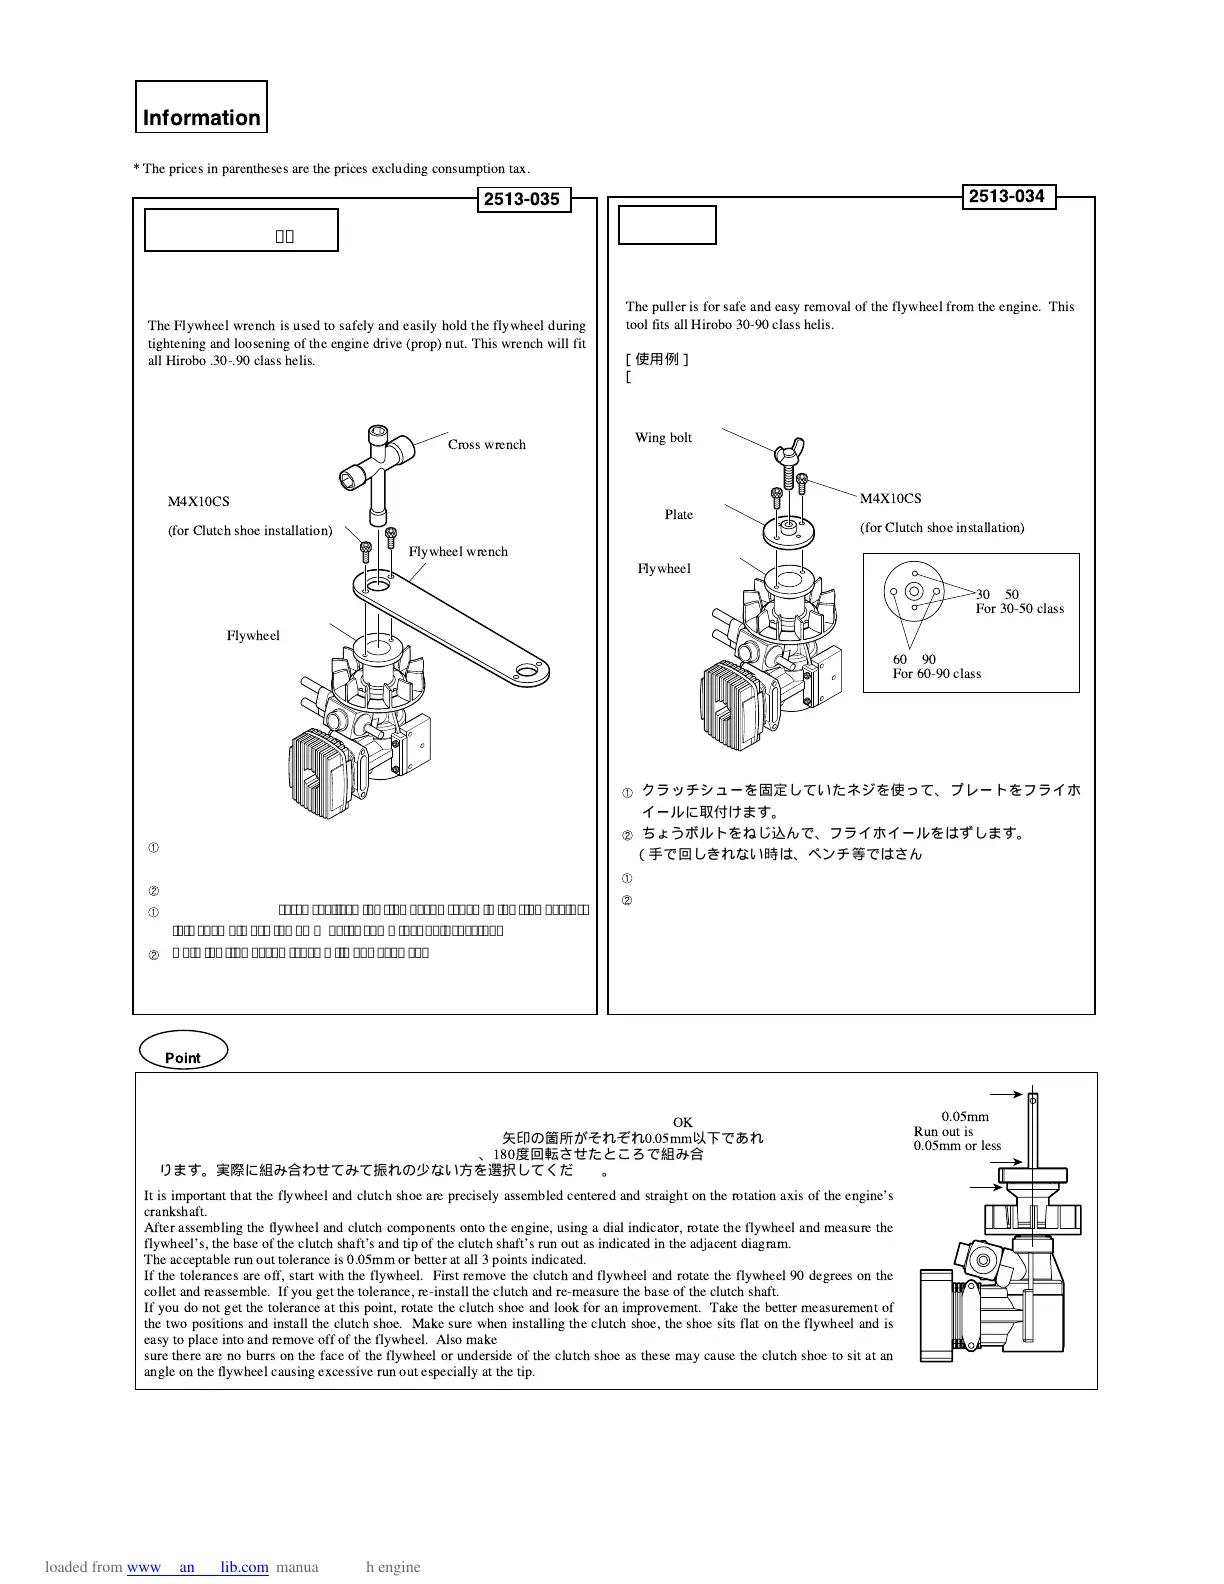
プーラーはフライホイールをエンジンから取外す際に使用します。
30 〜90 クラスのヒロボー製ヘリコプターでご使用になれます。
The puller is for safe and easy removal of the flywheel from the engine. This
tool fits all Hirobo 30-90 class helis.
クラッチシューを固定していたネジを使って、プレートをフライホ
イールに取付けます。
ちょうボルトをねじ込んで、フライホイールをはずします。
(手で回しきれない時は、ペンチ等ではさんで回してください。)
Attachthepullerユsplateontotheflywheelusingclutchattachmentscrews.
Turnthewingboltclockwiseuntiltheflywheelpopsloose. Ifthewingbolt
getstootightforhanduse,usepliersorsimilartogripthewingbolthead
andturncarefully.
フライホイールレンチはエンジンのドライブナットを取付け、及び取
外しするための工具です。
30 〜90 クラスのヒロボー製ヘリコプターでご使用になれます。
The Flywheel wrench is used to safely and easily hold the flywheel during
tightening and loosening of the engine drive (prop) nut. This wrench will fit
all Hirobo .30-.90 class helis.
クラッチシューを固定していたネジを使って、本品をフライホ
イールに取付けます。
十字レンチ等を使って、ドライブナットを取付(取外し)ます。
Usingclutchshoescrews,attachtheflywheelwrenchtotheflywheel.In
thisexampleusethe4mmholesandwiderboltspacing.
Holdtheflywheelwrenchwithonehandandtighten(orloosen)thedrive
nutusingacrosswrenchorsimilarasillustratedabove.Tip:wrapthe
flywheelwrenchwithashoptowelorragtocushionyourhand.
お知らせ
Information
エンジン周辺部品の着脱に便利な下記の工具を取り揃えております。是非ご利用下さい。
Hirobohighlyrecommendsthetoolslistedbelowforeasyattachmentandremovalofthefanhubassembly.Pleasecheckwithyourlocal
distributorforpriceandavailability.
プーラー
Puller
フライホイールレンチ
Flywheelwrench
[使用例]
[Usage]
[使用例]
[Usage]
60 〜90 クラス
60-90classexample
60 〜90 クラス
60-90classexample
2513-034
2513-035
¥1,029
(¥980)
¥1,890
(¥1,800)
ちょうボルト
Wing bolt
M4X10CS
(クラッチシューの取付ネジ)
(for Clutch shoe installation)
30
〜
50
クラス
For 30-50 class
60
〜
90
クラス
For 60-90 class
フライホイール
Flywheel
プレート
Plate
M4X10CS
(クラッチシューの取付ネジ)
(for Clutch shoe installation)
フライホイール
Flywheel
十字レンチ
Cross wrench
フライホイールレンチ
Flywheel wrench
税込価格(税抜価格)
* The prices in parentheses are the prices excluding consumption tax.
振れ
0.05mm
以下
Run out is
0.05mm or less
ポイント
Point
フライホイール及びクラッチシューは、エンジンの軸に対して偏芯しないようにまっすぐに組立てることがポイント
です。
組立後、手でフライホイールを回してみて、クラッチ軸の中心が振れていなければ
OK
です。
参考値:ダイヤルゲージ等で振れを測定した場合、図の矢印の箇所がそれぞれ
0.05mm
以下であれば問題ありません。
振れが大きい場合、いったんクラッチシューを外し、
180
度回転させたところで組み合わせると振れが少ない場合が
あります。実際に組み合わせてみて振れの少ない方を選択してください。
It is important that the flywheel and clutch shoe are precisely assembled centered and straight on the rotation axis of the engineÕs
crankshaft.
After assembling the flywheel and clutch components onto the engine, using a dial indicator, rotate the flywheel and measure the
flywheelÕs, the base of the clutch shaftÕs and tip of the clutch shaftÕs run out as indicated in the adjacent diagram.
The acceptable run out tolerance is 0.05mm or better at all 3 points indicated.
If the tolerances are off, start with the flywheel. First remove the clutch and flywheel and rotate the flywheel 90 degrees on the
collet and reassemble. If you get the tolerance, re-install the clutch and re-measure the base of the clutch shaft.
If you do not get the tolerance at this point, rotate the clutch shoe and look for an improvement. Take the better measurement of
the two positions and install the clutch shoe. Make sure when installing the clutch shoe, the shoe sits flat on the flywheel and is
easy to place into and remove off of the flywheel. Also make
sure there are no burrs on the face of the flywheel or underside of the clutch shoe as these may cause the clutch shoe to sit at an
angle on the flywheel causing excessive run out especially at the tip.