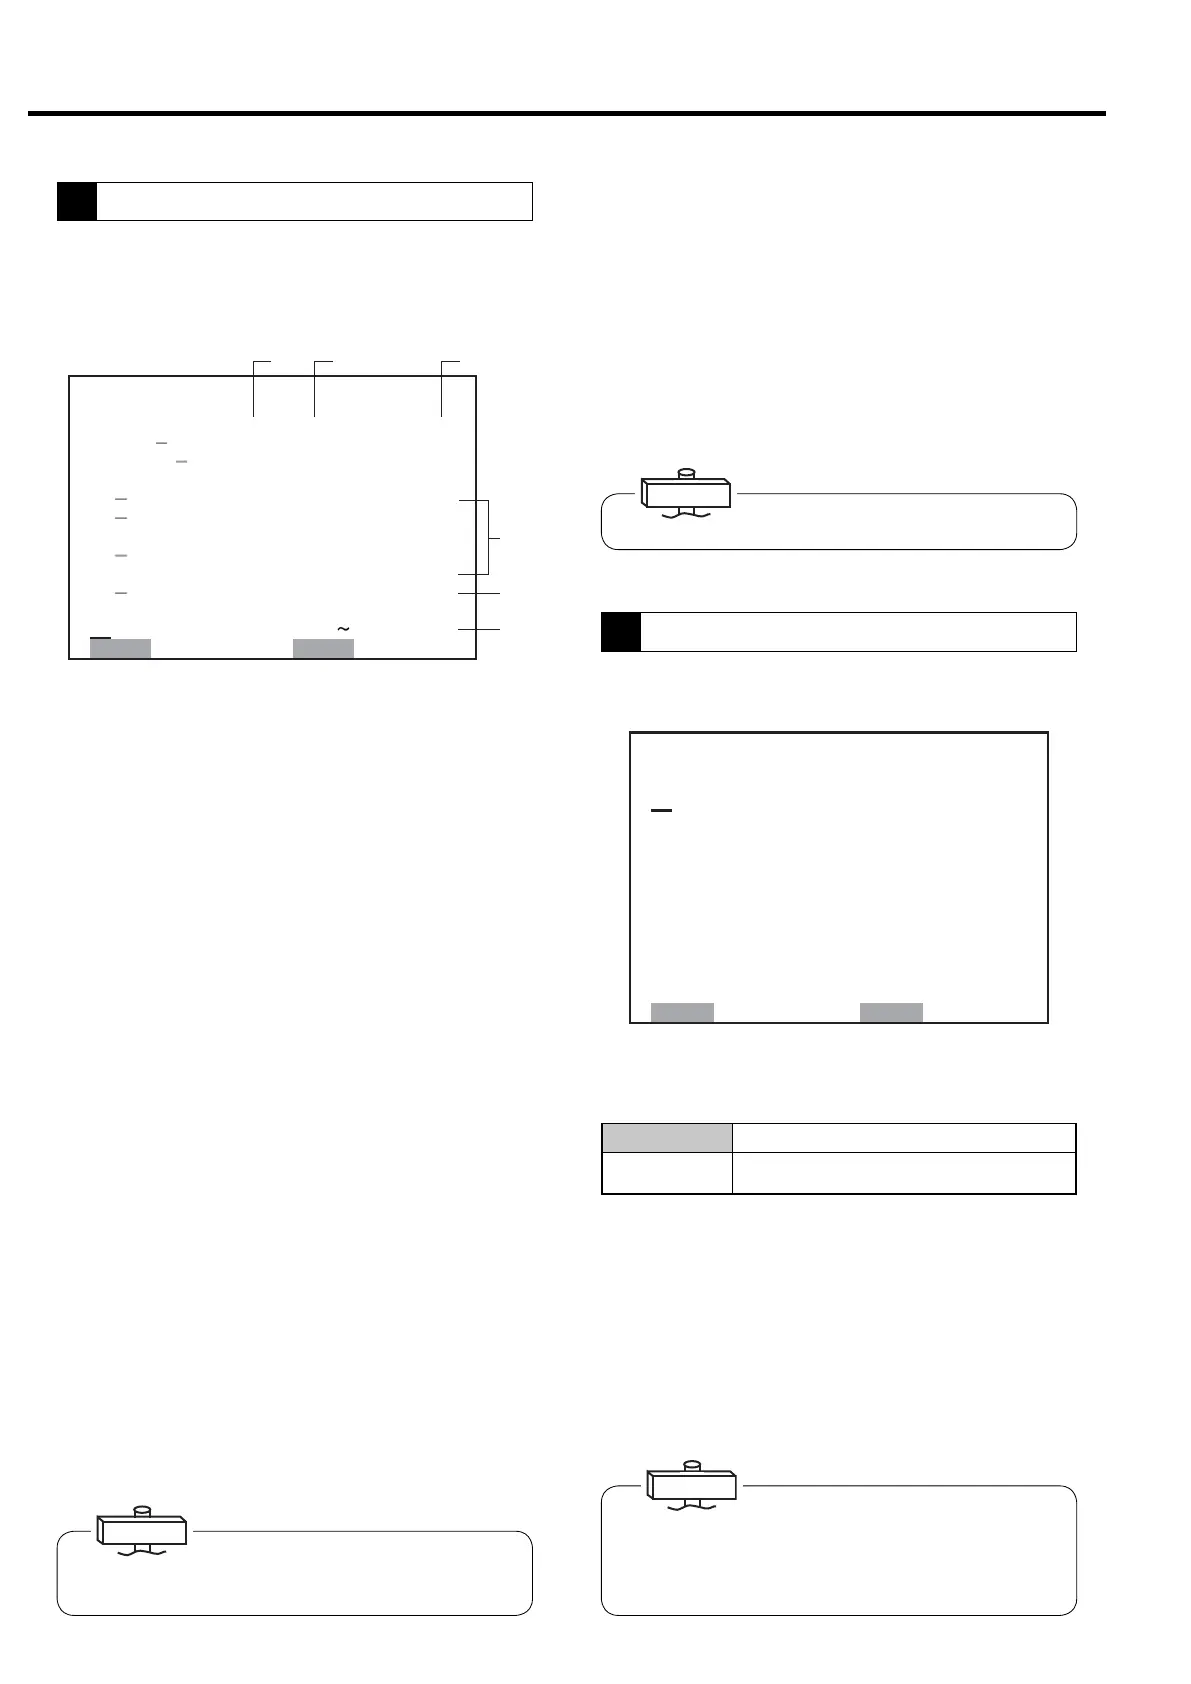
If “SCHEDULE” is set, the AUTO light lights. If there is no
valid setting for time, the AUTO light flashes. Altered set-
ting can only be entered when the compressor is not run-
ning.
㼇 㻿㻯㻴㻱㻰㼁㻸㻱 㻌 㻿㻱 㼀㼀 㻵 㻺㻳 㼉
㻝㻥䠖㻜㻣
㻝䠊㻹㻻㻰㻱 䠖 㻯㻴㻱㻰㼁㻸㻱
㻿㼀㻭㻾㼀 㻿㼀
㻿
㻻㻼
䠄㻝䠅㻜㻣䠖㻜㻜㻌 㼅 㻞㻜䠖㻜㻜㻌 㼅
䠄㻞䠅㻜㻜䠖㻜㻜㻌 㻺 㻜㻜䠖㻜㻜㻌 㻺
䠄㻟䠅㻜㻜䠖㻜㻜㻌 㻺 㻜㻜䠖㻜㻜㻌 㻺
䠄㻠䠅㻜㻜䠖㻜㻜㻌 㻺 㻜㻜䠖㻜㻜㻌 㻺
䠄㻡䠅㻜㻜䠖㻜㻜㻌 㻺 㻜㻜䠖㻜㻜㻌 㻺
㻞䠊㻾㻱㻯㻻㻾㻰 㻝䠖 㻝㻜䠖㻜㻜
㻟䠊㻾㻱㻯㻻㻾㻰 㻞䠖 㻝㻥䠖㻜㻜
㻿㻱㼀䠖㻿㼀㻻㻾㻱 㻌㻹㻻㻺䠖㻮㻭㻯㻷
Scheduled operation can be set for 1 day (standard equip-
ment).
1. TYPE: Displays setting data for capacity control.
① Control settings set by the digital monitor can be con-
firmed.
Fixed speed type: I (load/unload operation) / IP (AUTO
operation specifications * optional)
V type: VB (AUTO function off)/ VA (AUTO operation
specifications)
② Setting type of pressure set by the digital monitor can
be confirmed.
SETTING 1: Standard pressure setting;
SETTING 2: 2nd pressure setting
EXT: External load/unload setting
AUTO: Switches setting 1 and setting 2 by time.
③ Sets optional conditions. With standard specifications,
displays “ordinary” characters.
2 - 3. OPTION: Used for options.
4 - 6. PRESSURE SETTING: Pressure settings set by
the digital monitor, target pressure and time limit can be
confirmed all at once on the LCD monitor. ④
7. TIME LIMIT: (Fixed speed type only)
Preset time limit can be confirmed.
The time limit is effective when ECOMODE (energy
conservation mode) is selected by pressing and holding
the DISPLAY SWITCH button for at least 7 seconds.
The function sets energy conservation mode until con-
trol pressure (unload start pressure) drops to the target
value if the load and unload repeat time clears the time
limit. If control pressure and recovery pressure change
1. to 5. : Five Start/Stop Time Patterns
・ START: Starting Time
・ STOP: Stopping Time
・ Y or N :Yes starts or stops as scheduled.
2. DATA MEASUREMENT TIME: Time for recording
operation data twice a day can be set.
Recorded operation data can be confirmed by the “5”
operation data record screen.
If the time limit is altered, consult with your dealer or the
Hitachi Service Station given on the rear cover.
IMPORTANT
IMPORTANT
1. MODE: Scheduling Mode
The display shows an example setting of scheduled opera-
tion from 7:00 to 20:00. “19:07” indicates the current time
㼇 㻯㻻㻺㼀㻾㻻㻸 㻿 㻱 㼀㼀 㻵 㻺㻳 㼉
㻝䠊㼀㼅㻼㻱䠖㼂㻭 㼎㼎㼎 㼏㼏㼏
㻞䠊䠬
㻸㻻㻿㻿 䠖 㻖䠊㻖 㻖 㼜 㼟 㼕
㻟䠊䠬 㻵
㻯㻭䠖㻖㻖㻖 㻖㻖䠊㻖䡉㻟
䠄㻯㻻㻺㼀㻾㻻㻸䠋㻯㼁㼀㻙 㻵 㻺 㻕
㻠
㻼㻝䠖 㻌㻝 㻜㻜䠋㻌 㻌 㻤㻣㼜㼟 㼕
㻡
㻼㻞䠖 㻌㻝 㻜㻜䠋㻌 㻌 㻤㻣㼜㼟 㼕
䠄㼀㻭㻾㻳㻱㼀㻌㻼㻝䠋㻼㻞 㻕
㻢
㼀㻭㻾㻳㻱㼀 䠖
㻌㻌 㻥㻤䠋㻌㻌 㻥㻤㼜㼟 㼕
㻣
㼀㻵㻹㻱㻌㻸 㻵㻹㻵 㼀䠖 㻜㻟㻜㼟
䠄㻼㻞 㻱㻲㻲㻱㻯㼀 㻵 㼂㻱 㻕
㻤䠊㼀㻵㻹㻱䠖㻝㻤䠖㻜㻜
㻞㻞䠖㻜㻜
㻿㻱㼀䠖㻿㼀㻻㻾㻱 㻌㻹㻻㻺䠖㻮㻭㻯㻷
①② ③
④
⑤
⑥
time is measured and it exceeds the time limit, control
pressure is lowered so the time limit is no longer
exceeded. ⑤
(Time limit range: 30 - 120 seconds; initial value: 30 sec-
onds)
8. USE TIME: Sets time to use pressure of setting 2. At
that time, it displays automatic at the position of (2) of
the type. When start and stop time become the same
value, the automatic display is returned to setting 1 and
the function is stopped.
OFF
Operates the DSP without a schedule.
SCHEDULED
Operates the DSP according to a daily 24-
hour calendar.
Settings are selectable when the DSP is in a stop.
IMPORTANT
Screen for confirming pressure settings for capacity con-
trol. Pressure settings are set from the digital monitor.
Pressure settings consist of setting 1 and setting 2,
which can be used by setting time used.
20
3. OPERATING THE DSP [How to Use the Liquid Crystal Display (LCD)]
3
Capacity CONTROL SETTING Display
4
Schedule Setting
 Loading...