,
.?
4.T;tmT4;m,<:Q%/~~ ‘~~]fly~l~}~~~~~
-~..:.l~ =&..;?~,i ii>>
Usetime given on recipe when
cooking first time. Oven thermo-
stats. in time, may “drift” from the
factory setting and differencesin
timing betweenan old and a new
oven of 5 to 10minutes are not
unusual. Youroven has beenset
correctly at the factory and is more
apt to be accurate than the oven
which it replaced. However,if you
find that your foods consistently
brown too little or too much, you
may make a simpleadjustment in
the thermostat (Oven Temp) knob.
PULL KNOB OFF OF SHAFT,
LOOK AT BACK OF KNOB AND
NOTE CURRENT SETTING,
BEFORE MAKING ANY
ADJUSTMENT.
To increase temperature, turn
toward RAISE; to decrease turn
toward LOWER. Each notch
changes temperature 10degrees.
Temperature can be raised by 20
degrees or lowered by 30 degrees.
Follow one of the sketchesat right
to adjust your range.
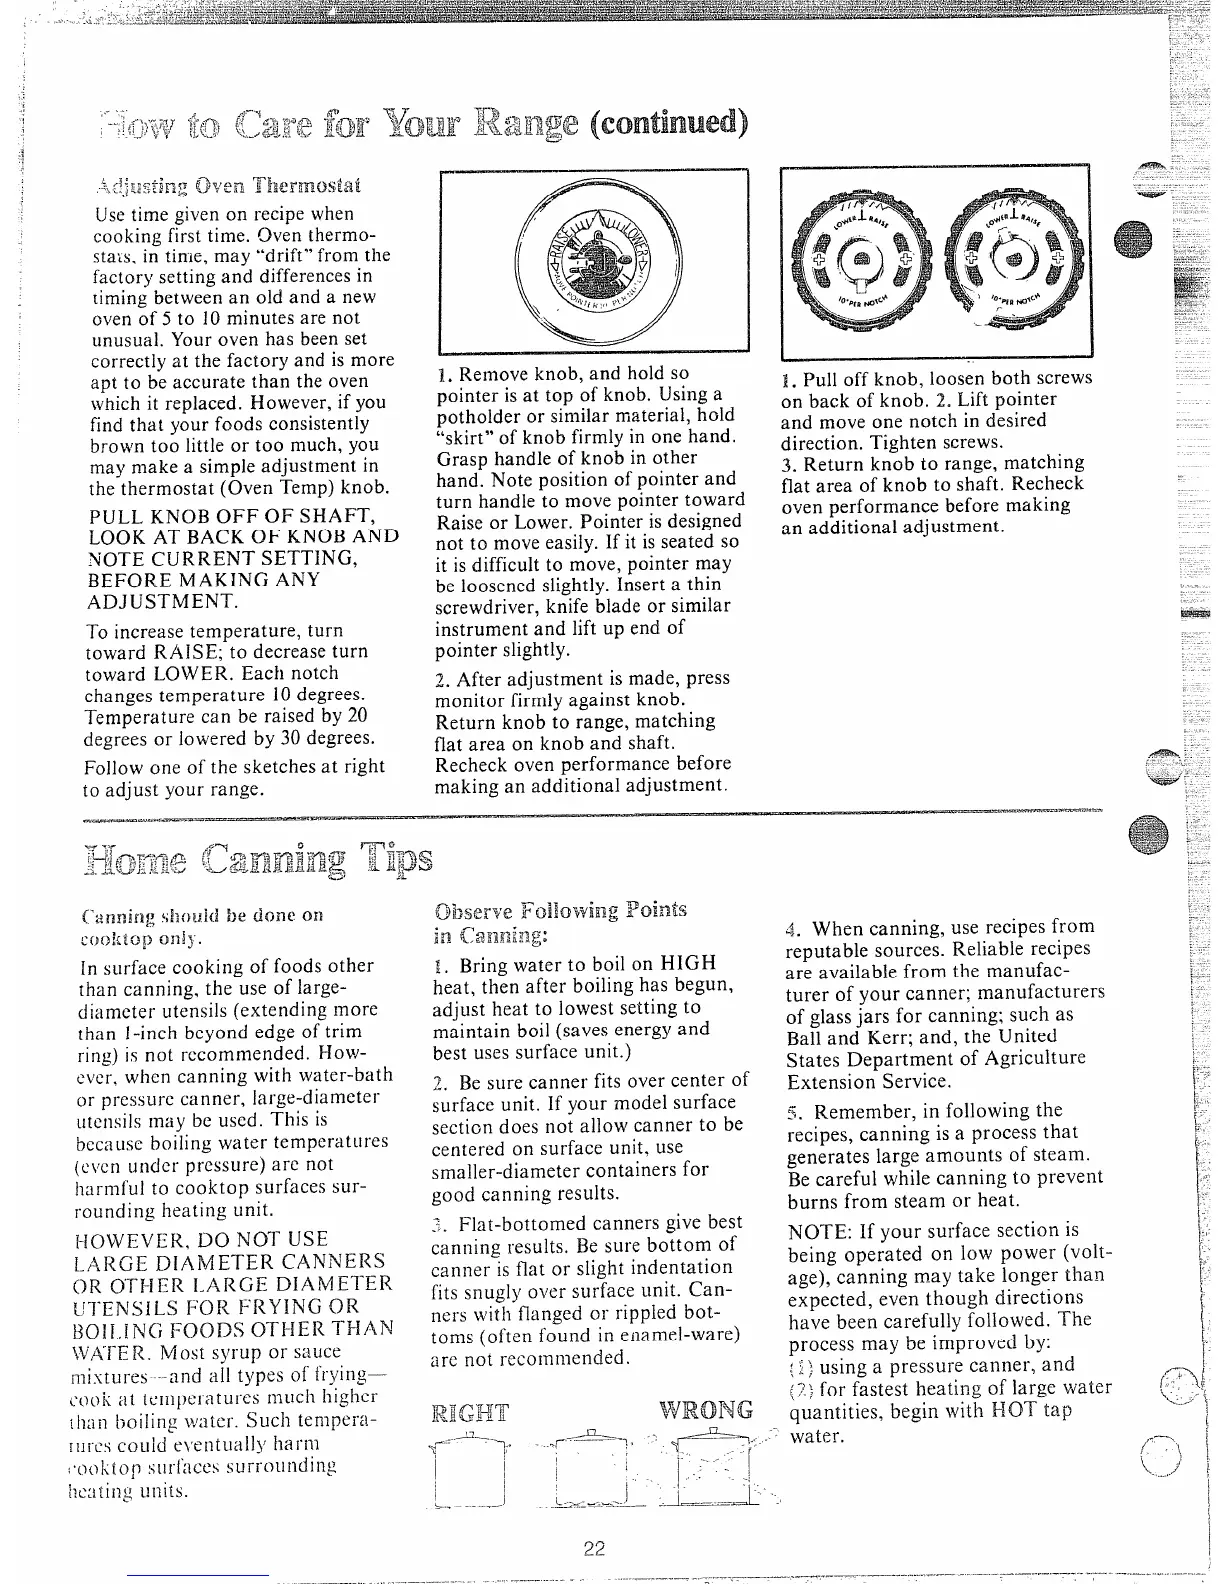
1..Removeknob, and hold so
pointer isat top of knob. Usinga
potholder or similar material, hold
“skirt” of knob firmly in one hand.
Grasp handle of knob in other
hand. Note position of pointer and
turn handle‘tomove pointer toward
Raise or Lower. Pointer is designed
not to moveeasily. If it isseated so
it isdifficultto move, pointer may
be loosened slightly.Insert a thin
screwdriver,knife blade or similar
instrument and lift up end of
pointer slightly.
2. After adjustment is made, press
monitor firmly against knob.
Return knob to range, matching
flat area on knob and shaft.
Recheck oven performance before
making an additional adjustment.
1
i
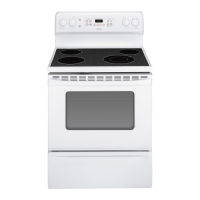
1. Pull off knob, loosen both screws
on back of knob. 2. Lift pointer
and move one notch in desired
direction. Tighten screws.
3. Return knob to range, matching
flat area of knob to shaft. Recheck
o~<enperformance before making
an additional adjustment.
———.-..-=.---,
. .. ..
.---—
. .
In surface cooking of foods other
than canning, the use of large-
(. fiamcterutensils (extending more
than 1-inch beyond edge of trim
ring) is not recommended. How-
e~’er,when canning with water-bath
or pressure canner, large-diamcter
utensils may be used. This is
because boiling water temperatures
(even undel”pressure) are not
harmful to cooktop surfaces sur-
rounding heating unit.
HOWEVER, DO NOT USE
LARGE DIAMETER CANNERS
OR
o’”rHERLARGE~IAMETER
uTENsif-sFORFRYINGOR
BC)ll,INGFOODS
OTHEil THAN
‘\v”A-i”ER. Most syrup or S:~Ll~e
[LII”CScould ~\rC1ltLI~l]~’ ha 1’111
i~)’~~f+~-:~Ffjbwing points
-q
.
j~~.
a!mmg :
1. Bring water to boil on HIGH
heat, then after boiling has begun,
adjust heat to lowest setting to
maintain boil (saves energy and
best uses surface unit.)
2. Be sure canner fits over center of
surface unit. If your model surface
section does not allow canner to be
centered on surface unit. use
smaller-diameter containers for
good canning results.
l!. Flat-bottomed canners give best
canning results. Be sure bottom of
canner isflat or slight indentation
fits snugly over surface unit. Can-
ners with flanged or rippled bot-
toms (often found in eilamel-ware)
are not recommended.
22
4. When canning, use recipes from
..
reputable sources. Reliable recipes
are available from the manufac-
turer of your canner; manufacturers
of glassjars for canning; such as
Ball and Kerr; and, the United
States Department of Agriculture
r:‘
—....... —
-.. . -----——-—-----------—.—---—
Extension-Service.
5. Remember, in following the
recipes, canning is a process that
generates large amounts of steam.
Be careful while canning to prevent
burns from steam or heat.
NOTE: If your surface section is
being operated on low power (volt-
age), canning m-aytake longer than
expected, even though directions
have been carefully followed. The
process may be improved by:
{i) using a pressure canner, and
(7}for fastest heating of large water
quantities, begin with HOT tap
water.