Setup mode
Chapter 4 OPERATION MANUAL
V2.0.0en/09.06.16//15.09 Unistat®
▪ During the fill process, ensure any necessary measures, such as earthing the tanks, funnels and
other aids, have been taken.
▪ Fill to the lowest possible height.
PROCEDURE
Open the >Expansion vessel cap< [22] by hand and remove, if fitted, the >Isolating sleeve< [27]
(see page 33 in section »Mounting/removing the isolating sleeve (optional)«). The >Isolating
sleeve< [27] can only be mounted in externally open systems in the >Expansion vessel< [18].
In case of standard devices, open the >Venting valve expansion vessel< [21] by turning it anti-
clockwise (turn 90° left as far as it will go).
Carefully pour suitable thermofluid, using the filling accessories (funnel and/or beaker) into the
>Filling port< [17]. The thermofluid flows from the >Expansion tank< [18] into the temperature
control unit and over the hose connection to the external application. The fill level is displayed in
the >Sight glass< [23]. Follow the instructions on page 16, section »Proper disposal of resources
and consumables« for cleaning the filling accessories.
Before starting the venting process, fill the >Expansion vessel< [18] from 50 to 70%.
Go to the “Categories Menu”.
Tap on the category “Temperature Control”.
Tap on the category “Start/Stop”.
Tap on the Dialog entry “Start air-purge”.
Confirm your choice by tapping on “OK”.
Using the number keypad that appears, enter the time interval for the ventilation. The default is
0.5 minutes.
Confirm your entry by tapping on “OK”. Venting will start.
If, with externally closed applications (reactors), the fluid level in the fill level display remains the
same when the pump is running and when the pump has stopped, the application has been vent-
ed.
Stop venting. To do this, go to the category “Temperature Control”.
Tap on the category “Start/Stop”.
Tap on the dialog entry “Stop air-purge”.
Confirm your choice by tapping on “OK”. Venting is stopped and the pump continues to run for
approx. 30 seconds. Wait until the pump stops.
Close the >Expansion vessel cap< [22] by hand.
Venting and degassing must be performed especially during commissioning and after changing the
thermal fluid. Only this ensures a trouble-free operation. After venting, follow the steps on page
66, section »Degassing externally closed applications
«.
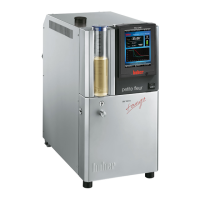
Note the volume expansion of the thermal fluid according to the working temperature range in
which you wish to work. At the “lowest” working temperature, do not go beyond the minimum
mark of the >Sight glass< [23] and at the “highest” working temperature there should be no over-
flow from the >Expansion vessel< [18]. In case of overfilling, drain the excess amount of thermal
fluid (see page
68, section »Draining externally closed applications«).
Fill levels in the
>Sight glass< [23]