Setup mode
Chapter 4 OPERATION MANUAL
V2.0.0en/09.06.16//15.09 Unistat®
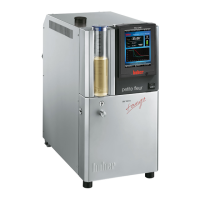
4.3.2.1 Filling and venting externally open application
Non-compliance with the safety data sheet for the thermofluid to be used
INJURIES
Risk of injury to the eyes, skin, respiratory tract.
The safety data sheet for the thermofluid to be used must be read prior to use and its contents
respected.
Observe the local regulations/work instructions.
Wear your personnel protective equipment (e.g. temperature-resistant safety gloves, safety
goggles, safety footwear).
Danger of slipping because floor and work area are contaminated. Clean the work station and
follow the instructions for the disposal of thermofluid and material on page 16 in section
»Proper disposal of resources and consumables«.
Overflowing thermofluid inside the temperature control unit
MATERIAL DAMAGE
If the temperature control unit is installed below the open system, the thermofluid will escape
from the >Expansion vessel< [18] and from the >Sight glass< [23].
Shut down the temperature control unit immediately.
Isolate the temperature control unit from the power supply.
Have the temperature control unit only serviced and cleaned by staff trained by Peter Huber
Kältemaschinenbau AG. On page 16 observe section »Proper disposal of resources and con-
Overflowing thermofluid will create a film on surfaces, and therefore must be collected and dis-
posed of immediately after the event in accordance with the safety data sheet. Follow the instruc-
tions on page 16, section »Proper disposal of resources and consumables« for the disposal of
thermofluid and material.
If this is not complied with, it is assumed that the temperature control unit does not comply with
all requirements of DIN EN 61010-2-010.
▪ During the fill process, ensure any necessary measures, such as earthing the tanks, funnels and
other aids, have been taken.
▪ Fill to the lowest possible height.
PROCEDURE
Open the >Expansion vessel cap< [22] and verify that the >Isolating sleeve< [27] is installed (see
page 33 in section »Mounting/removing the isolating sleeve (optional)«). Then close the >Ex-
pansion vessel cap< [22]. The >Isolating sleeve< [27] must be mounted in externally open sys-
tems in the >Expansion vessel< [18]. Consequently, the >Expansion vessel< [18] is closed off
from the externally open application and you can also place the temperature control unit below
the externally open application.
In case of standard devices, close the >Venting valve expansion vessel< [21] by turning it clock-
wise (turn 90° right as far as it will go).
Fill suitable thermofluid into the bath vessel. The thermofluid flows over the return line into the
temperature control unit and over the flow line to the bath. Thereby the air in the temperature
control unit reaches the outside. Follow the instructions on page 16, section »Proper disposal of
resources and consumables« for the cleaning of the filling accessories.
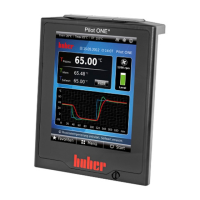
Go to the “Categories Menu”.
Tap on the category “Temperature Control”.
Tap on the category “Start/Stop”.
Tap on the dialog entry “Start air-purge”.
Confirm your choice by tapping on “OK”.
Using the number keypad that appears, enter the time interval for the ventilation. The default is
0.5 minutes.
Confirm your entry by tapping on “OK”. Venting will start.
 Loading...