Setup mode
Chapter 4 OPERATION MANUAL
V2.0.0en/09.06.16//15.09 Unistat®
Confirm your choice by tapping on “OK”.
Read the Note and confirm by tapping on “OK”.
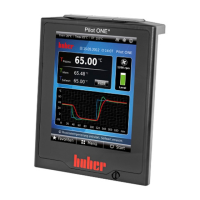
Go to the “Home” screen.
Tap on the keypad symbol next to “T
Setpoint
”.
Enter a setpoint using the number keypad that appears. This setpoint must be below the low-
boiling thermofluid. The setpoint will be increased in 10 K steps during the degassing process up
to the maximum working temperature.
Confirm your entry by tapping on “OK”.
In the display that follows, confirm your entry again by tapping on “OK”.
The correct selection will be displayed graphically and the “setpoint” will be changed immediate-
ly. If tapping on “OK” is not correct, it will be displayed graphically for 2 seconds. The display will
return to the “Home” screen. Try changing the “setpoint” again.
Carry out temperature control to this setpoint until the temperature in the >Expansion vessel<
[18] no longer rises or even falls.
Monitoring the temperature in the >Expansion vessel< [18].
Go to the “Categories Menu”.
Tap on the category “Safety”.
Tap on the category “Display OT values”. All the measured temperatures will be displayed.
Check the temperature in the >Expansion vessel< [18]. The degassing process is active if it in-
creases. Wait until the temperature in the >Expansion vessel< [18] no longer rises or even falls.
Go to the “Home” screen.
Tap on the keypad symbol next to “T
Setpoint
”.
Increase the setpoint by 10 K.
Confirm your entry by tapping on “OK”.
In the display that follows, confirm your entry again by tapping on “OK”.
The correct selection will be displayed graphically and the “setpoint” will be changed immediate-
ly. If tapping on “OK” is not correct, it will be displayed graphically for 2 seconds. Then the dis-
play will return to the “Home” screen again. Try changing the “setpoint” again.
Carry out temperature control until the temperature in the >Expansion vessel< [18] no longer
rises or even falls.
Check the temperature in the >Expansion vessel< [18] again.
Continue to increase the setpoint by 10 K increments until the temperature in the >Expansion
vessel< [18] no longer rises during an increase.
Now maintain the thermal fluid at the last temperature set until the >Expansion vessel< [18] has
reached ambient temperature.
The entire process can take several hours, depending on the degree of contamination and the
application size. Continue the control process until the temperature in the >Expansion vessel< [18]
has returned to ambient temperature.
Go to the “Categories Menu”.
Tap on the category “Temperature Control”.
Tap on the category “Start/Stop”.
Tap on the dialog entry “Stop degassing”.
Confirm your choice by tapping on “OK”.
Read the note and confirm by tapping on “OK”. Degassing stops immediately and the pump
continues to run for approx. 30 seconds. Wait until the pump stops.
Connect a suitable drain hose (must be compatible with the thermofluid) to the >Expansion
vessel drain< [9] (if fitted) or >Drain< [8] an.
Place the other end of the hose in a suitable container, which is compatible with the thermofluid
and the thermofluid temperature.
Drain the >Expansion vessel< [18]. To do so, open the >Expansion vessel drain valve< [5] by
turning it counterclockwise (turn 90° left as far as it will go). Pay attention to the high tempera-
ture of the thermofluid. On page 16 observe section »Proper disposal of resources and consum-
ables«.
Close the >Expansion vessel drain valve< [5] by turning it clockwise (turn 90° right as far as it will
go).
Remove the drain hose and the container.
Open the >Expansion vessel cap< [22] by hand.
Carefully pour original thermofluid into the >Filling port< [17], using the filling accessories (fun-
nel and/or beaker). The fill levels are displayed in the >Sight glass< [23] or >Level indica-
tor/Level< [25]. Do not mix different thermofluids.
Close the >Expansion vessel cap< [22] by hand.
The de-gassing process is complete.