4)
Posizionar
e
la
torr
etta
(16,
Fig.
A)
contr
o
il
bor
do
del
cerchio
e
bloccare
i
bracci
operanti
agendo
come
spiegato
al
punto
2
della fase "smontaggio".
A
TT
E
N
Z
I
O
N
E
:
s
e
il
m
o
nt
agg
i
o
v
i
e
n
e
f
a
tt
o
s
ull
a
r
u
o
t
a
p
r
e
c
e
d
e
nt
e
-
m
e
nt
e
s
m
o
nt
a
t
a
,
o
c
o
m
un
q
u
e
s
e
s
i
o
p
e
r
a
s
u
r
u
o
t
e
c
o
n
c
e
r
c
hi
o
di
uguale
dimensione,
non
è
necessario
agir
e
ogni
volta
sul
pulsante
della
maniglia
(9,
Fig.
A) per
bloccar
e
e
sbloccare
ma
solamente
si
deve
ribaltar
e
e
riposizionar
e
il
palo
(8,
Fig.
A) agendo
sull'apposito pedale (7, Fig. A)
.
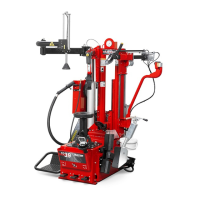
4
)
P
o
s
i
t
i
o
n
t
h
e
m
o
un
t
/
d
e
m
o
un
t
t
oo
l
(
16,
F
i
g
.
A)
b
y
h
a
n
d
a
g
a
i
n
s
t
t
h
e
e
d
g
e
o
f
t
h
e
ri
m
.
L
o
c
k
t
h
e
v
e
r
t
i
c
a
l
s
li
d
e
(
1
0,
F
i
g
.
A)
a
n
d
swing
ar
m
(
11,
Fig.
A)
as
described
under
2
of
the
demounting
pr
ocedur
e.
IMPOR
T
ANT!
If
you
ar
e
mounting
a
tir
e
pr
eviously
demounted
or
on
wheels
with
the
same
size
rims,
ther
e
is
no
need
to
use
the
yellow
on
the
handle
(9,
Fig.
A) every
time
to
lock
or
unlock
the
swing
and
vertical
ar
ms.
Simply
tilt
back
the
tower
(8,
Fig.
A) and r
eposition it with the pedal (7, Fig. A).
T
ener
e le mani e le altr
e parti del
corpo il più lontano possibile dalla
torr
etta quando l'autocentrante è
in fase di r
otazione per evitar
e
rischi di schiacciamento.
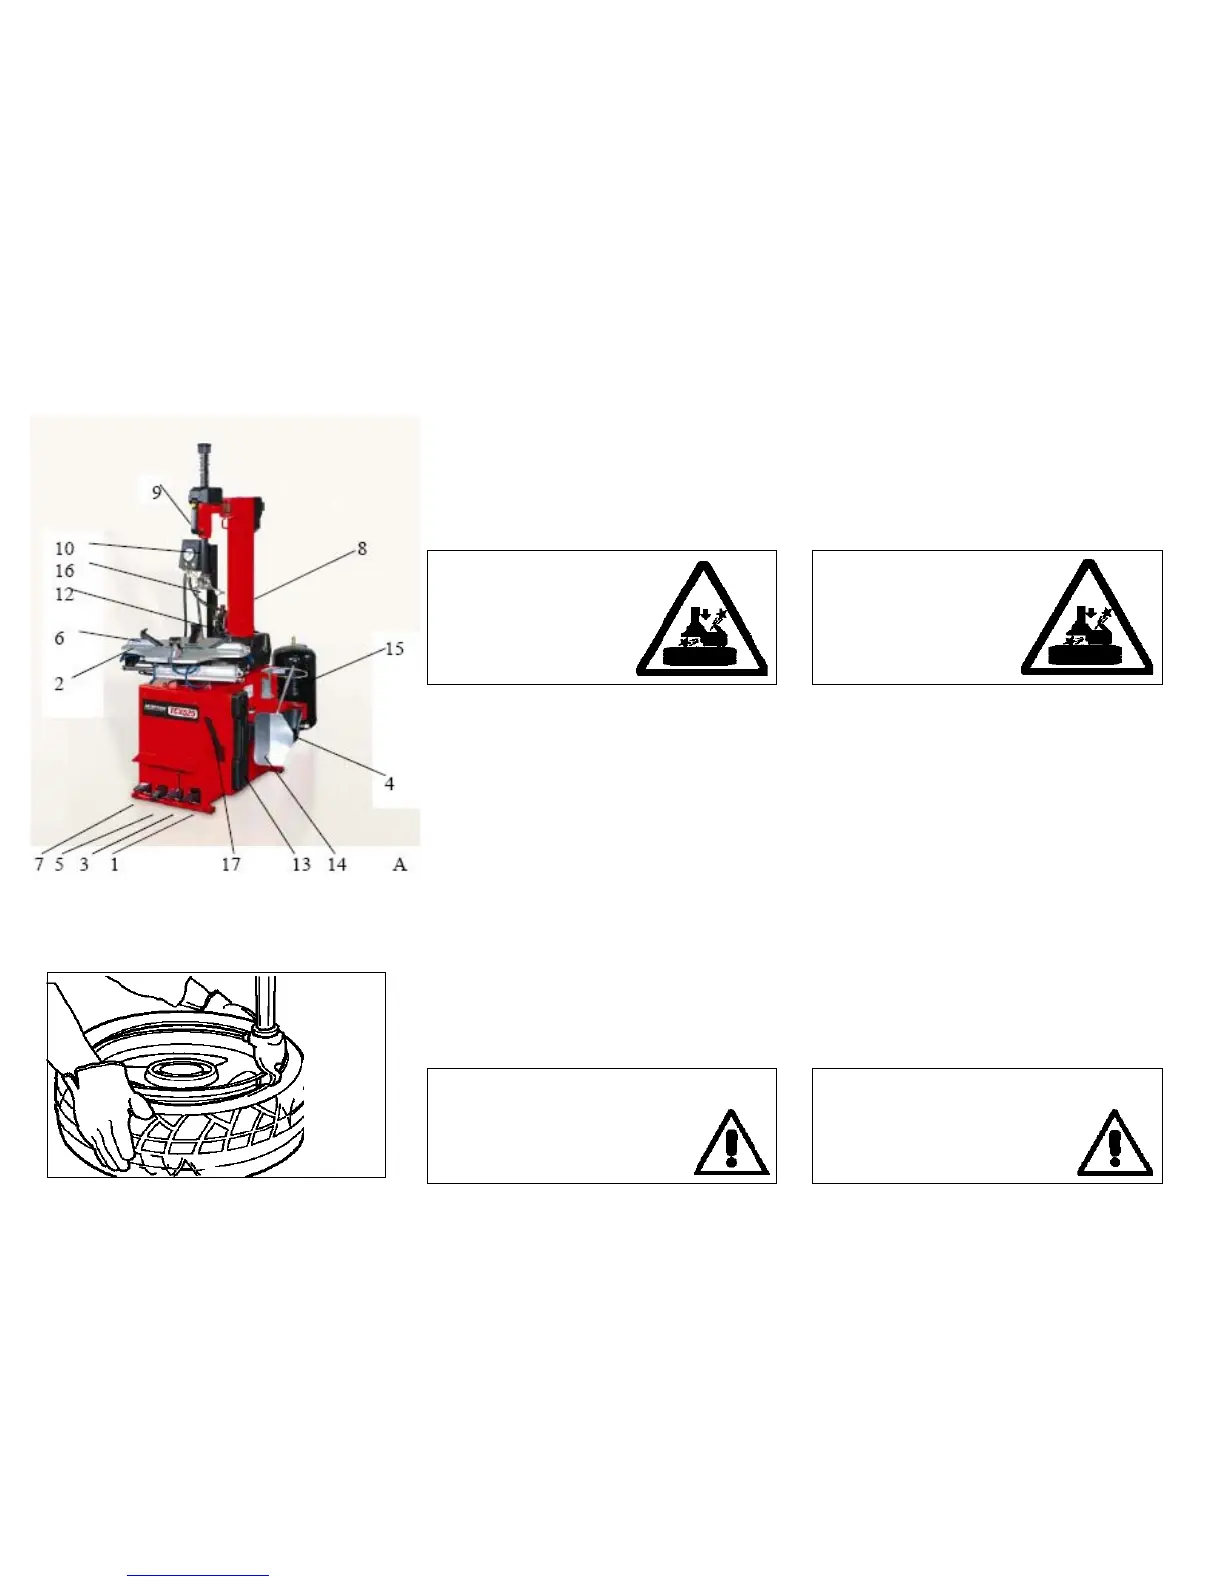
5)
Guidar
e
con
le
mani
il
pneumatico
in
modo
che
il
tallone
passi
sotto
la
parte
a
for
ma
di
unghia
della
torr
etta
(
16,
Fig.
A)
e all'ester
no del suo labbr
o di sostegno (
vedi Fig. F
).
TTENZIONE
:
Se
il
pneumatico
è
tubeless
iniziar
e
il
montaggio
con la valvola posizionata a 180° rispetto la torr
etta.
Ruotar
e
l'autocentrante
in
senso
orario
pr
emendo
il
pedale
(
1,
Fig.
A)
e
mantenendo
con
le
mani
il
tallone
del
pneumatico
premuto nella gola inter
na del cerchione.
T
o prevent industrial accidents,
keep hands and other parts of the
body as far fr
om the tool ar
m as
possible when the table top
is tur
ning.
5)
Guide
the
tir
e
so
that
the
lower
bead
is
above
the
forwar
d
portion of the mount/demount head (
16, Fig. A : See Fig. F
).
I
M
P
O
R
T
A
N
T
!
If
th
e
ti
r
e
i
s
tu
b
e
l
e
ss
,
m
o
unt
it
w
ith
th
e
v
a
l
v
e
a
t
180°
fr
om the tool ar
m.
Now
depr
ess
the
pedal
(
1,
Fig.
A)
to
begin
clockwise
r
otation.
Utilize
the
wheel’s
dr
op-centr
e
ar
ea
by
pushing
down
on
the
s
i
d
e
w
a
ll
n
e
a
rl
y
o
pp
o
s
i
t
e
t
h
e
h
e
ad
t
o
r
e
d
u
c
e
t
e
n
s
i
o
n
a
l
f
o
r
c
e
o
n
the bead as the wheel r
otates.
6)
Se il pneumatico è con camera d'aria inserir
e la medesima.
7)
Ripeter
e
le
operazioni
del
punto
5
anche
per
il
tallone
supe
-
rior
e
del
pneumatico.A
montaggio
ultimato
premer
e
il
pedale
(
7,
Fig.
A)
in
modo
da
portar
e
il
palo
ribaltabile
(
8,
Fig.
A)
in
posizione di fuori lavor
o.
8)
Pr
emer
e
il
pedale
(
5,
Fig.
A
)per
liberar
e
la
ruota
dall'auto
-
centrante.
6)
Insert the inner tube if the tir
e has one.
7)
Once
the
lower
bead
is
completely
mounted,
r
epeat
the
p
r
e
v
i
o
u
s
p
r
o
c
e
d
u
r
e
s
f
o
r
t
h
e
u
pp
e
r
b
e
ad
.
W
h
e
n
t
h
e
ti
r
e
i
s
mounted,
depr
ess
pedal
(
7,
Fig.
A)
to
tilt
the
tower
(
8,
Fig.
A)
back to its non-work position.
8
)
D
e
p
r
e
ss
p
e
da
l
(
5,
F
i
g
.
A)
t
o
r
e
l
e
a
s
e
t
h
e
w
h
ee
l
f
r
o
m
t
h
e
table top.
N
.
B
.:
E
nt
r
a
m
b
e
l
e
o
p
e
r
a
z
i
o
ni
d
i
s
m
o
nt
agg
i
o
e
m
o
nt
agg
i
o
v
a
nn
o
ef
fettuate ruotando in senso orario l'autocentrante.
Il
senso
di
r
otazione
antiorario
serve
solamente
per
rimediar
e
ad eventuali er
e.
N.B.
Demounting
and
mounting
ar
e
always
done
with
the
table
top r
otating clockwise.
nticlockwise
r
otation
is
used
only
to
corr
ect
operator
err
ors
or if the table to
TTENZIONE!
Durante le operazioni tener
e le mani e le altr
e parti
del corpo il più lontano possibile dalle parti
in movimento. Collane, braccialetti, abiti
non ader
enti, possono costituir
e pericolo
per chi opera.
W
ARNING!
During all operations, keep hands and other parts
of the body as far as possible fr
om moving
parts of the machine. Necklaces, bracelets
and too lar
ge clothes, can be danger
ous
for the operator
.
 Loading...