3.3
Adjusting setscrew
and hex nut.
BLADE TRACKING
First, inspect the blade wheels for wear or damage and repair as required. Blade tracking adjustment should always begin
at the wheel where the tracking is farthest out of specication. Using the instructions below, adjust the worst wheel, jog the
blade and recheck both wheels. Repeat this process until both wheels are within specication (M16 = .200-220”, M20 =
.260-.300” of tooth over hang from the front of the wheel). Both the drive and idler wheels are factory set a certain dis-
tance from the wall behind the wheel. Adjustment should not be required unless the wheel is being replaced. On the drive
wheel there is a large hex head bolt and four set screws in a “push/pull” arrangement. For the idler wheel there is single
adjuster assembly in the center of the idler shaft under the cover on the front of the head. Hyd
·
Mech Service should be
contacted before making any adjustment to the wheel position.
DRIVE WHEEL ADJUSTMENT
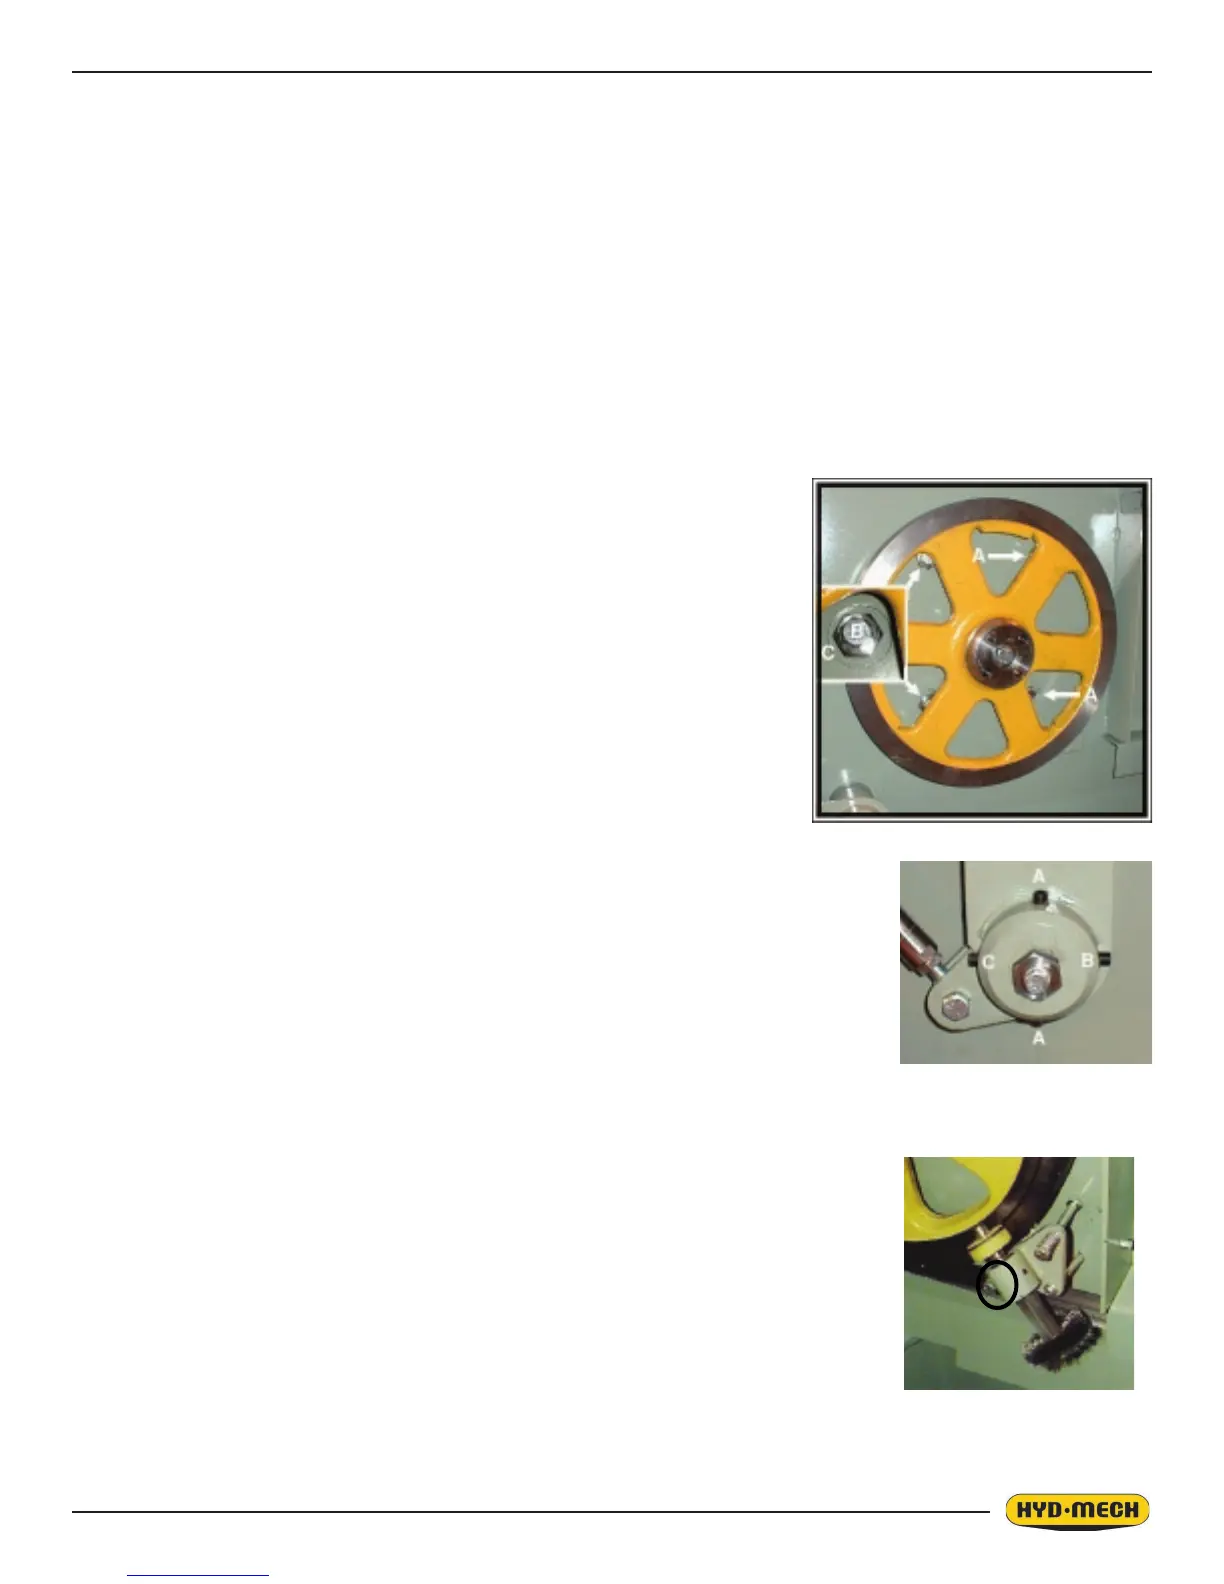
The drive wheel has two mounting bolts and two adjusting bolt assemblies.
The mounting bolts (A) should be loosened but remain snug before making any
adjustment to the bolt assemblies (B & C). Both of the bolt assemblies should be
adjusted by equal amounts. To adjust the bolt assemblies, release blade tension
slightly, loosen bolts “B” and turn bolts “C” in or out by equal amounts and tighten
bolts “B”. Turning bolts “C” in will pull the blade onto the wheel and turning them
out will push the blade off the wheel. Check the tracking movement after each
one quarter turns of bolts “C” by running the blade at minimum speed. When the
tracking is within specication, tighten bolts “A”.
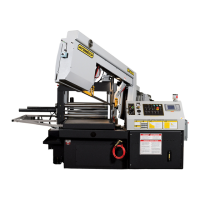
IDLER WHEEL ADJUSTMENT
Remove the cover on the front of the idler end of the head to reveal the hori-
zontal pin. There are four set screws; “A” set screws should not be adjusted as
they are the pivot points. Set screws “B & C” are adjusted by turning one out,
the other in 1/4 turn and tightening the rst again. Adjustments should be made
with the blade tension released slightly, 1/4 turn at a time and checking the blade
movement with each adjustment by running the blade at minimum speed. Loosening “C”
and tightening “B” will push the blade off the wheel. Loosening “B” and tightening “C” will
pull the blade onto the wheel.
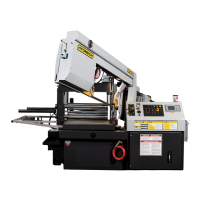
BLADE BRUSH ADJUSTMENT
The blade brush, located behind the drive wheel door, is properly set when the machine
leaves the factory, but it wears out during operation and needs to be readjusted periodically.
The plastic drive wheel that is driven by the drive wheel face should be held against the blade
face with the minimum force that is necessary. As the blade brush wears it is necessary to
periodically adjust it closer to the blade or if a new brush is installed, further away from the
blade.
As shown, there are two springs on socket head screws holding the brush assembly against
the blade. There is also an adjusting socket set screw with a hex nut on it. Loosen the hex
nut with a 9/16” wrench and turn the set screw counter clockwise with a 3/16” Allen key.
This will move the brush closer to the blade. Adjust the set screw so that the brush cleans
to the bottom of the blade gullets and tighten the hex nut.



 To Next Page