EasyManua.ls Logo

Hytorc Digital jGun Series - User Manual

Hytorc Digital jGun Series
30 pages
Print Icon
To Next Page IconTo Next Page
Loading...
5th Edition / December 2017
Digital jGun
Operations Manual
Question and Answer IconNeed help?

Do you have a question about the Hytorc Digital jGun Series and is the answer not in the manual?

Summary

Torque Gun Warranty Information

Digital jGun Overview

Digital jGun Safety Guidelines

Personal Protective Equipment

Details required personal protective equipment for safe operation of the Digital jGun.

Air Supply Requirements

Specifies the necessary air supply line diameter and pressure for the Digital jGun.

Digital jGun Safety Button Function

Explains the function of the directional control selector button as a safety feature.

Li-Ion Battery Safety Instructions

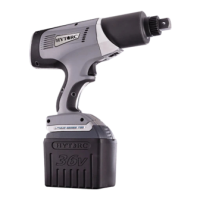
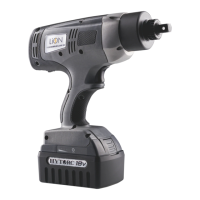
Provides crucial safety guidelines for handling and charging the Digital jGun's Li-Ion battery.

RBRC Seal and Battery Recycling

Explains the RBRC seal and guidelines for battery recycling.

Battery Charger Safety Instructions

Provides essential safety guidelines for using the battery charger with the Digital jGun.

Key Operating Safety Points

Reaction Arm Placement and Stability

Ensures correct positioning of the reaction arm against an immovable object for safe operation.

Body Part Clearance During Torqueing

Warns against placing body parts between the reaction arm and immovable object during use.

Tool Alignment and Fastener Engagement

Details proper alignment of the jGun barrel and socket engagement for secure operation.

Digital jGun Setup and Use

Setting a Torque Value

Steps to connect air supply, select units, and adjust the regulator for desired torque.

Changing the Drive Direction

Instructions on how to change the drive direction using the selector button on the tool.

Charging the Digital jGun

Guides on checking the battery indicator and connecting the charger via USB for power.

Operating the Digital jGun

Standard Operating Procedure

Step-by-step guide for calibrating, setting direction, and operating the Digital jGun for torqueing.

Loosening a Fastener Procedure

Instructions for operating the Digital jGun to loosen fasteners by depressing the trigger.

Digital jGun Repair and Maintenance

Maintaining Hoses and Fittings

Guidelines for inspecting and maintaining air lines and fittings for optimal tool performance.

Lubricating the Air Motor

Procedure for lubricating the air motor with air tool oil for routine maintenance.

HYTORC Reaction Washer Overview

System Description and Benefits

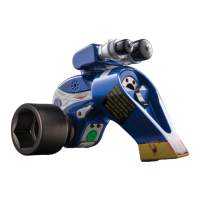
Explains the HYTORC Reaction Washer as a reaction arm replacement and its unique functionality.

HYTORC Washer Safety Precautions

Safety precautions for qualified personnel operating the HYTORC Washer system.

HYTORC Washer Personal Protective Equipment

Recommended PPE for operating the Digital jGun with the HYTORC Washer.

HYTORC Washer Requirements

Specifies the correct HYTORC Washer size and accessory coordination for use.

Washer Assembly, Use, and Service (SETUP)

Details on correct preparation and use of HYTORC Washers for safe handling and operation.

Important Preparation Steps for HYTORC Washer

Key preparation steps before using the HYTORC Washer, including cleaning and lubrication.

Important Installation Steps for HYTORC Washer

Steps for sliding bolts, determining side, and installing nuts onto the HYTORC Washer.

Aligning HYTORC Washer Socket Set Screw

Guide to aligning the socket set screw with the tool's milled recess for proper connection.

Installing HYTORC Washer Driver

Instructions for installing the HYTORC Washer Driver and tightening its set screw.

Tightening with HYTORC Washer

Steps for using the HYTORC Washer Driver to tighten nuts, following standard torque procedures.

Digital jGun Maintenance and Troubleshooting

Air Pressure and Coupler Maintenance

Ensures proper tool function by checking air pressure limits and coupler cleanliness.

Gearbox and Gasket Inspection

Check gearbox for loose screws and gasket for leaks to ensure accurate torque.

Overview

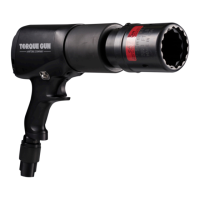
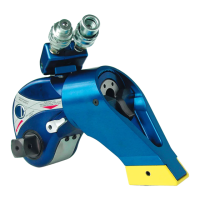
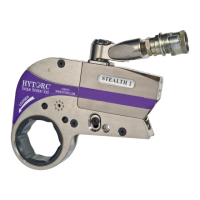
The Digital jGun is a pneumatic torque wrench designed for industrial bolting applications, capable of delivering up to 8,000 ft-lbs of torque. It is engineered for safety and accuracy, utilizing a patented planetary gearbox torque multiplier system. Unlike impact wrenches, the Digital jGun applies torque between the fastener and the reaction surface, preventing working torque from being transmitted to the operator.

Function Description

The primary function of the Digital jGun is to tighten fasteners to a specified torque value safely and accurately. It achieves this through a high torque multiplication ratio (up to 4180:1) provided by its planetary gearbox. The tool stalls out once the final torque value is reached, ensuring the fastener is tightened to specification.

The Digital jGun incorporates a built-in pressure sensor and signal conditioner. During calibration, the tool's torque chart is established and stored in its display electronics. Users can select the desired torque by adjusting a regulator until the target value is displayed on the screen.

A key safety feature is the directional control selector button, which must be pushed in the desired direction (clockwise or counter-clockwise) before the trigger can be depressed. This mechanism helps prevent accidental operation and operator error. The tool also includes an integral Filter-Regulator and corrosion-resistant internal components, eliminating the need for continuous lubrication or a separate FRL (Filter, Regulator, Lubricator) unit.

The Digital jGun can be used with either a standard reaction arm or the HYTORC Reaction Washer™ system. The reaction arm or washer absorbs the counter-rotational force generated during tightening. The HYTORC Reaction Washer system offers an alternative to the traditional reaction arm, providing a universal reaction point and eliminating the need for custom-designed reaction arms. It also enhances safety by removing external moving parts and improves bolting accuracy by eliminating side-load and equalizing surface friction.

Usage Features

  • Torque Setting: To set a torque value, connect an adequate air supply to the tool's regulator, select the desired torque units (Nm or ft-lbs) via the rightmost push button, and then adjust the regulator until the target torque is displayed. It is recommended to pulse the trigger while setting the torque to ensure the displayed value is stable.
  • Drive Direction Change: The square drive direction can be changed from clockwise to counter-clockwise using the direction selector located behind the trigger.
  • Display Modes: The left button on the display toggles between TORQUE and PRESSURE modes. The right button, when in TORQUE mode, toggles between units of PSI, bar, and KPa. When in PRESSURE mode, it toggles between ft-lbs and Nm.
  • Battery Indicator: The Digital jGun features a three-segment battery charge indicator on the lower right side of the screen, which shows the charge level of the non-removable rechargeable Li-Ion battery that powers the display electronics.
  • Charging: A charger with a USB cable is provided. To charge, connect the charger to the USB connector on the right side of the display housing at the rear of the gun. The battery is fully charged when three bars are indicated on the display.
  • Operating the Tool: Before operation, ensure the jGun is calibrated and the desired direction is set. Place the correct size impact socket on the square drive and secure it with the locking pin and ring, ensuring it is fully engaged onto the nut. The reaction arm must be placed firmly against a stationary surface (e.g., an adjacent nut, flange, or equipment housing). If using the HYTORC Reaction Washer, follow its specific setup instructions. Apply momentary pressure to the trigger to confirm proper socket engagement and reaction arm placement. Verify the desired torque on the screen, then depress the trigger until the socket stops turning and air bypasses the motor, indicating the fastener is torqued.
  • Loosening Fasteners: To loosen a fastener, adjust the regulator to the maximum torque setting, set the desired direction (counter-clockwise), and follow the same steps for socket engagement and reaction arm placement as for tightening. Depress the trigger until the socket turns freely.

Maintenance Features

  • Hoses and Fittings: Before each use, visually inspect air lines and fittings for wear or leaks. Replace worn or leaking lines and tighten any leaky fittings. It is crucial to ensure air line fittings are tight but not overly tightened to prevent thread failure, personal injury, and tool damage.
  • Air Motor Lubrication: The air motor does not require continuous lubrication but benefits from occasional application of air tool oil. To lubricate, turn the Digital jGun upside down, disconnect the air hose at the regulator coupling, pour approximately one ounce (29.6 ml) of air tool oil or spray lubricant into the hose coupling, then reconnect the hose and operate the gun while standing clear of the exhaust opening at the base of the handle. Excess lubricant will be expelled upon initial operation.
  • General Inspection: Regularly check the female coupler on the unit's hose and the male coupler on the Digital jGun for dirt, as dirt can damage the air motor. Inspect the gear box for loose or missing screws; do not operate the tool if any screws are loose or missing, and use LOCTITE 262 on screws if needed. Check the back cover gasket for air leaks, as these can lead to inaccurate torque.
  • Storage: When not in use, store the Digital jGun and its accessories in the provided plastic storage case. Avoid exposing the gun to high humidity or large temperature variations.
  • Battery Care: Do not splash or immerse the battery in water or other liquids. Do not incinerate the battery, as it can explode and release toxic fumes. Avoid charging or using the battery in explosive atmospheres. In case of skin contact with battery contents, wash immediately with mild soap and water. If battery liquid gets into eyes, rinse for 15 minutes or until irritation ceases and seek medical attention if necessary. Contents of opened battery cells may cause respiratory irritation; provide fresh air and seek medical attention if symptoms persist.
  • Charger Safety: Only use the charger supplied with the product. Do not expose the charger to rain or snow. To disconnect, grasp the plug firmly, not the cord. Ensure the cord is placed to avoid being stepped on, tripped over, or damaged. Avoid using extension cords unless absolutely necessary, and if used, ensure it has adequate wire size (AWG). Do not block charger ventilation slots. Do not operate a damaged charger; have it replaced immediately. Do not disassemble the charger; take it to an authorized service center for repair. The charger is designed for standard household electrical power (120V/220V 60hz/50hz).
  • HYTORC Washer Maintenance: Before using the HYTORC Washer, ensure connection elements are clean and dry, free from oil and grease. The nut mounted above the washer must be lubricated according to specifications.
  • Reaction Arm Care: Never modify a reaction arm, as this can lead to personal injury or tool damage and voids the warranty. If a custom reaction arm is needed, consult a local Torque Gun dealer.

Hytorc Digital jGun Series Specifications

General IconGeneral
Power SourceBattery
Data StorageYes
ConnectivityBluetooth
Unitsft-lbs, Nm
Battery LifeVaries by model

Related product manuals