16
2
SETTING A FREQUENCY
1
2
3
4
5
6
7
8
9
10
11
12
13
14
15
16
17
18
19
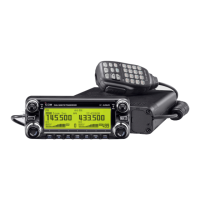
z Push [BAND] to select main band.
x Push and hold [BAND] for 1 sec. to enter fre-
quency band selection.
• The frequency band is displayed.
c Push [Y]/[Z] to select the desired frequency
band.
v Push [
CLR
A(MW)] (or [BAND]) to exit the con-
dition, and return to frequency indication.
✔
About extra frequency bands— depending on versions
In addition to the 2 m and 70 cm ham bands, some versions
of the the IC-E2820 have extra frequency bands for each left
and right bands as follow.
See the specifications for the available frequency bands for
details.
*The frequency band initials are default indication only. Once the op-
erating frequency is set in the band, the initial indication will be
changed. ✔: Available, —: Not available
D VFO and memory modes
The transceiver has 2 basic operating modes: VFO mode and
memory mode. Select VFO mode first to set an operating fre-
quency.
➥ Push the desired band’s [V/MHz•SCAN] to select VFO
mode.
• When VFO mode is already selected, the digits to the right of the
10 MHz or 1 MHz digits will disappear depending on version. In
this case, push [V/MHz•SCAN] again (or twice depending on ver-
sion).
➥ Push [M/CALL•MW] to select memory mode.
•“X” indicator appears when memory mode is selected.
➥ Push [VFO/LOCK] to select VFO mode.
➥ Push [MR/CALL] to select memory mode.
• The microphone controls the main band only. Push
[BAND] to toggle the main band, then push
[VFO/LOCK] or [MR/CALL], if necessary.
VFO mode is selected.
memory mode is selected.