-6-
After draining the oil, tighten the oil drain
sc
rew 0 .
5. Periodi
ca
lly
wipe
away any oil which
co
llects
in
the r
ear
bed oil s
ump
0 with a cloth.
6. Turn the machine pulle
y,
so that the o
il
hole
cove
r @ is facing
up
ward, and then remove the o
il
h
ole
cover
@
and fill the oil tank
0 with oi
l.
If
the l
eve
l
of
lubricating
oil
drops below the middle reference line 0
on
the oil tank, no oil will thus not be lu-
bricated sufficiently. Be sure to maintain the lubri
ca
ting oil level
at
a l
eve
l above the center
ref
eren
ce
line.
7. Attach the o
il
hole cover @ .
*
if
the machine is being u
se
d with lhe pull
er
atlached remove the
cove
r screws
G)
and
fill with o
il
until the l
eve
l
reach
es
the upper referen
ce
line in the o
il
sig
ht
glass.
If the o
il
level drops to the l
owe
r reference line, be sure to add m
ore
oil.
After lubrication is
co
mpleted, tighten the
cove
r scr
ew
G)
.
4-4. ~~fJtfftr-JiE~:nioJ I Checking the machine pulley rotating diretion
A
ft~
CAUTION
awM~~
.
~~~mff~~~$~~~~
a
n~~$~~.
~h~*~•Am~m~aw
tJU.6:itr-
.
Do n
ot
touch any
of
the moving parts
or
pl
ace
any objects against the machine while s
ew
ing, as this
m
ay
result in per
so
nal injury or
damage
to
the machine.
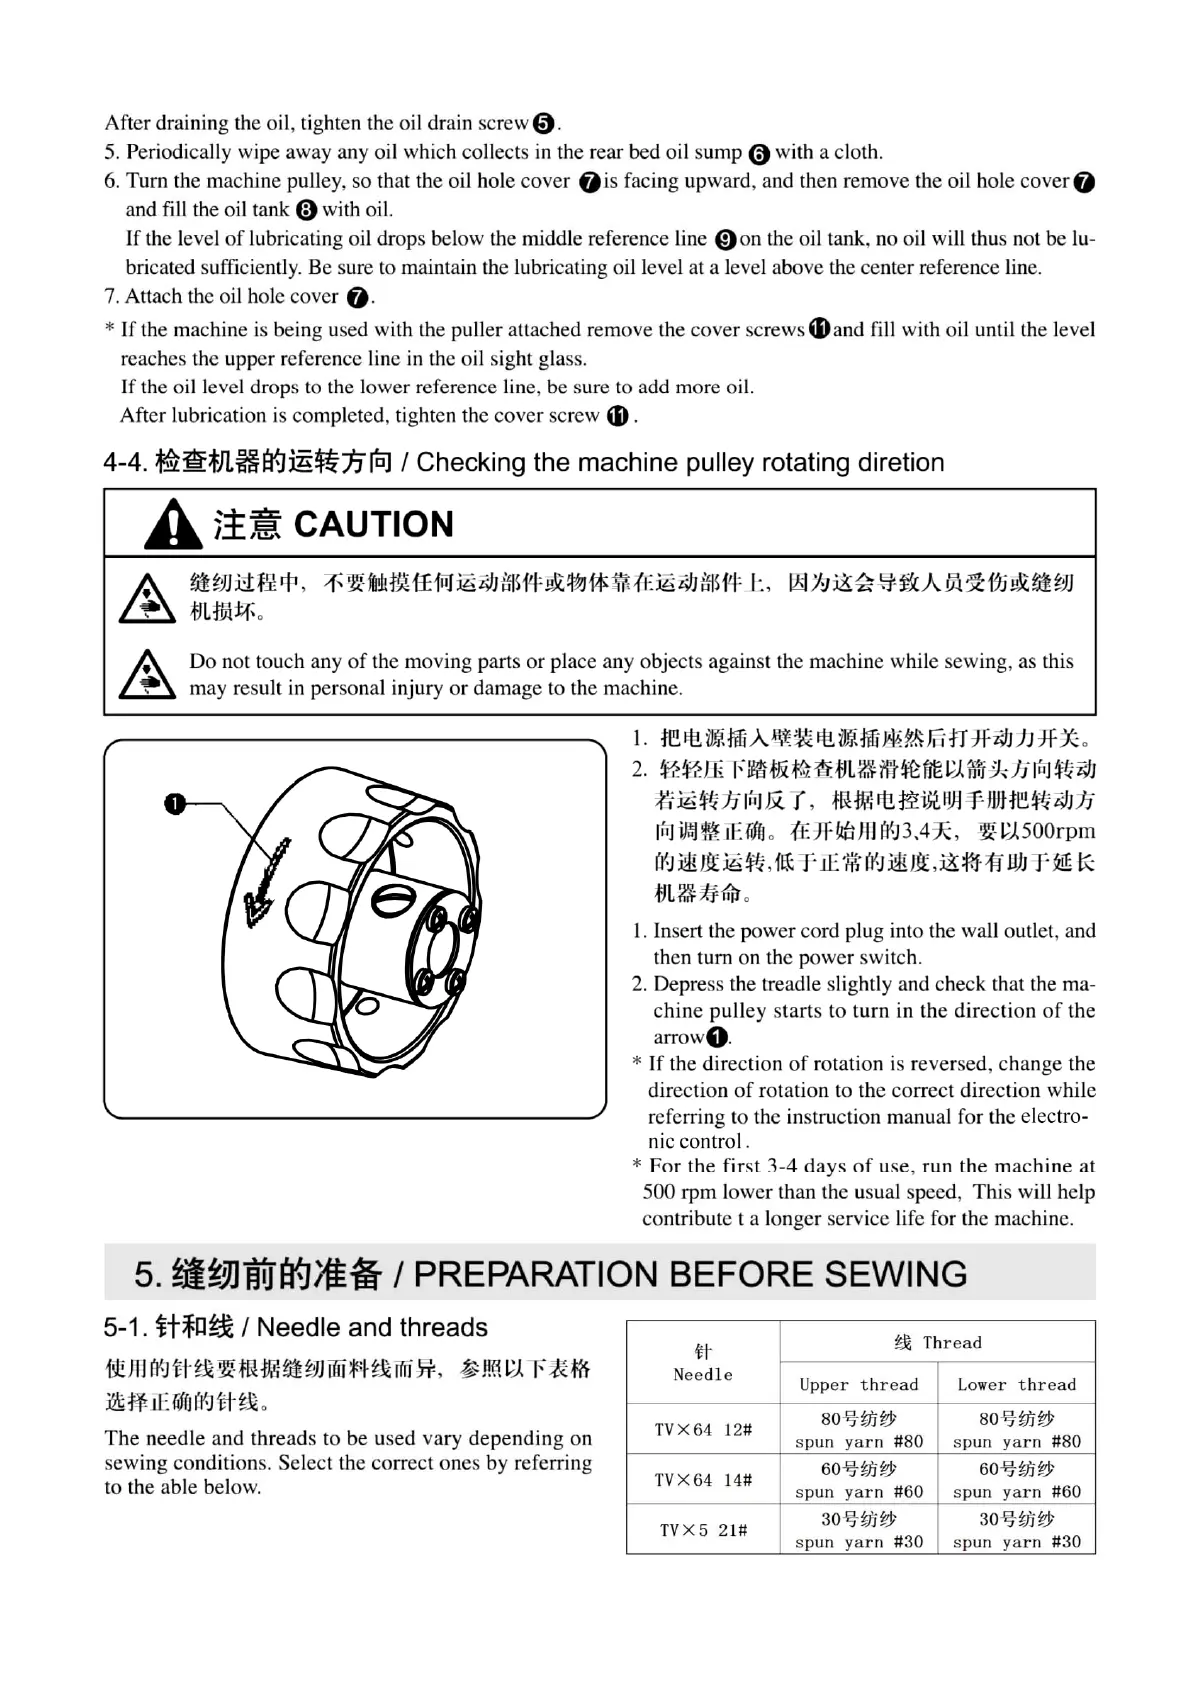
l .
re%
iJff,
n1L
A
~
~
It! fit
ffff
w.
r,Mf
HT
:;Jf
z;/
J)
HF
.k.
2.
!i1.
$?.
Bi
Fl
l1HJi
¥}
~
fJL~
t!
Ht
00
~J
%1
.:J,
}j
l
wJ
~"
z;/
J
~
:i6
~
Jj
l
iIJ
Jx
( , ffi
~
it
rt~
194
T
JVH~
4"-t
4'J
Jj
l•
1
J
iJ.'d~
1Ef
ef
(J
.
11:Jf!itiJI
I
!]{J3,4:;R
, ~ ~
J500
rpm
(i
J i£
Ht~~
,
fkt
T iE ·,
ip;
t
(-.1
i£
JJt,
:i!
:r.J-
ff
ilJJ
T
~
K:
m~
J.r
ftl?
.
l. Insert the p
owe
r cord plug
int
o the wall outlet, and
then
tum
on the p
owe
r
sw
itch.
2.
De
pre
ss the treadle slightly and c
he
ck th
at
the ma-
c
hin
e
pull
ey
s
tarts
to
turn
in
th
e
direction
of
the
arrow
O .
*
If
th
e
dir
ec
tion
of
rotation is r
everse
d, ch
ange
the
direction
of
rotation
to
the
co
rre
ct
dir
ect
ion while
r
efe
rring to the instruction ma
nu
al for the electro-
nic control.
*
For
th
e
fir
st 3-4
days
of
u
se,
run
the
m
ac
hine
at
50
0
rpm
l
owe
r than lhe usual speed, This will help
co
ntribute t a lon
ger
se
rvice
li
fe for the m
ac
hine.
5.
~t11.JfiJa{])i§ I PREPARATION BEFORE SEWII
NG
5-1
. it~n~ I Needle and threads
i!l!Jrl
IY-J
tt
tit~
m
~a;,]]
llU
" ~
t:lH
IIT
ff
'
~
$~
~
r
~ ~
~
ff. Jf
(d(1
W;_i
H ~i.
The
n
eed
le and
thr
ea
ds to be u
sed
vary
depending
on
sewing
co
nditions. Select the correct ones by referring
to the able below.
tt
N
ee
dl
e
TV
X 64 12#
TVX64 14#
TV
X 5 21#
~
Thr
ead
Upper
thr
ead
Low
er
thr
ea
d
80
%~~
80
%~
~
sp
un
yar
n #80 spun
yarn
#80
60
%~~
60
%~
~
sp
un
yarn
#60
spun
yarn
#60
30
%~~
30
%
~~
sp
un
yarn
#30 spun
yarn
#30
From the library of Superior Sewing Machine & Supply LLC - www.supsew.com