-15-
bar
clamp
sc
r
ew
0 and adjust
so
that the distance between the bottom
of
the ne
ed
le clamp@)and the top
of
the needle bottom
of
the needle cl
amp
and the top
of
the needle plate 8 is 11.3mm (for thin materials)
or
I 0.
*If the needle
clamp
is
se
t in the
way
de
scribed above, the distance between the points
of
the needlesQ a
nd
the top
of
the
needle
plate 8 wi
ll
be
8.5mm
(for thin materials)
or
1
0.3mm
(for
medium
thick mat
er
ials)
when the needle
clamp
@)
is rai
se
to its hig
he
st
po
siion.
4. Remove the three screws @ , and then remove the needle plate
8 .
5. Turn the
ma
chine pull
ey
so that the needle 8 and the n
eed
le guard 0 are aligned, and then adjust the tilt
of
the needle clamp
@)
so that there is no space between the left and right needes 8 and the needel gua
rd
0
at
this time.
Install the n
ee
dle plate with the thr
ee
sc
rews 8 , and after ch
ec
king that the needles @ are
in
the centers
8
of
the needle holes 0 , tighten the needle
bar
clamp
sc
rew 0 .
6.
In
se
rt the rubber plug C,.
7. Install the
pre
sse
r foot ~ with the
sc
rew@) .
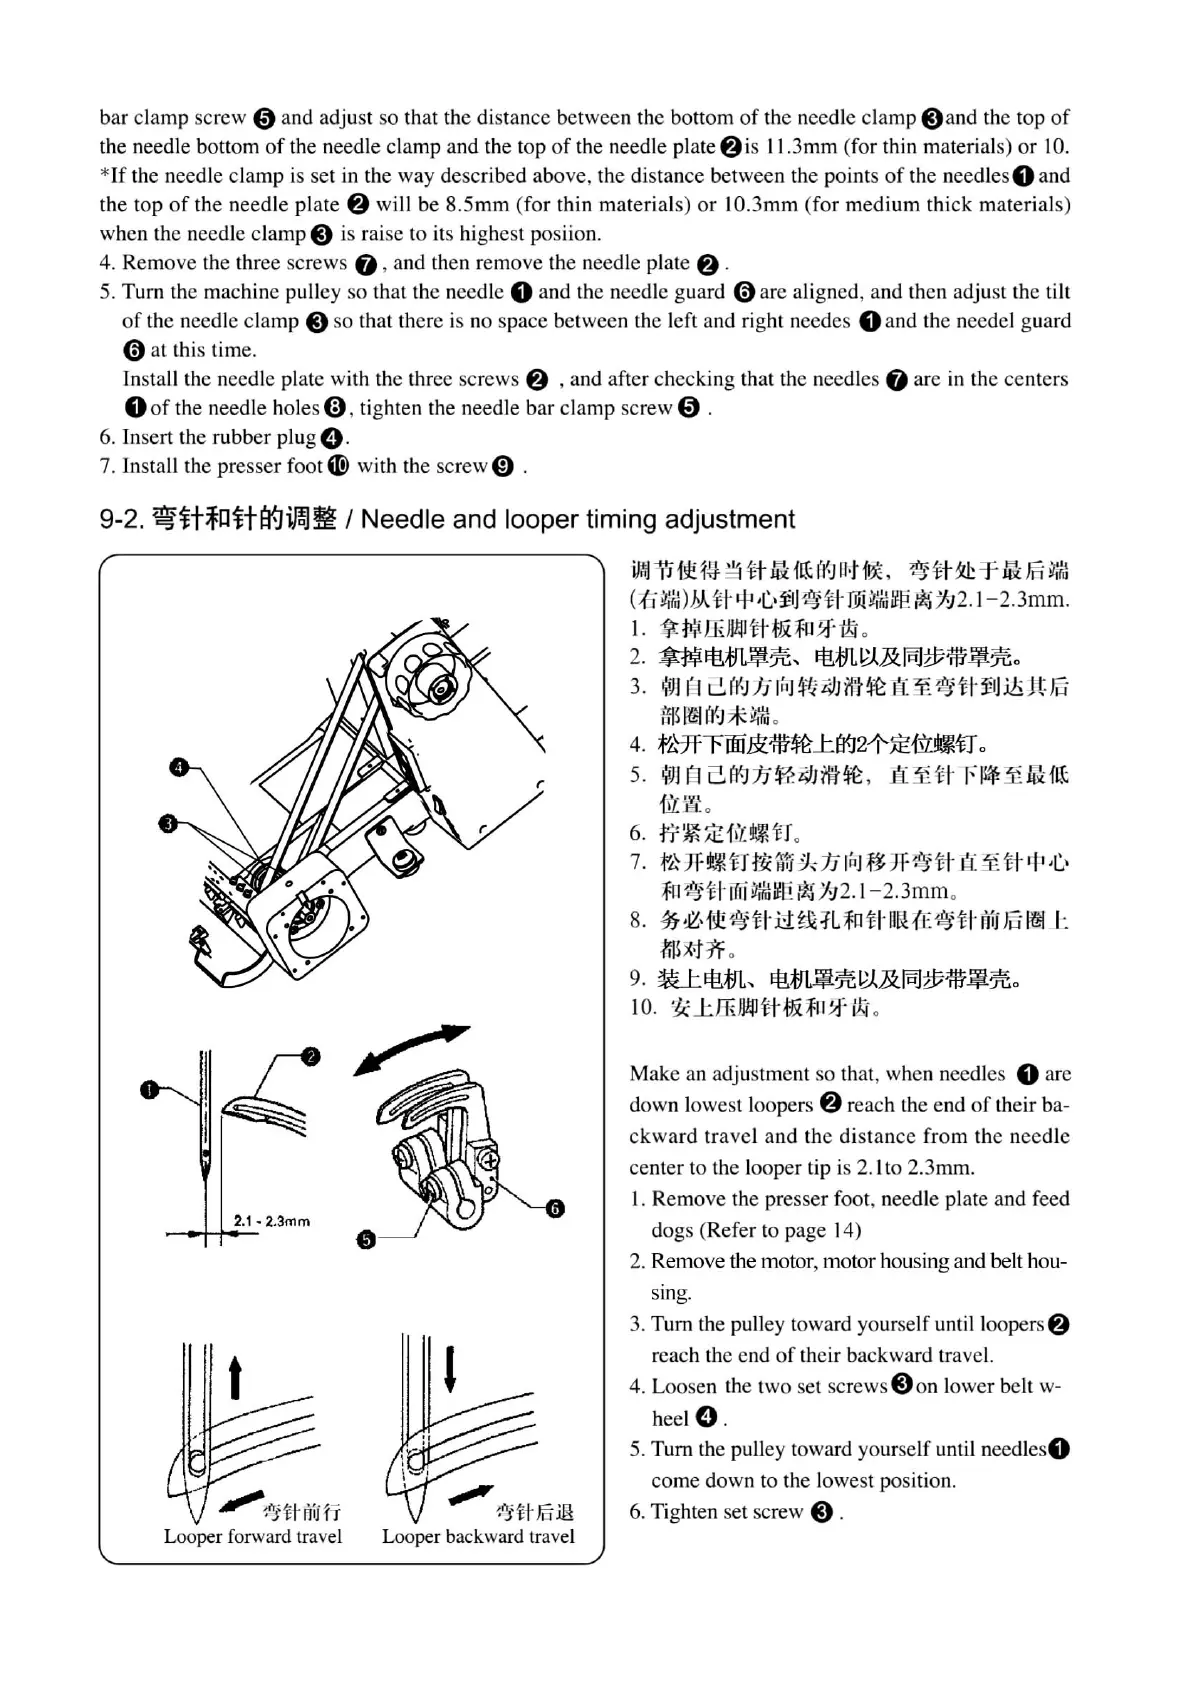
9-2.
~ttfllttagifoJ~
/ Needle
and
looper
timing
adjustment
2.1
• 2.3mm
'
Looper forward travel Looper backward travel
~~~W~tt~~~M•.
eytt~~~~~
(ti~lr.l)M!it
i-p,C,,f1J
eytl·
Im~~e
~1-J2. l
-2.3mm.
1 .
1!
:Milli
)Jt.l
J
ti
·
;f'Jj
;f U *
1!1
o
2.
~~MX,
~mPJ.lk~tv1W.37Go
3.
19J
17
LJ
((~
Ji
1i
1
J f!t
t;/J
~·t
~
1![
~
~
t~
ff
Jib
Jt
Jil
fflm!I
(.(.
J
~~:M
o
4. f,Hfrffi&:1ir~J:1¥J2-t-5E~fl o
5.
~~B~
nft~M~.
A~tt
F~
~Q~
fil:
't'!t'_
0
6.
ti-'~~111.it;H
o
7.
f~
Jft~/fTfJt:(Jg,_
1J
li:rJ
~
JF~tt
b(.3i
'fi·
i-p
,c,,
fll~tl"
ITfiftt/il~li
~
J92
. l
-2.3mm
o
8. #
£,-f9!
~
ti-
:ct
;:JH
L fl]
tt
lllH'E
~
it-
fllj
JJ
~
I:
jjf~x,j"jf
0
9.
~~m,
~m.3
7G
PJ.lk~tv1W.3Xo
1
0.
~
..l ffi
~
tt
,lii
~
L'.,,f
/Ar
o
Make an adjustment so that, when n
ee
dles 8 are
down lowest loopers
8 reach the end
of
their ba-
ckwa
rd
tra
vel
and
the
distance
from
the
n
ee
dle
ce
nt
er
to the looper tip is 2.1 to 2.3mm.
1. Remove the presser foot, needle plate and feed
dogs (Refer to
pa
ge
14
)
2. Remove the motor, motor housing and belt hou-
sing.
3.
Tum
the pull
ey
t
owa
rd yourself until loopers@
reach the end
of
their
ba
ckward trave
l.
4. Loosen the t
wo
se
t
sc
r
ews
8 on lower belt w-
heel C, .
5. Turn the pulley toward yourself until needles8
come down to the lowest position.
6. Tighten set screw
@)
.
From the library of Superior Sewing Machine & Supply LLC - www.supsew.com