-16-
7. loosen set screw0 , move looper hold
er
(!)in the a
rr
ow
direction until the distance between the n
eedle
ce
nter
and the looper tip is 2. 1 to 2.3mm, and retigten set screw
0 securely.
8.
Make
sure that the looper thread eyes match the needle eyes in the forward and backward travals
of
the loopers.
9. Insta
ll
the motor,
mot
or
housing and belt houing.
10. Install the presser foot, n
ee
dle plate and feed dogs.
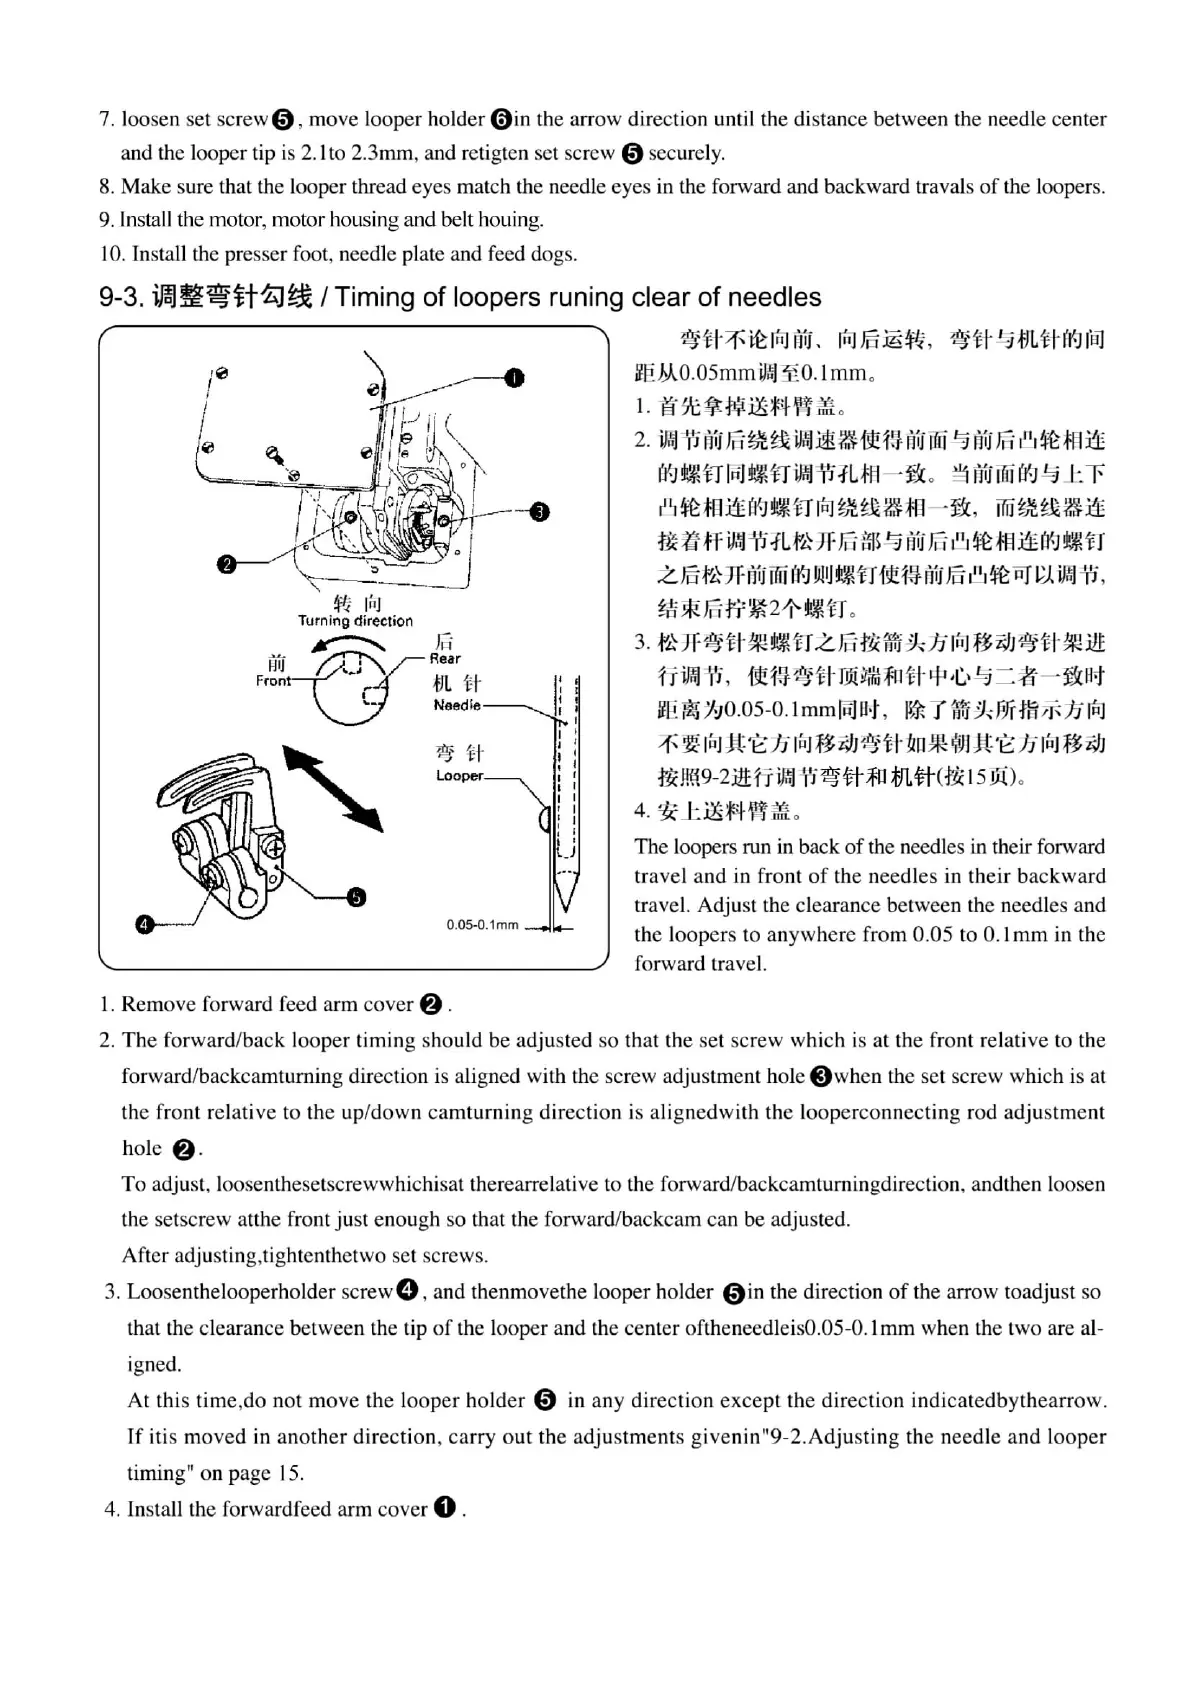
9-3. ifa.l~~it~~ I
Timing
of
loopers
runing
clear
of
needles
--0
vgn
Looper
0.05-0.1mm
I.
Remove forward feed
arm
cover
8 .
ey
!M-
.:f
ii::
fnJ
HIJ
,
fnJ
€jg~,
~~
tt
½
tJ
L
tt
(~
li:fl
fi'eM0.05mmv~
~0.
1
mm
.
I.
tt
$16
1jt
f'-j!
Jri
~ ~
~
0
2.
iJ
,~ J
r;
"'j
him~
iJ,>,i
Jfil
~-fic1~1
"'j illi
"3
fl,
j
f'i
,~,
!it
mu
~•n~•n~-wR~
- ~.
ili~rrrr~½
~~
r
1
¼
~
t8
ii
(:(;;it'½!
H rn
"J
~
;~
~tfl
-ft,
W1
;Jf.
tl~
ii
m Y ff
iJ,~
fi
.f
Lf
~ Jf
Ji1
tff~
~
H1j
hi
,n
, !it
fl:
I u
(.(',]
!I\.~
H
z.J§r~
Jf
Hijffii
~
!J!IJ
t~:n
itl
!=H
11J
€ 1
11
1 !it
Pf
i;;,
iJWr'i,
~*f'itr~2~t~n
.
3.
f~
Jf~H#Rt~H
-LJiiti<ff.i
.:J,Ji
1
[,
J
fti;1
1
~'H#R.itl:
fi~-W.
Rm~ttffi~~tt~~~
- ~-
~~
fi'I
~
~
:1/
!J
0.05-0.1
mm
lfiJO·t
, I~ T
,'{(J
J,
fifrm
:,
1'
JJ
(ti]
+
~
1
ii
J
J:l:·~Ji
1
ii
J fti;JJ
~Him*
19
J
J:l:·~
Ji
1uJ
fti;11
fli
J!
~9-2:i!l:fiifnl
fj~tt~
.mtt
cfli
15
w)
.
4. ~J:.i1ifHln'lf.
The loopers run
in
back
of
the needles
in
the
ir
forward
travel
and
in
front
of
the needles in th
eir
backward
travel. Adjust the clearance between the needles and
the l
oopers
to anywhere from 0.05 to 0. I
mm
in the
forward travel.
2.
The
for
ward
/back l
ooper
ti
ming should be adjusted
so
that the
se
t screw
wh
ich is at the front relative to the
forward/backcamtuming direction is aligned with the screw adju
st
ment
hole@when
the set
sc
rew which is at
the front relative to the
up
/
dow
n
camt
urning direction is alignedwith the l
ooperconnec
ting rod adjustment
hole @.
To
adju
st
, loo
se
nthesetscr
eww
hichisat therearrelative to the forward/backcamtumingdirection, andthen loosen
the setscrew
att
he front
just
enough so that the forward/backcam can
be
adjusted.
After adjusting,tightenthetwo
se
t
sc
rews.
3. Loosenthelooperholder
screw
C,
, and thenmovethe looper hold
er
0in
the direction
of
the arrow toad
ju
st
so
that the clearance between the tip
of
the loop
er
and the cent
er
oftheneedleis0.05-0.1
mm
when the t
wo
are al-
igned.
At
this time,
do
not
move
the l
ooper
holder
0 in any direction
excep
t
the
direction
indi
catedbythear
r
ow
.
If itis moved
in
an
ot
h
er
direction, carry out the adjus
tment
s givenin"9-2.Adjusting the n
ee
dle
and l
ooper
timing"
on
page
15
.
4. Install the forwardfeed
arm
cover
O .
From the library of Superior Sewing Machine & Supply LLC - www.supsew.com