5–1: Track Edit
110
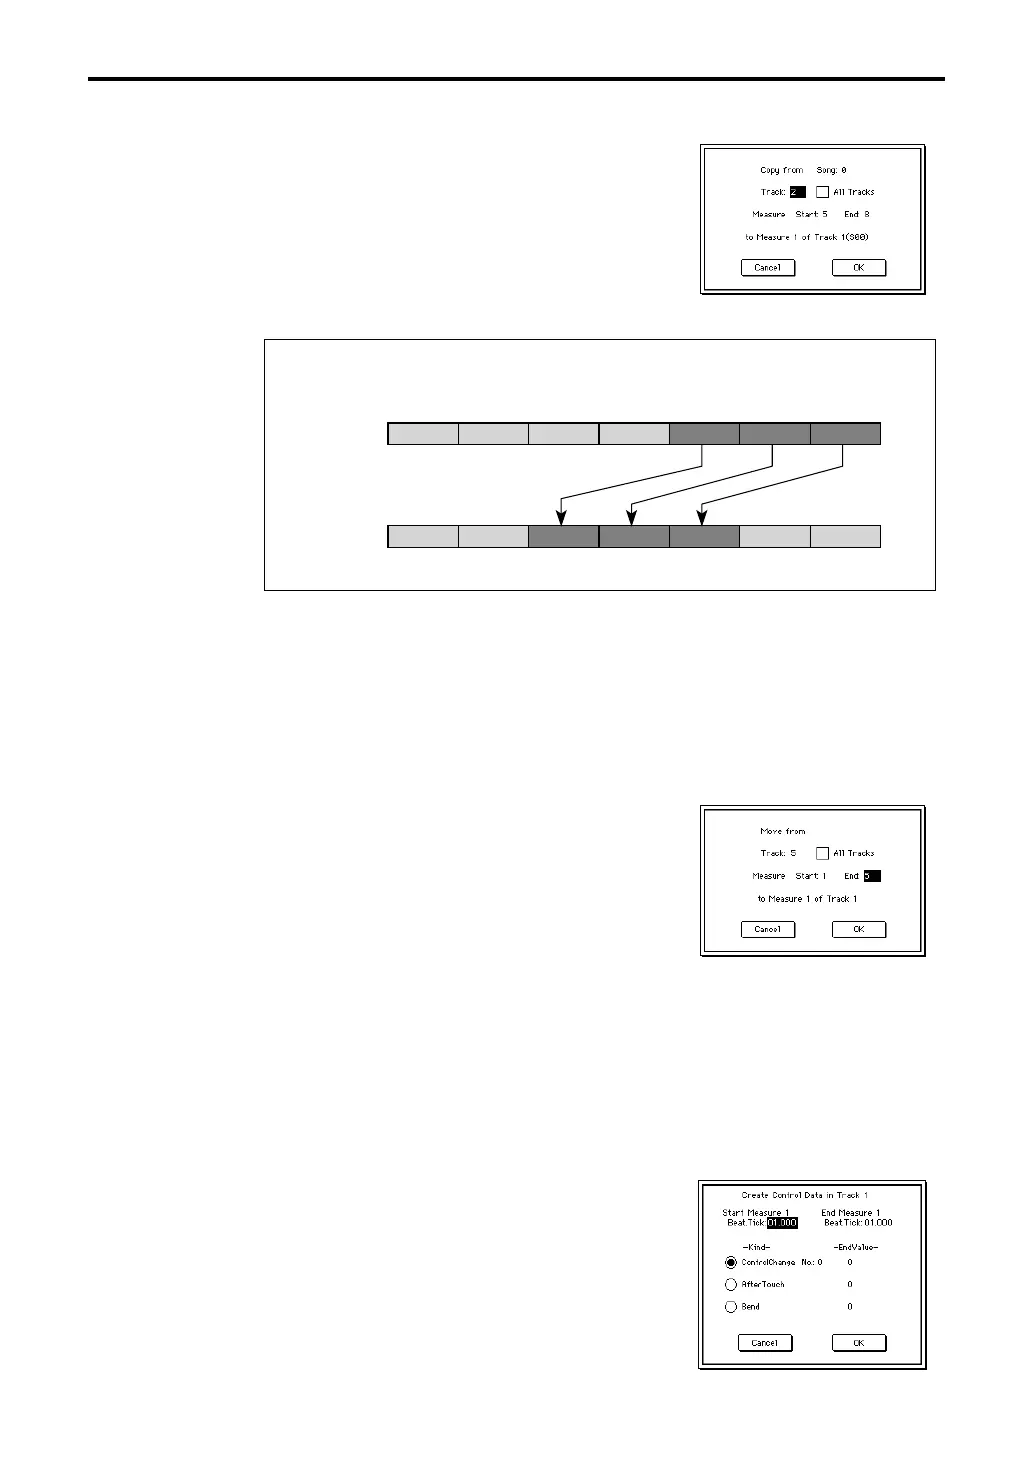
1 In the tab 1 display, specify the copy destination track and Start Measure.
2 When this command is selected, the dialog box shown at
right will appear.
3 Specify the copy source track. If you wish to copy the
musical data of all tracks including the master track, check
All Tracks.
4 Specify the desired first and last measure of the copy
source track.
5 To execute the Copy Measure command, press the OK
button. To cancel without executing, press the Cancel button.
5–1K: Move Measure
Measures of musical data in the track specified in the dialog box will be moved to the measure
specified in the tab 1 display.
Be aware that when the Move Measure operation is executed, the musical data will change as fol-
lows:
• Data following the move source measures will be moved forward to fill the gap.
• Data following the move destination will be moved backward to make room.
1 In the tab 1 display, specify the track and Start Measure of the move destination.
2 When this command is selected, the dialog box shown at
right will appear.
3 Specify the move source track. If you wish to move the
musical data of all tracks including the master track, check
All Tracks.
4 Specify the desired first and last measure of the move
source track.
5 To execute the Move Measure command, press the OK
button. To cancel without executing, press the Cancel but-
ton.
5–1L: Create Control Data
This command creates and inserts control data that changes smoothly until it reaches a specified
value.
The beat and clock of the specified area are set after selecting the page menu command.
1 In the tab 1 display, specify the track in which you wish to create control data, and the Start
Measure and End Measure. If you wish to create tempo data, select MTR as the Track. In this
case, the Kind parameter in step
4 will be Tempo.
2 When this command is selected, a dialog box shown at
right will appear.
3 For “kind”, select the type of data that you wish to create;
Control Change, After Touch, or Bend. If Control Change
is selected, you can also select the control number
(☞ page 105 in this manual).
4 Set the beat and clock (Beat, Tick) of the starting location.
5 Set the beat and clock (Beat, Tick) of the end location.
6 Set the desired End Value.
The Start Value will be the value at the starting location.
Track 1
(source)
2 (4/4)1 (4/4) 5 (3/4)4 (3/4)3 (4/4)
Track 2
(destination)
6 (3/4) 7 (4/4)
Example: If measures 5
–7 of track 1 are copied to measure 3 of track 2, measures 3–5 of track 2 will be written.
2 (4/4)1 (4/4) 5 (3/4)4 (3/4)3 (4/4) 6 (3/4) 7 (4/4)