7
H
C
16
D
A
カバーの取り付け
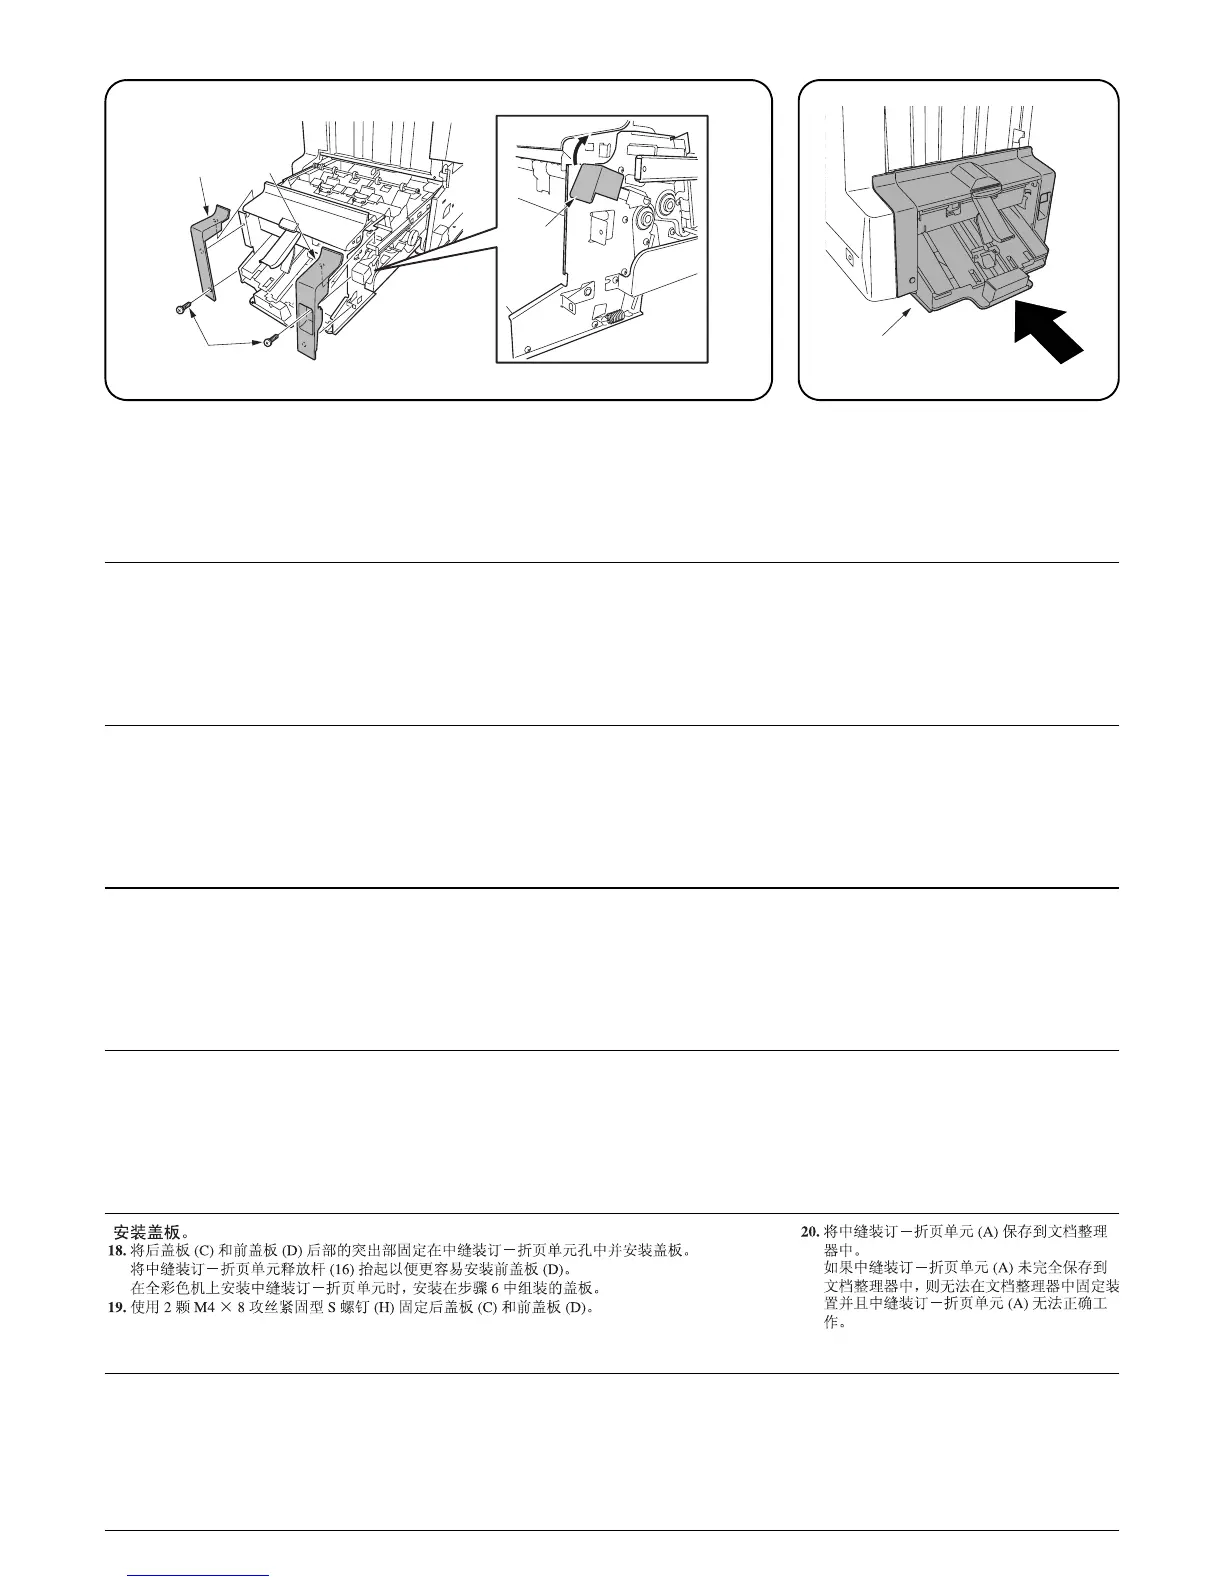
18.カバー後 (C)、カバー前 (D) を、裏側の突起を中折りユニット (A) の穴にはめ込み、取り付ける。
カバー前 (D) は、中折りユニット解除レバー(16) を上げると取り付けやすい。
フルカラー機に取り付ける場合、手順 9 で組み立てたカバーを取り付けること。
19.ビス M4 × 8 タップタイト S(H)2 本でカバー後 (C)、カバー前 (D) を固定する。
20.中折りユニット (A) をドキュメントフィ
ニッシャに収納する。
確実に収納されていない場合、中折りユニッ
ト (A) がドキュメントフィニッシャに固定
されず、中折りユニット (A) が正常に動作し
ない。
Installing covers.
18.Fit the projections at the rear side of rear cover (C) and front cover (D) into the center-folding
unit’s holes and install the covers.
It is easy to install front cover (D) by lifting center-folding unit releasing lever (16).
Install the cover assembled in step 6 when the center-folding unit is installed into the full-color
machine.
19.Use two M4 × 8 tap-tight S screws (H) to secure rear cover (C) and front cover (D).
20.Store center-folding unit (A) into the docu-
ment finisher.
If center-folding unit (A) is not stored com-
pletely inside the document finisher, the unit
cannot be fixed in the document finisher and
center-folding unit (A) won’t operate prop-
erly.
Installation des capots.
18.Ajuster les saillies à l’arrière du capot arrière (C) et du capot avant (D) dans les orifices de la
plieuse et installer les capots.
Il est facile d’installer le capot avant (D) en soulevant le levier de relâchement de la plieuse (16).
Installer le capot assemblé à l’étape 6 lorsque la plieuse est installée dans la machine pleine cou-
leurs.
19.Utiliser deux vis S taraudées M4 × 8 (H) pour fixer le capot arrière (C) et le capot avant (D).
20.Ranger la plieuse (A) dans le finisseur de
document.
Si la plieuse (A) n’est pas complètement ran-
gée à l’intérieur du finisseur de document, la
plieuse ne peut pas être fixée dans le finis-
seur de document et la plieuse (A) ne fonc-
tionne pas correctement.
Instalación de cubiertas.
18.Coloque los resaltos del lado posterior de la cubierta posterior (C) y de la cubierta frontal (D) den-
tro de los agujeros de la unidad de plegado e instale las cubiertas.
Es más fácil instalar la cubierta frontal (D) levantando la palanca de liberación de la unidad de
plegado (16).
Instale la cubierta ensamblada en el paso 6 cuando la unidad de plegado esté instalada en la
máquina a todo color.
19.Utilice dos tornillos de ajuste M4 × 8 (H) para asegurar la cubierta posterior (C) y la cubierta fron-
tal (D).
20.Meta la unidad de plegado (A) en el finaliza-
dor de documentos.
Si la unidad de plegado (A) no se mete com-
pletamente en el finalizador de documentos,
ésta no podrá fijarse en el finalizador de
documentos y no funcionará correctamente.
Anbringen der Abdeckungen.
18.
Führen Sie die Vorsprünge an der Rückseite der hinteren Abdeckung (C) sowie der vorderen Abde-
ckung (D) in die Löcher der Mittenfalteinheit ein, und bringen Sie danach die Abdeckungen an.
Um den Einbau der vorderen Abdeckung (D) zu erleichtern, ist der Entriegelungshebel (16) der Mit-
tenfalteinheit anzuheben.
Bringen Sie nun die in Schritt 6 zusammengesetzte Abdeckung an, nachdem die Mittenfalteinheit in
den Vollfarbenkopierer eingebaut wurde.
19.Verwenden Sie die beiden M4 × 8 Passstift-Verbundschrauben (H), um die hintere Abdeckung
(C) und die vordere Abdeckung (D) zu befestigen.
20.Setzen Sie die Mittenfalteinheit (A) in den
Dokument-Finisher ein.
Wenn die Mittenfalteinheit (A) nicht vollstän-
dig in den Dokument-Finisher eingesetzt
wurde, kann die Mittenfalteinheit nicht im
Dokument-Finisher befestigt werden, und
die Mittenfalteinheit (A) funktioniert dann
nicht richtig.
Installare i pannelli.
18.Inserire le parti sporgenti sul retro dei pannello posteriore (C) e anteriore (D) nei fori dell’unità di
piegatura centrale e installare i pannelli. È semplice installare il pannello anteriore (D) sollevando
la leva di rilascio unità (16). Installare il pannello assemblato nel passo 6 nel momento in cui
l’unità di piegatura centrale è installata nel macchinario a colori.
19.Utilizzare due viti con testa a croce S M4 × 8 (H) per fissare i pannello posteriore (C) ed anteriore
(D).
20.Inserire perfettamente l’unità di piegatura
centrale (A) nella finitrice.
Se l’unità di piegatura centrale (A) non è del
tutto inserita all’interno della finitrice, è
impossibile fissarla alla finitrice stessa e
l’unità di piegatura centrale (A) non funzio-
nerà correttamente.

 Loading...