6 QUICK START TUTORIAL
close the Aux Input Mixer window.
Note that Module B’s processing is not required 20.
in this configuration. Open Module B’s input
mixer in the same way as the previous
steps, and make sure that both Input 1 and
Input 2 are selected OFF.
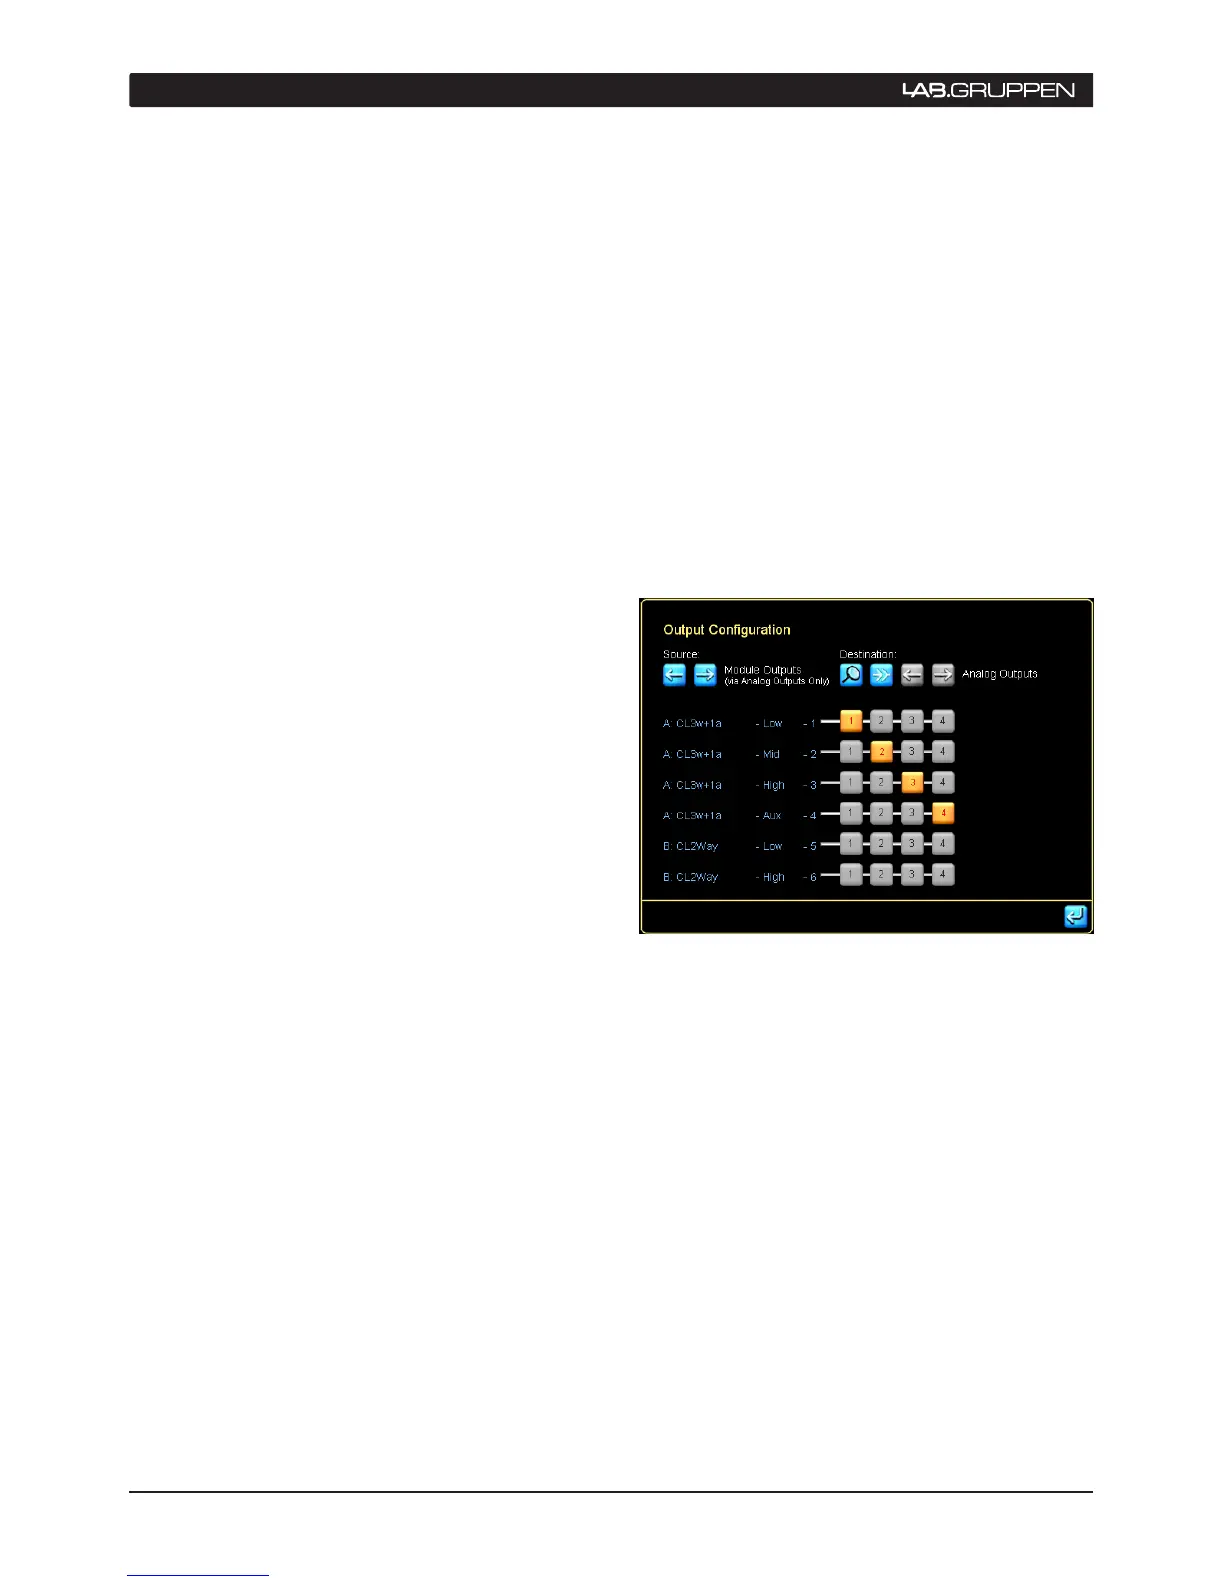
Tap any of the four magnifying glass 21.
symbols at the right-hand edge of Module A’s
pane to open the Output Configuration control
panel. It is possible to reassign each of the four
Module outputs to any of the power output
channels. To ensure that the PLM is set up in
accordance with your original channel allocation,
check that the Output Configuration control
panel looks like this:
Figure 4: Output conguration page
If the output assignments are not as shown, 22.
tap the Clear All Assignments button (“split
arrows”) and tap Yes to the warning dialog
box. Then tap the numeric buttons to set
the assignments as shown in the screenshot
above. Tap the return key to close the control
panel and return to the I/O Config page.
The following settings in the left-hand pane 23.
should be made automatically by default:
Digital Clock: Internal – 96 kHz•
Input Configuration: Auto: Auto; Type: Ana-•
log; Offset/Headroom: 26 dBu
Dante Configuration: Dante Disabled•
Analog Iso-Float & AES Termination: Inputs •
1-2: Floating; AES: terminated.
Another dialog box opens asking whether
Module B should be reconfigured. Tap either 2
Way or 2 Aux, as Module B will not be used in
this configuration.
Tap on Store/Recall EXIT14. to return to the
Modules screen.
With Module A’s border still yellow 15. (tap it if
it isn’t), tap the I/O Config button at the
bottom of the screen to open the I/O Config
screen.
The upper-right-hand pane depicts a block 16.
diagram of Module A. To the right of the red
disc are blocks representing the inputs to the
3-way crossover section. Tap on the Input 1
block to open the Input Mixer control panel.
The control panel shows two faders for Inputs 1 17.
and 2 to the left, and a bargraph meter showing
the signal level of the mixer output to the right.
If the faders are not already so positioned,
move Input 2’s fader down until the button
below the fader shows Input 2 OFF and turns
red. Move Input 1’s fader up its scale until
0.00 dB is showing in the blue box at the top of
the fader. Close the control panel by tapping
on the Return button.
The block diagram should now indicate that the 18.
3-way crossover is fed from Input 1 only, at zero
level. Now note the small square block towards
the bottom of the pane labeled Post EQ. This
currently indicates that the Auxiliary output
channel (which will be output 4) is fed from the
main crossover signal path. As Analog Input 2 is
being used for the subwoofer input, tap on the
Post EQ block. This will change the routing of
the Auxiliary channel to receive its input directly
from the Input Mixer and not post-EQ.
Tap on the lower Input 1 block19. (still in Module
A’s pane) to open the Input mixer control panel
for the Aux channel. Move Input 2’s fader to
the 0.00 dB position and tap on the Input
1 On/Off button (at the bottom of the fader)
so that it turns red. The block diagram will now
show that the Auxiliary channel is fed from Input
2 only, at unity gain. Tap the Return button to
 Loading...