NMS045 Reference Manual Overview 4-1
Module 4 Options Installation
4.1 Overview ..............................................................................................................................4-1
4.2 Required Tools (not supplied) ............................................................................................4-1
4.3 Solar Installation .................................................................................................................4-1
4.4 Weather Installation ............................................................................................................4-7
4.1 Overview
The following options can be installed in conjunction with the steps in
"Field Installation".
4.2 Required Tools (not supplied)
The tools listed are a recommended to have available for installation. It
is not a comprehensive list, and comparable substitutions can be made
at your discretion.
TAKE NOTE It is recommended
to have two installers for the
solar panel install.
• Ladder for each installer
• Ratchet or box wrench
• Open pole (TRP019): 3/4”
• Solar panel install: 9/16”
• Weather arm install: 9/16”
• Electrical wire fish tape
• Tape to help with feeding cables with fish tape
• #2 or #3 flat head screwdriver
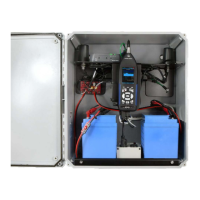
4.3 Solar Installation
Step 1 The pole should be in the tip down position. See 3.3.1
"Positioning the Pole Tip-Down" on page 3-2.
Step 2 Locate solar outlet hole in TRP019. See Figure 3-7 Cables in
TRP019.
Step 3 Install the bracket and mount it to the solar panel
following the manufacturer’s instructions included with