X-431 ADAS PRO Calibration Tool User Manual
42
2. Launch the diagnostic App.
3. Tap “ADAS” to auto-identify the vehicle info and navigate to the ADAS menu. Or
manually select the vehicle model and the system to be calibrated, e.g. MFK.
4. A window with information and instructions appears.
Fig. 5-3 (The screenshot varies from vehicle to vehicle.)
Generally, the on-screen calibration instructions include the following 3 parts:
A).
The calibration background (i.e why to calibrate the front camera?).
B).
Preconditions to be met (i.e which conditions should the vehicle work in before
the calibration etc.)
C).
Setup of the calibration tool and the vehicle.
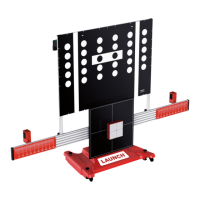
A. Attach the calibration reference pattern to the calibration frame: According to the
prompt message in Fig. 5-3, choose the corresponding calibration reference pattern
and attach it to the calibration panel (Refer to Chapter 4.1.4).
B. To adjust the distance between the calibration panel and the vehicle: follow the
instructions on the screen to proceed, if necessary, use the laser distance meter
(included in the packing list) to measure from the vehicle to the calibration panel.
*Note: The distance between the calibration panel and the vehicle varies by vehicles. It
may be the distance between the calibration panel and the vehicle front (license plate),