EasyManuals Logo

Lexmark C746 Quick Reference

Lexmark C746
27 pages
To Next Page IconTo Next Page
To Previous Page IconTo Previous Page
Page #23 background imageLoading...
Page #23 background image
Understanding jam numbers and
locations
When a jam occurs, a message indicating the jam location appears on
the printer display. Open doors and covers, and remove trays to access
jam locations. To resolve any paper jam message, you must clear all
jammed papers from all possible locations.
Area name Jam numbers What to do
Inside the printer 200–201 Open the front door, and then
remove the jammed paper
from behind the toner
cartridge area.
Open the front door, and then
remove the jammed paper
from under the
photoconductor units.
Open the front door, and then
remove the jammed paper
from under the fuser.
Inside the printer 202–203 Open the front door, and then
remove the jammed paper
from the fuser area.
Open the top access cover,
and then remove the jammed
paper.
Inside the printer 230 Open the front door, and then
remove the jammed paper
located between the front
door and Tray 1.
Standard output bin 202–203 Remove all paper from the
standard output bin, and then
remove the jammed paper.
Tray [x] 24x Open each tray, and then
remove any jams.
Multipurpose feeder 250 Remove all paper from the
multipurpose feeder, and
then remove the jammed
paper.
200–201 paper jams
Paper jam in the toner cartridge area
1 Open the front door.
WarningPotential Damage: To avoid overexposing the
photoconductor units, do not leave the front door open for
more than 10 minutes.
CAUTION—HOT SURFACE: The inside of the printer might
be hot. To reduce the risk of injury from a hot component,
allow the surface to cool before touching it.
2 Firmly grasp the jammed paper on each side, and then gently pull
it up and out to remove it from behind the toner cartridge area.
Note: Make sure all paper fragments are removed.
3 Close the front door.
4 Depending on your printer model, touch Continue, jam cleared or
press
.
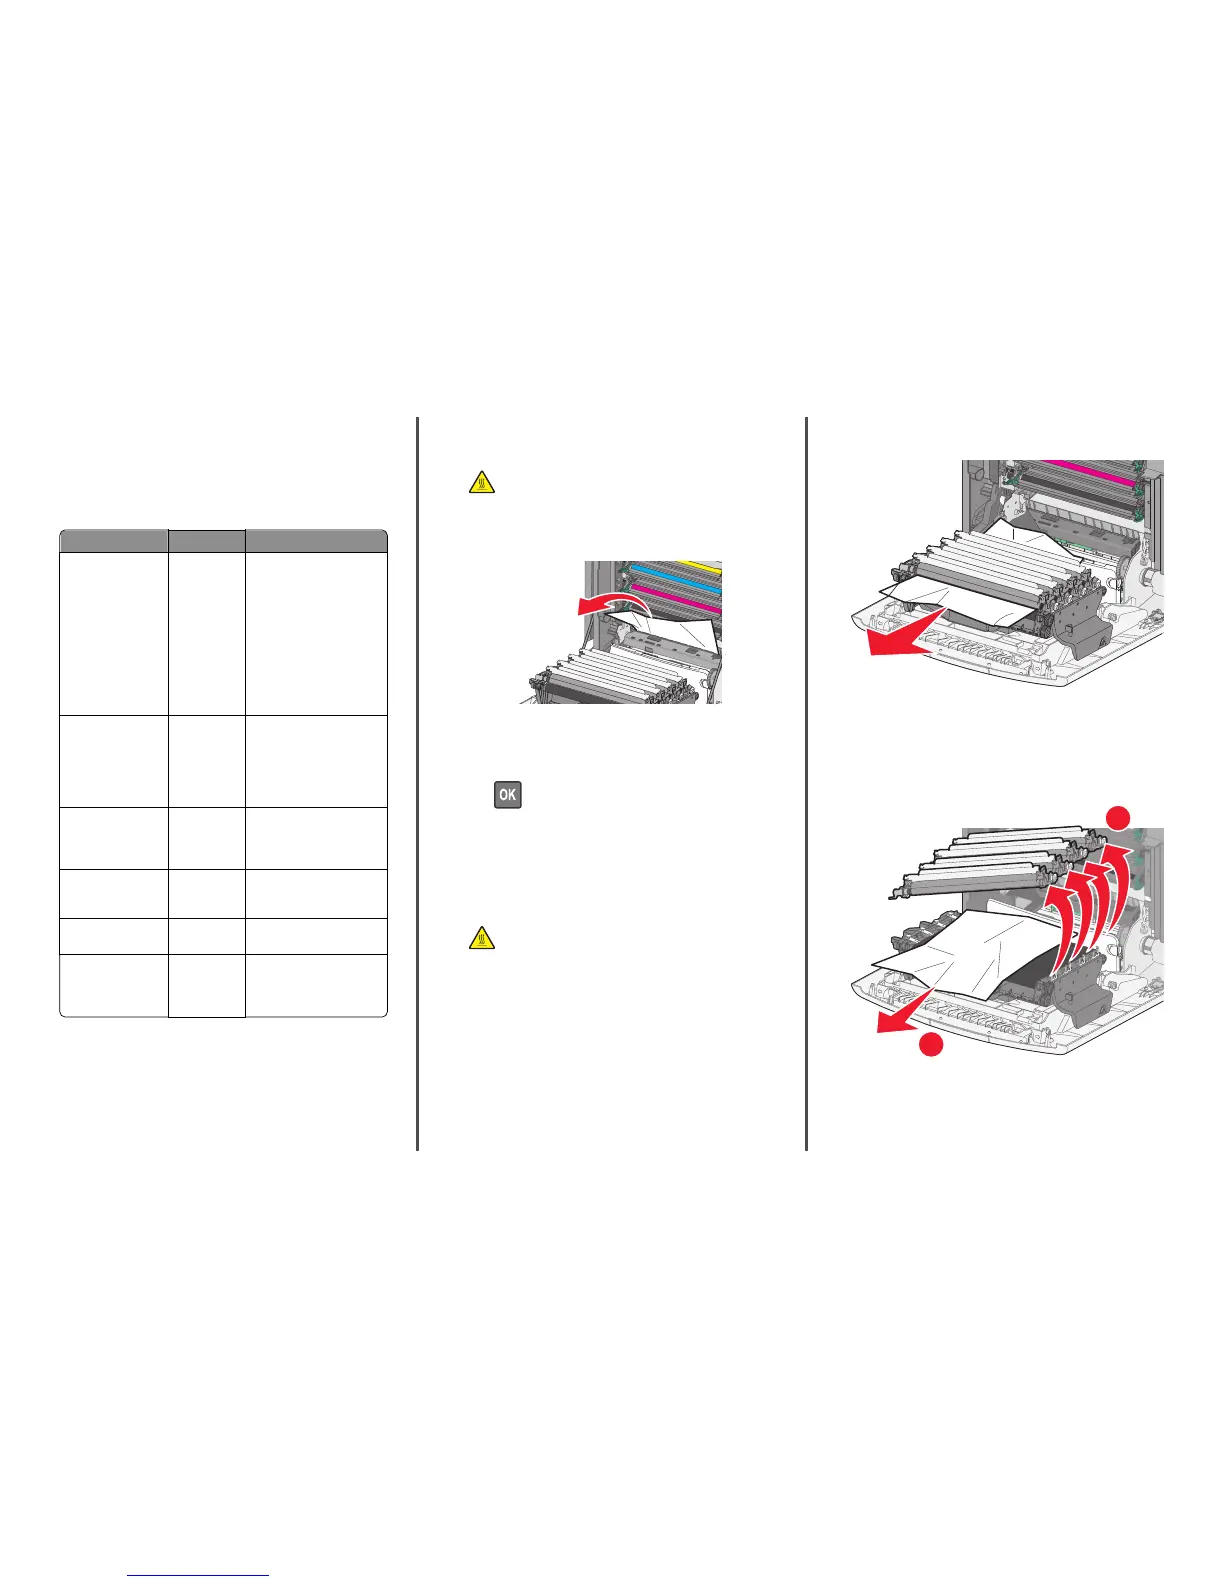
Paper jam under the photoconductor units
1 Open the front door.
WarningPotential Damage: To avoid overexposing the
photoconductor units, do not leave the front door open for
more than 10 minutes.
CAUTION—HOT SURFACE: The inside of the printer might
be hot. To reduce the risk of injury from a hot component,
allow the surface to cool before touching it.
2 If lodged under the photoconductor units, then firmly grasp the
jammed paper on each side, and then gently pull it out .
3 If the jammed paper is lodged too tightly under the photoconductor
units, then remove the photoconductor units and place them on a
flat surface.
Warning—Potential Damage: Be careful not to touch the
photoconductor drum. Doing so may affect the print quality of
future print jobs.
2
1
4 Firmly grasp the jammed paper on each side, then gently pull it out,
and then reinstall each photoconductor unit.
Note: Make sure all paper fragments are removed.
5 Close the front door.
23

Other manuals for Lexmark C746

Questions and Answers:

Question and Answer IconNeed help?

Do you have a question about the Lexmark C746 and is the answer not in the manual?

Lexmark C746 Specifications

General IconGeneral
ColorYes
Print technologyLaser
Resolution color2400 x 600 DPI
Maximum resolution1200 x 1200 DPI
Duplex printing modeAuto/Manual
Time to first page (black, normal)9 s
Print margins (top, bottom, right, left)4.2 mm
Print speed (black, normal quality, A4/US Letter)33 ppm
Printing colorsBlack, Cyan, Magenta, Yellow
Maximum duty cycle85000 pages per month
Recommended duty cycle1500 - 9200 pages per month
Number of print cartridges1
Page description languagesMicrosoft XPS, PCL 5c, PCL 6, PDF 1.6, PostScript 3, PPDS
Paper input typePaper tray
Total input capacity650 sheets
Total output capacity300 sheets
Maximum input capacity4300 sheets
Total number of input trays2
Maximum number of input trays6
Multi-Purpose tray input capacity100 sheets
Envelopes sizes7 3/4, 9, 10, B5, C5, DL
Paper tray media typesCard stock, Envelopes, Labels, Plain paper, Transparencies
Paper tray media weight60 - 218 g/m²
Non-ISO print media sizesExecutive (184 x 267mm), Folio (media size), Letter (media size), Oficio (media size), Statement (140 x 216mm), Universal, Legal (media size)
ISO A-series sizes (A0...A9)A4, A5, A6
JIS B-series sizes (B0...B9)B5
Maximum ISO A-series paper sizeA4
Wi-FiNo
Security algorithms802.1x RADIUS, HTTPS, LEAP, MD5, PEAP, SSL/TLS
Mobile printing technologies-
Supported network protocols (IPv4)TCP/IP, AppleTalk
Supported network protocols (IPv6)TCP/IP, TCP, UDP
Standard interfacesEthernet, USB 2.0
Optional connectivityParallel, Serial (RS-232), Wireless LAN
USB 2.0 ports quantityUSB 2.0 ports have a data transmission speed of 480 Mbps, and are backwards compatible with USB 1.1 ports. You can connect all kinds of peripheral devices to them.
Noise level (idle)32 dB
Maximum internal memory1536 MB
Sound pressure level (printing)54 dB
Sound pressure level (quiet mode)48 dB
DisplayLCD
CertificationCAN/CSA-C22.2 60950-1, CSA E60825-1, ICES-003 Class A, BSMI Class A, VCCI Class A, US FDA, FCC Class A, UL 60950-1, EN/IEC 60320-1, CE Class A, CB IEC 60950-1, EN 60950-1, EN/IEC 61000-3, EN 55022 Class A, EN 55024, EN/IEC 60825-1, GS (TÜV), AR S (TÜV), SMA C-tick mark Class A, CCC Class A, CISPIR 22 Class A, MIC Mark, EK Mark
Product colorBlack, White
Display diagonal2.4 \
Power consumption (off)6.8 W
Power consumption (standby)48 W
Power consumption (printing)420 W
Server operating systems supportedWindows Server 2003, Windows Server 2003 x64, Windows Server 2008, Windows Server 2008 R2, Windows Server 2008 x64, Windows Server 2012, Windows Server 2012 R2
Operating altitude0 - 3048 m
Operating temperature (T-T)16 - 32 °C
Operating relative humidity (H-H)8 - 80 %
Package depth553 mm
Package width588 mm
Package height545 mm
Package weight29700 g
Weight and Dimensions IconWeight and Dimensions
Depth400 mm
Width435 mm
Height455 mm

Related product manuals