4. Operation DVI-OPT-220-Pro series – User's Manual 15
Viewing Attached Monitor
Use the left and right buttons
to select the ATTACHED MONITOR
menu.
Information about the monitor that
is attached to the local monitor
output is shown. If no monitor is
connected, then the last attached
Three screens toggle automatically
showing the preferred resolution,
the name of the display and a three
letter abbreviation assigned to the
manufacturer.
Switching EDID
Step 1. Use the left and right
buttons to select the SWITCH
EDID menu.
Step 2. Use the up and down
memory slot. Hold down the
up and down buttons to
scroll faster. Three screens
toggle automatically showing
the preferred resolution, the
name of the display and
a three letter abbreviation
assigned to the manufacturer.
Step 3. Press ENTER to emulate
selected EDID.
After every EDID change, the transmitter toggles the HOT PLUG signal
for approx. 1 sec. Some graphic cards or DVD players do not sense
the HOT PLUG signal, and even if EDID has been changed, the set
resolution is not affected. In this case the source device must be
restarted, or powered OFF and ON again.
INFO: Location D02 has a special function. If a monitor is connected
to LOCAL MONITOR OUT, then its EDID is copied to location D02.
If no monitor is connected to the output then the last connected
Attached Monitor
1920x1200@60.0Hz
Attached Monitor
24WMGX3
Attached Monitor
NEC
Deleting EDID
Step 1. Use the left and right
buttons to select the Delete
EDID menu.
Step 2. Use the up and down
memory slot. Hold down
the up and down
buttons to scroll faster.
Three screens toggle
automatically showing the
preferred resolution, the name of the display and a three letter
abbreviation assigned to the manufacturer.
Step 3. Press ENTER to delete
selected EDID, then use the
up and down buttons to
change YES/NO.
Step 4. Press Enter to execute YES/
NO switch.
INFO: The factory preset EDIDs cannot be deleted by the user.
INFO: If such an EDID is deleted that is currently emulated on the
input, the EDID will be deleted from the location (e.g. from the user
memory). But the EDID on the input will not be changed until a new,
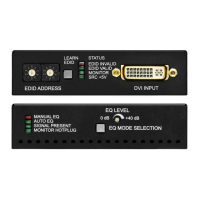
Laser Enabling
Step 1. Use the left and right
buttons to select the LASER
ENABLE menu.
Step 2. Use the up and down
buttons to change ON/OFF.
The selected value will blink.
Step 3. Press ENTER to execute ON/OFF switch.
Delete EDID U51
1280x1024@60.1Hz
Delete EDID U51
LCD1970NXP
Delete EDID U51
NEC
EDID Deleted!
Confirm Delete?
YES
Laser Enable
ON
Laser Changed!
Step 1. Use the left and right
buttons to select the
FACTORY RESET menu.
Step 2. Press the ENTER button to
reset the device to the factory preset values.
Step 3. A completion message will
appear, and then the unit
reboots.
This action sets all parameters to factory default values:
▪ Emulated EDID: F49 – Universal EDID
▪ Learn EDID: U01
▪ Switch EDID: D02
▪ Delete EDID: U01
▪ Laser Enable: ON
Device Information
The device name is displayed
toggle automatically showing the
the serial number.
Factory Reset
OK
Factory Defaults
Reloaded!!!
DVI-OPT-TX220-PR
FW:1.1.8 HW:3.2
DVI-OPT-TX220-PR
SN:06342203
Switch EDID F33
1440x288@50.6Hz
Switch EDID F33
1440x576i@50
Switch EDID F33
LWR
EDID Switched!