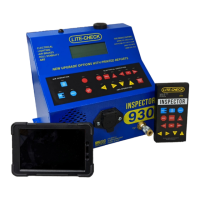
LITE-CHECK INSPECTOR 930
13
Set-Up Procedures
The following steps should be taken to ensure proper setup of the INSPECTOR 930:
1. Read the Operations Manual and the Quick Reference Guide.
2. Mount the Tester securely.
3. Connect the INSPECTOR 930 Tester to a regulated 12 Volt, 20 amp capable power
supply.
Warning: A 12 volt battery charger cannot be used, applied power must be clean
(filtered and regulated) and capable of generating 20 amps.
4. Connect the air supply to the tester on the side panel through a filtered regulator.
(110 to 120 psi is recommended.)
5. Connect the red battery clamp or ring terminal to the positive output.
6. Connect the black battery clamp or ring terminal to the negative output.
Important Reminders
ü Do not use battery chargers as a power supply – Battery Chargers are non-
regulated and may cause damage to the ABS ECU, or the tester.
ü Do not charge a battery while using the tester, except mobile installations
using a vehicle alternator.
ü The tester will not operate reliably below 11.0 volts and will indicate a “Low
Battery Voltage” condition” (LOW BAT).
ü The tester will completely shut down if the voltage drops below 9.0 volts.
ü Be sure the air pressure supply is above 90 psi if the tester is used for air brake
inspections. (110 to 120 psi input air with regulator is recommended.)
Note: If the 930 will not operate, check if the 12 volt power line polarity is reversed. Refer to steps
5 and 6 of the set-up procedures.