The Loupedeck CT (Creative Tool) is a control surface designed to enhance the workflow for creative professionals, particularly for use with Adobe Premiere Pro. It aims to provide an intuitive and precise way to interact with editing software, reducing reliance on mouse and keyboard for many common tasks.
Function Description
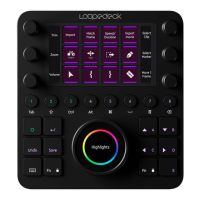
The Loupedeck CT serves as a "toolbox" of related functions, offering a collection of dials, touch buttons, and a central wheel with an integrated touch screen. These elements are organized into "workspaces" tailored for different stages of the creative process, such as editing, color grading, and audio adjustments. The device also features "general elements" – round and square buttons – that provide access to frequently used actions across all workspaces.
The core functionality revolves around providing tactile and visual feedback for adjustments. Dials are typically assigned to common adjustments like exposure, temperature, or contrast, and often include a press function to reset values. Touch buttons on the integrated screen offer quick access to actions within a workspace or serve as page links for different sets of dial or wheel controls. The central wheel combines rotation for continuous adjustments with a touch screen for interactive controls and visual feedback.
The Loupedeck CT is designed to complement, rather than entirely replace, mouse usage. It excels in tasks requiring precise, incremental adjustments or repetitive actions, such as navigating timelines, moving clips, fine-tuning colors, or adjusting transitions. For instance, selecting a clip might still be done with a mouse, but subsequent adjustments to that clip can be handled with the CT.
Usage Features
The Loupedeck CT's design emphasizes customization and workflow efficiency. Users can freely customize profiles to suit their specific needs, workflows, and projects, saving these profiles on the device's built-in storage. This adaptability ensures that the most relevant tools are always within easy reach, speeding up the workflow.
General Elements:
- Round Buttons (1-8): These buttons change color based on the assigned action type (e.g., green for workspace, purple for action), providing visual cues. They are used for various actions, including marking in/out points, copying, pasting, and editing.
- Square Buttons: Dedicated to frequently used actions that are consistent across different editing software, such as undo, save, enter, and navigation arrows.
- Fn Button: This button provides a "second layer" of actions for many buttons and dials. For example, pressing Fn + Undo performs a Redo action, and Fn + Enter acts as Esc.
Workspace Elements:
- Dials: Prioritized for common adjustments. Pressing a dial often resets its corresponding value. Users can reassign the press function if a reset is not needed.
- Touch Buttons (on touch screen): Contain frequently used actions within a workspace or page links for dials or the wheel.
- Wheel (with touch screen): Offers both rotation (wheel ring) and touch capabilities (wheel screen). The touch screen provides interactive controls and visual feedback, such as color wheels or navigation indicators.
Specific Workspace Features for Premiere Pro:
Editing Workspace:
- Project Page: Helps organize projects by adding new bins and sequences, importing material, navigating imported clips, sending clips to the Source Window, reviewing clips with the Shuttle Wheel or Navigation Wheel, marking in/out points, and inserting selections into the timeline. Dialog windows can be confirmed with Enter (or Fn + Enter for ESC).
- Tools Page: Provides quick access to various editing tools, reducing mouse usage. Touch pages can also be accessed by horizontal swipes on the touch display.
- Slip & Slide, Nudge Dials: These dials allow for precise movement of clips. Rotating a Slip or Slide dial moves clips by one frame, offering fine control. Nudge dials move clips horizontally in the timeline.
- Trim Dial: Pressing the Trim dial moves to the closest edit point; a second press toggles the In/Out Trim direction. Rotating the dial trims the edit point.
- Navigation Wheel: Offers precise control for navigating the timeline, with functions for 1 Frame and 5 Frames movement, toggled by clicking the wheel.
- Shuttle Wheel: Ideal for navigating through large amounts of material, accelerating speed based on rotation. Releasing the wheel stops the playhead instantly. Fn + rotation of the Shuttle Wheel provides exact frame navigation. Square buttons C + D also facilitate frame-by-frame navigation.
- Zoom Dial: Zooms in and out of the timeline. Pressing the dial fits all material into the timeline view.
Color Workspace:
- Dedicated to color grading tools, offering precise control over Premiere Pro's Color Panels (Basic Corrections, Creative Corrections, Color Wheels, HSL Secondary, Vignette, Curves).
- Basic Corrections Dials and Color Wheel: Automatically open upon entering the Color Workspace, allowing immediate adjustments.
- Dials for Adjustments: Control Temperature, Tint, Blacks, Whites, Saturation, and Contrast.
- Color Wheel: Swiping on the wheel adjusts Hue, while rotating adjusts Brightness for Midtones, Shadows, and Highlights. Changing between Shadows, Midtones, and Highlights is done by pressing Fn + swiping up/down.
- Page Links: Blue page links on the CT display allow access to specific color panels. Opening these links reveals controls assigned to dials and the wheel, pre-laid out for Premiere color controls.
- Full Screen Mode: Most color grading (except Curves) can be done in Full Screen Mode.
- Navigation on Color Wheel Pages: Pressing Fn + horizontal swipe navigates between pages without making color adjustments.
- Undo and Attributes: Changes can be undone by pressing a dial, double-tapping the wheel, or removing the entire effect with the "Remove Attributes" touch button. Fn + wheel rotation on color and tint wheels enables "5 Frames" Navigation for checking adjustments across a clip, and attributes can be copied/pasted with round buttons 7 and Fn + 8.
- Curves: Rotating the wheel automatically sets a point on the curve. Separate controls for horizontal and vertical movements allow smooth adjustments. "Double Click" resets the curve.
- Vignette: Applying a Vignette is fast. Additional controls are activated by tapping the wheel or pressing Fn and rotating the wheel. Double-tapping the wheel resets the Vignette.
Audio Workspace:
- Designed for audio work, allowing enlargement of audio track height with a dedicated dial.
- Volume Adjustment: Select clips with the mouse, then rotate the Wheel with the "Volume" action selected. A stronger blue line indicates the active action.
- Default Transition: Add a default transition with a single click on the touch display.
- Keyframe Control: For full control over transitions, users can select the PEN TOOL and set keyframes. Alternatively, "Add keyframes" can be assigned to a touch button. Keyframe visibility must be enabled by right-clicking the audio clip.
- Keyframe Movement: Rotating the wheel moves keyframes up and down, enabling quick fade in/out. Tapping the wheel toggles between keyframe selection and horizontal keyframe adjustment.
- Keyframe Interpolation: Adjusting keyframe interpolation (Ease In, Ease Out, Linear) provides precise control over the rate of changes in transitions or effects.
- Ease In: Slows down value changes entering a keyframe.
- Ease Out: Gradually accelerates value changes leaving a keyframe.
- Linear Interpolation: Creates an evenly-paced change between keyframes, with abrupt starts and stops.
Maintenance Features
The manual emphasizes the importance of proper software installation and configuration for optimal performance.
- Software Installation: Download and install the latest Loupedeck software from the official website. Connect the device via USB.
- Admin Rights (Windows): Install Loupedeck Setup software with admin rights to avoid installation issues or insufficient permissions.
- Application Folder (macOS): Install applications into the Applications folder to ensure Loupedeck software can detect editing software.
- Keyboard Settings: Ensure the computer keyboard uses UK or US keyboard settings for full functionality within Adobe Premiere Pro, as some actions may not work correctly with Scandinavian and German layouts.
- Software Compatibility: Loupedeck CT requires Loupedeck Setup software 3.0 or later. It is compatible with Windows 10 (64-bit) or later and macOS 10.12 or later. Older OS versions (MacOS 10.11 or older, 32-bit Windows, 64-bit Windows 7/8/8.1 without .NET Framework 4.5.1 or later) are not officially supported.
- Troubleshooting: The manual provides a "More Questions?" section with helpful hints for common issues, such as Premiere Pro not working with CT (check Premiere version), inability to install Loupedeck Setup (check OS compatibility), and actions not working (check keyboard language).
- Support: Users can find FAQs and support on the Loupedeck website.