Do you have a question about the Lutron Electronics C-L and is the answer not in the manual?
The approximate time in minutes after which the lights will go out after the last motion is detected.
The sensitivity of the sensor can be adjusted based on the expected level of activity in the room.
The automatic functionality of the sensor can be adjusted to control how the lights respond upon initial occupancy.
Allows the user to set a specific light level that the dimmer will turn on to.
Controls how quickly the lights fade up when the dimmer is turned ON.
Controls how quickly the lights fade down when the dimmer is turned OFF.
Delays the time between pressing the Tap button and the lights beginning the fade to OFF process.
Allows for enabling or disabling the indicator lights when the dimmer is turned OFF.
Ability to change the lowest achievable light level to which the dimmer can be adjusted.
Ability to change the highest achievable light level to which the dimmer can be adjusted.
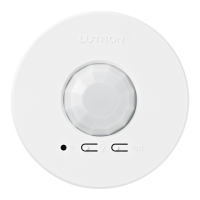
Details the sensor's detection range and beam patterns.
Step-by-step instructions to enter the dimmer's programming mode.
Guide to selecting and setting the desired timeout duration for the sensor.
Instructions to navigate and select specific programming options within APM.
Details the two settings: Locked Preset and Unlocked Preset for light level.
Step-by-step guide to program a Locked Preset light level.
Guide to choosing and setting the desired manual fade ON time for light transitions.
Guide to choosing and setting the desired manual fade OFF time for light transitions.
Step-by-step instructions to set the desired delayed fade to OFF time for lights.
Guide to enabling or disabling the nightlight mode for indicator lights on the dimmer.
Step-by-step instructions to set the desired Low-End Trim level for optimal bulb performance.
Step-by-step instructions to set the desired High-End Trim level for maximum light output.
Step-by-step instructions to return the dimmer to its original factory settings.
Details wiring for controlling lights from two locations using a mechanical switch.
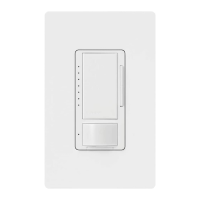
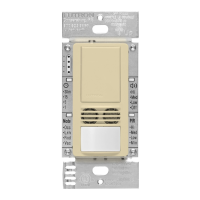
The Lutron Maestro Occupancy Sensor C•L Dimmer is a sophisticated lighting control device designed to enhance convenience and energy efficiency in residential and commercial spaces. This dimmer combines occupancy sensing capabilities with advanced dimming features, allowing for automated and customizable lighting experiences. It is available in models MSCL-OP153M and MSCL-OP153MH.
The core function of the Maestro Occupancy Sensor C•L Dimmer is to automatically control lights based on occupancy, while also providing manual dimming control. It detects motion within a room to turn lights on when someone enters and off when the room is vacated. This automation helps save energy by ensuring lights are only on when needed.
The dimmer offers an "Auto-On Feature" with four settings:
The "Occupied Level" feature allows users to set the light level at which the sensor turns on when motion is detected. Options include:
The Maestro Occupancy Sensor C•L Dimmer offers extensive customization through its "Sensor Dimmer Programming Mode" and "Advanced Programming Mode."
This mode allows users to adjust fundamental sensor behaviors:
APM provides granular control over dimming characteristics and other advanced settings:
Programming is done directly on the dimmer using the Tap, Raise, and Lower buttons in conjunction with the indicator lights (IL1-IL7). The indicator lights blink to guide the user through menu selections and setting adjustments. The FASST (Front Accessible Service Switch) is used to enter programming modes.
The dimmer supports two-location control using either a Lutron Companion Dimmer or an existing 3-way mechanical switch. Specific wiring and programming adjustments are required for mechanical switches to ensure proper functionality.
The Maestro Occupancy Sensor C•L Dimmer incorporates features that simplify maintenance and ensure long-term performance:
| Type | Wallplate |
|---|---|
| Voltage | 120V |
| Material | Plastic |
| Color | White |
| Number of Gangs | 1 |