ever attempt to light a burner if you smell gas.
lways keep the lid open (side-burner lids must be completely
removed) when lighting your grill.
Releasing fuel into a closed grill befor
e lighting will increase the
risk of explosion, property damage , personal injury or death.
Keep your face and body as far fr
om the grill as possible when
ny time a burner doesn’t light within 5 seconds, turn
off the control, wait 5 minutes for gas to dissipate, and repeat the
sure you have completed the
Before proceeding, make
sure you have completed the
Before proceeding, make
sure you have completed the
“Before
sure you have completed the
sure you have completed the
ach
sure you have completed the
sure you have completed the
se” checklist.
sure you have completed the
ollow these steps to light any
of the burners on your grill:
ollow these steps to light any
of the burners on your grill:
ollow these steps to light any
allowing the igniter to heat
the knob to the desired heat
of the burners on your grill:
Before any use, always make
... you do not smell gas
befor
... you do not smell gas
... you do not smell gas
f
... you do not smell gas
you do smell gas, shut every-
thing off and have a qualied
you do smell gas, shut every-
thing off and have a qualied
you do smell gas, shut every-
thing off and have a qualied
plumber check for leaks.
thing off and have a qualied
and clear of any combustibles,
… the cooking ar
and clear of any combustibles,
… the cooking ar
besides your food, that might
and clear of any combustibles,
besides your food, that might
and clear of any combustibles,
portable propane cylinder, it is
securely connected and leak
portable propane cylinder, it is
securely connected and leak
portable propane cylinder, it is
nstructions” for details.)
main gas supply shut-off is
… you know wher
main gas supply shut-off is
… you know wher
main gas supply shut-off is
located
main gas supply shut-off is
properly in the grill with
mounting legs in the slots.
properly in the grill with
mounting legs in the slots.
properly in the grill with
ongly or blowing on the
back of grill.
ongly or blowing on the
… wind is not blowing too
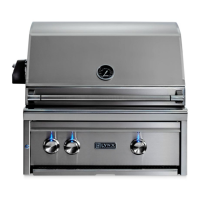
he main burners must sit level and
rmly on the frame with their mount
rmly on the frame with their mount
ing legs inserted into the frame slots.
rmly on the frame with their mount
ing legs inserted into the frame slots.
rmly on the frame with their mount
a thermocouple sensor with a
a thermocouple sensor with a
safety valve that automatically
safety valve that automatically
a thermocouple sensor with a
safety valve that automatically
a thermocouple sensor with a
a thermocouple sensor with a
safety valve that automatically
a thermocouple sensor with a
shuts off the ow of gas if the
shuts off the ow of gas if the
safety valve that automatically
shuts off the ow of gas if the
safety valve that automatically
safety valve that automatically
shuts off the ow of gas if the
safety valve that automatically
onditions” for tips on how
to prevent burner blow out)
to prevent burner blow out)
push and hold the control
push and hold the control
knob in for 2 seconds and
push and hold the control
knob in for 2 seconds and
push and hold the control
then turn the knob to the
thermocouple will heat up and
the safety valve will remain
thermocouple will heat up and
the safety valve will remain
thermocouple will heat up and
f you release the control knob
before the thermocouple has
f you release the control knob
before the thermocouple has
f you release the control knob
heated up, the safety valve
before the thermocouple has
heated up, the safety valve
before the thermocouple has
will shut off the ow of gas to
heated up, the safety valve
will shut off the ow of gas to
heated up, the safety valve
the rotisserie burner and you
will have to re-light the burner.
he rotisserie burner features
a thermocouple sensor with a
a thermocouple sensor with a