f a burner doesn’t light after
several attempts, it can be
match lit using the lighting r
several attempts, it can be
match lit using the lighting r
several attempts, it can be
atch-lighting your grill is
done in one of three ways,
atch-lighting your grill is
done in one of three ways,
atch-lighting your grill is
depending upon which
burners are being lit.
depending upon which
returned all of the control
irst, make sure you’ve
returned all of the control
irst, make sure you’ve
and have allowed 5 minutes
position
and have allowed 5 minutes
position
for any accumulated gas to
dissipate before attempting to
for any accumulated gas to
dissipate before attempting to
for any accumulated gas to
dissipate before attempting to
match light a burner.
dissipate before attempting to
manual lighting tubes for all
our grill featur
manual lighting tubes for all
our grill featur
main burners except for the
manual lighting tubes for all
main burners except for the
manual lighting tubes for all
main burners except for the
right-most main burners.
main burners except for the
xtremely cold temperatures
xtremely cold temperatures
S
xtremely cold temperatures
burner to light
burner instead of
burner to light
diately turn the burner knob
off to extinguish the ame
diately turn the burner knob
off to extinguish the ame
diately turn the burner knob
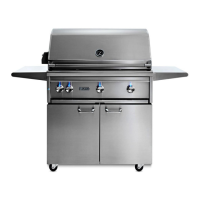
sing the lighting rod, place a
sing the lighting rod, place a
lit match in fr
sing the lighting rod, place a
sing the lighting rod, place a
ont of the manual
sing the lighting rod, place a
lighting tube for the burner
ush and turn the correspond-
ush and turn the correspond-
ing bur
ush and turn the correspond-
ush and turn the correspond-
ner control knob to
ush and turn the correspond-
light within 5 seconds turn the
knob off and wait 5 minutes
light within 5 seconds turn the
knob off and wait 5 minutes
light within 5 seconds turn the
before attempting to light it
before attempting to light it
O
before attempting to light it
before attempting to light it
nce lit, gas will stop
before attempting to light it
owing through the manual
again.
owing through the manual
again.
nce lit, gas will stop
owing through the manual
nce lit, gas will stop
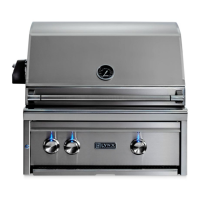
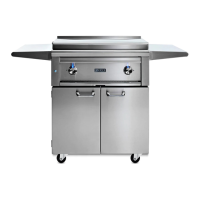
he right-most main burner,
does not feature a manual
he right-most main burner,
does not feature a manual
he right-most main burner,
the lighting rod to insert a lit
match through the cooking
grate into the front slot of the
match through the cooking
grate into the front slot of the
match through the cooking
briquette tray for that burner.
grate into the front slot of the
briquette tray for that burner.
grate into the front slot of the
ing burner control knob to
ing burner control knob to
f the burner doesn’t
ing burner control knob to
light within 5 seconds turn the
knob off and wait 5 minutes
knob off and wait 5 minutes
light within 5 seconds turn the
knob off and wait 5 minutes
light within 5 seconds turn the
before attempting to light it
before attempting to light it
ush and turn the correspond-
ing burner control knob to
ush and turn the correspond-
ing burner control knob to
ush and turn the correspond-
not feature a manual lighting
the lighting rod to insert a lit
match through the cooking
grate and through the protec-
ing burner control knob to
ing burner control knob to
ing burner control knob to
f the burner doesn’t
ing burner control knob to
light within 5 seconds turn the
light within 5 seconds turn the
knob off and wait 5 minutes
knob off and wait 5 minutes
light within 5 seconds turn the
knob off and wait 5 minutes
light within 5 seconds turn the
light within 5 seconds turn the
knob off and wait 5 minutes
light within 5 seconds turn the
before attempting to light it
before attempting to light it
ush and turn the correspond-
ush and turn the correspond-
ing burner control knob to
ing burner control knob to
ush and turn the correspond-
ing burner control knob to
ush and turn the correspond-
ush and turn the correspond-
ing burner control knob to
ush and turn the correspond-