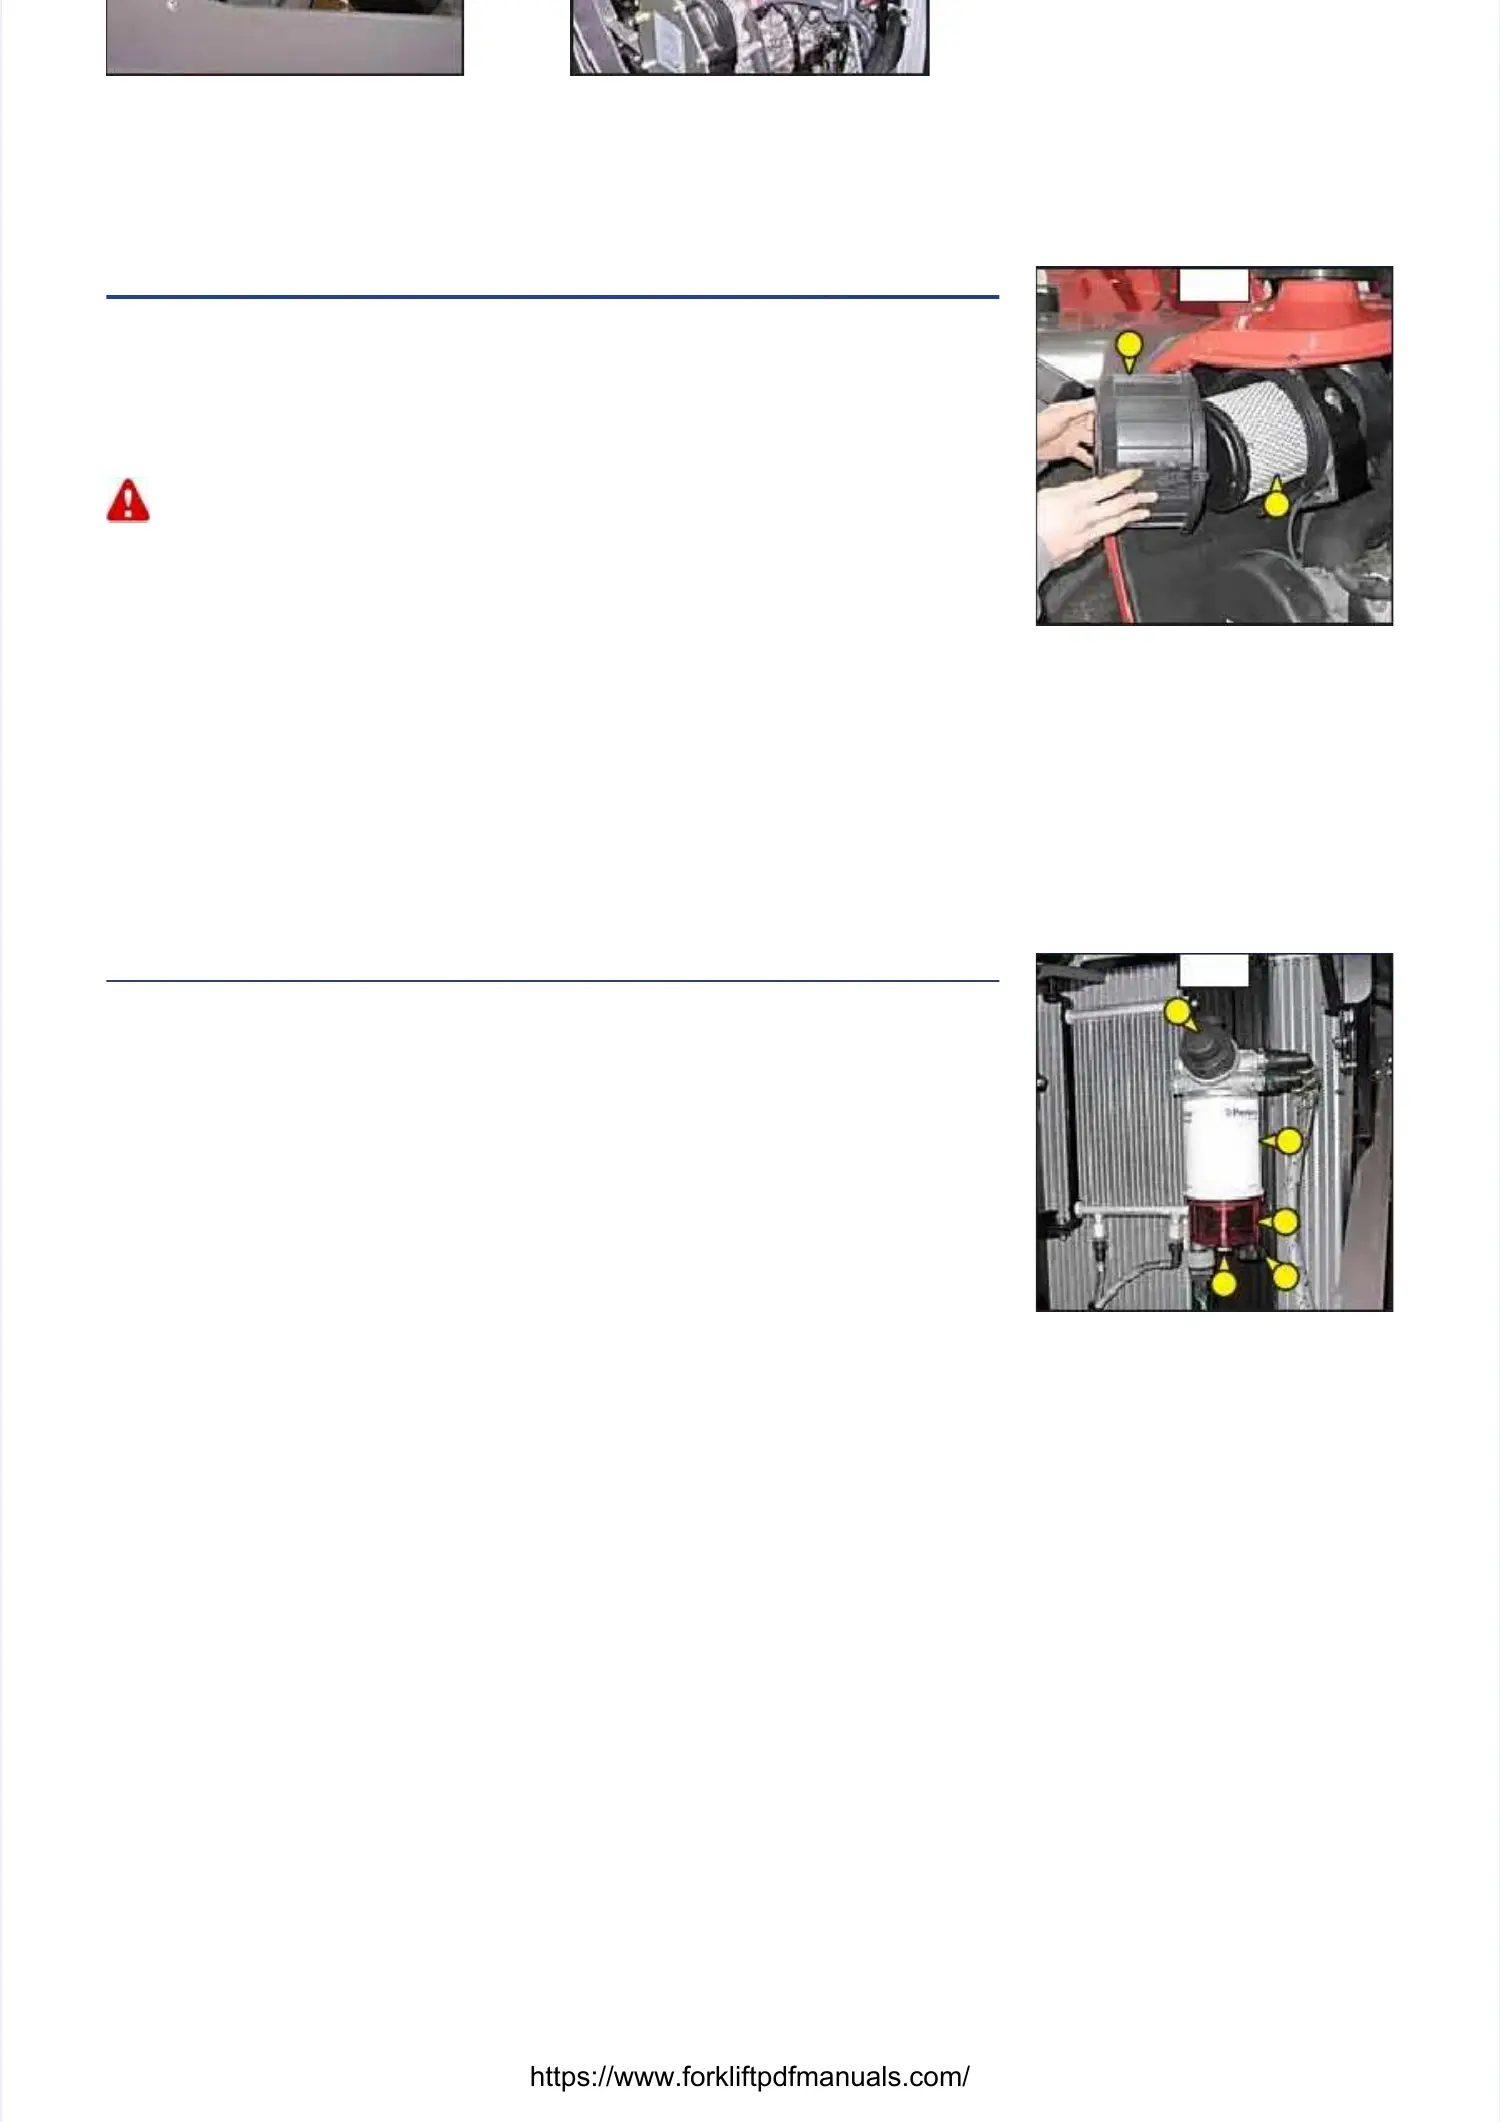
D3 - DRY AIR FILTER CARTRIDGE
D3 - DRY AIR FILTER CARTRIDGE
CHANGECHANGE
In case of use in a heavily dust laden atmosphere, there are pre-filtration cartridges, see:In case of use in a heavily dust laden atmosphere, there are pre-filtration cartridges, see:
3 - MAINTENANCE: FILTERS CARTRIDGES AND BELTS. Also, the checking and cleaning3 - MAINTENANCE: FILTERS CARTRIDGES AND BELTS. Also, the checking and cleaning
periodicity of the cartridge must be reduced (up to 250 hours in a heavily laden dustperiodicity of the cartridge must be reduced (up to 250 hours in a heavily laden dust
atmosphere and with pre-filtration).atmosphere and with pre-filtration).
Change the cartridge in a clean location, with the I.C. engine stopped. Never operate the lift truck withChange the cartridge in a clean location, with the I.C. engine stopped. Never operate the lift truck with
the air filter removed or damaged.the air filter removed or damaged.
- Open the I.C. engine bonnet.- Open the I.C. engine bonnet.
- Loosen the bolts and remove - Loosen the bolts and remove cover 1 (fig. D3).cover 1 (fig. D3).
-- Gently remove the cartridge 2 (fig. Gently remove the cartridge 2 (fig. D3), taking care to D3), taking care to avoid spilling the dust.avoid spilling the dust.
- Leave the safety cartridge in place.- Leave the safety cartridge in place.
-- The following parts must be cleaned The following parts must be cleaned with a damp, with a damp, clean lint-free cloth.clean lint-free cloth.
• The inside of the filter • The inside of the filter and cover.and cover.
• The inside of the filter inlet hose.• The inside of the filter inlet hose.
• The gasket surfaces in the filter and in the cover.• The gasket surfaces in the filter and in the cover.
-- Check pipes and connections between Check pipes and connections between the air filter and the I.C. engine and the air filter and the I.C. engine and the connection and state of the the connection and state of the clogging indicator onclogging indicator on
the filter.the filter.
-- Before mounting check the state of the new cartridge (see: 3 - MAINTENANCE: FILTERS CARBefore mounting check the state of the new cartridge (see: 3 - MAINTENANCE: FILTERS CARTRIDGES AND BELTRIDGES AND BELTS).TS).
-- Introduce the cartridge into the filter axis and push it in, pressing the Introduce the cartridge into the filter axis and push it in, pressing the edges and not the middle.edges and not the middle.
- Reassemble the cover, guiding the valve downwards.- Reassemble the cover, guiding the valve downwards.
D4 - FUEL PRE-FILTERD4 - FUEL PRE-FILTER
CHANGECHANGE
- Open the I.C. engine bonnet.- Open the I.C. engine bonnet.
-- Carefully clean the outside of the pre-filter and its holderCarefully clean the outside of the pre-filter and its holder, to prevent dust from getting into, to prevent dust from getting into
the system.the system.
-- Place a container under the pre-filter anPlace a container under the pre-filter and drain it using drain plug 1 (fig. d drain it using drain plug 1 (fig. D4).D4).
- Unscrew locking screw 2 (fig. D4).- Unscrew locking screw 2 (fig. D4).
- Remove housing 3 (fig. D4) and discard cartridge 4 (fig. D4) as well as the seals of the cartridge.- Remove housing 3 (fig. D4) and discard cartridge 4 (fig. D4) as well as the seals of the cartridge.
-- Clean the inside of the pre-filter head and Clean the inside of the pre-filter head and the housing, using a brush immersed in cleanthe housing, using a brush immersed in clean
diesel oil.diesel oil.
-- Refit the assembly with a new pre-filter and new seals (see: 3 - MAINTENANCE: FILRefit the assembly with a new pre-filter and new seals (see: 3 - MAINTENANCE: FILTERSTERS
CARTRIDGES AND BELTS).CARTRIDGES AND BELTS).
-- Pressurise the circuit with Pressurise the circuit with the hand pump the hand pump 5 (fig D4).5 (fig D4).
D3D3
11
22
D4D4
55
44
11
22
33

 Loading...