3-45
IT EN
648870 IT-EN-PL (04/05/2015)
D4
6
3
2
4
2
1
5
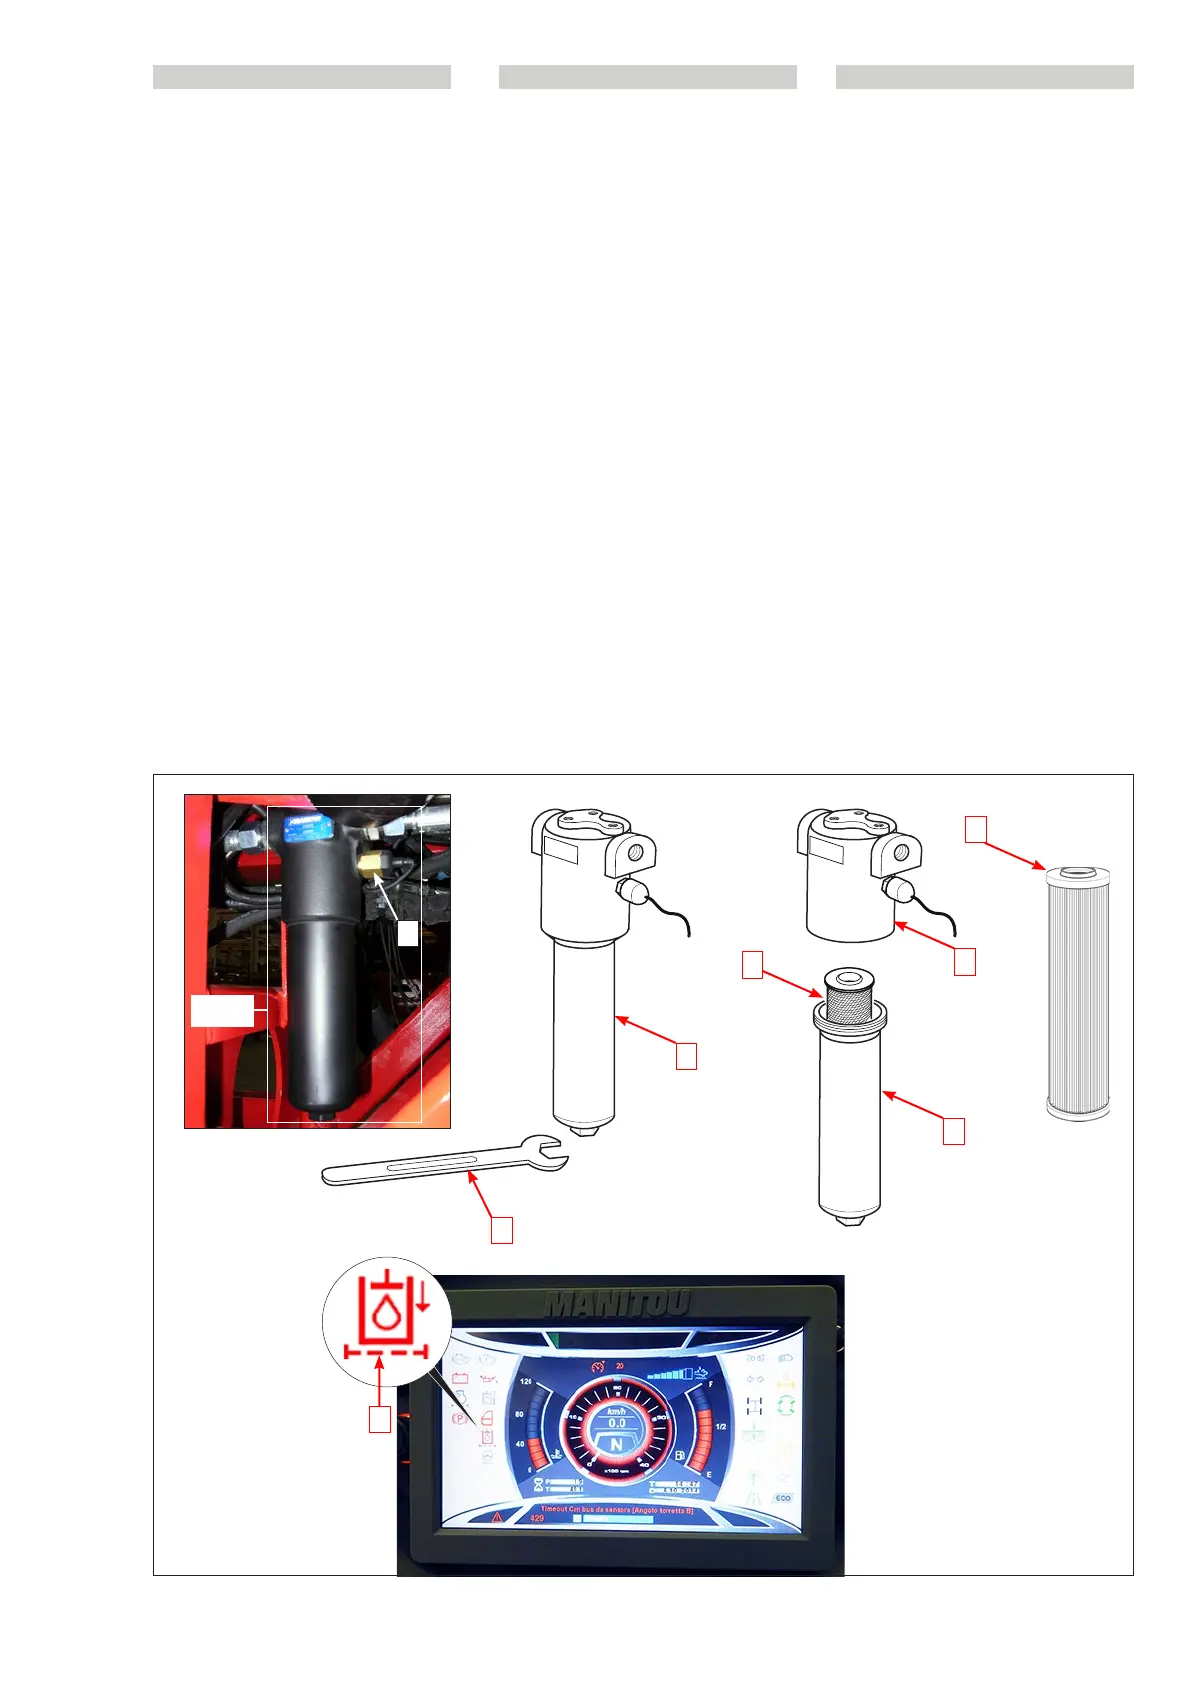
D4 - Replace the filter cartridge on the
main circuit delivery
The cartridge is inside the filter “D4” and to
replace it:
- Unscrew filter body 2 (fig.D4) using a
spanner and dismantle 3 (fig.D4) from
filter head 4 (fig.D4).
- Remove cartridge 1 (fig.D4) from the
filter head and replace it with a new one
5 (fig.D4) (see: “FILTER ELEMENTS AND
BELTS TABLE”).
- Then screw the filter body 2 (fig.D4)
back on head 4 (fig.D4) and start up
the truck and check for leaks. (Check
the efficacy of the filter periodically by
means of indicator 6 fig.D4).
Filter “D4” is provided with sensor 1 (fig.
D6) which detects blockage of the oil filter
cartridge.
If the filter is clogged, a red indicator lights
up on the control panel in cab 6 (fig.D4) (in
F1 mode).
6
D4 - Sostituire cartuccia filtro in man-
data circuito principale
La cartuccia si trova all’interno del filtro
“D6” e per sostituirla occorre:
- Svitare il corpo filtro 2 (fig.D4) con una
chiave e smontarlo 3 (fig.D4) dalla testata
del filtro 4 (fig.D4).
- Estrarre la cartuccia 1 (fig.D4) dalla testata
del filtro e sostituirla con una nuova 5 (fig.
D4) (vedi : “TABELLA ELEMENTI FILTRANTI
E CINGHIE”).
- Infine riavvitare bene il corpo filtro 2 (fig.
D6) alla testata 4 (fig.D4) e avviare il car-
rello e controllare che non ci siano perdi-
te. (Controllare periodicamente l’efficacia
del filtro mediante l’indicatore 6 fig.D4).
Il filtro “D4” è munito di un sensore 1 (fig.
D4) che rileva l’intasamento della cartuccia
filtro olio. Se il filtro è intasato si accende
una spia rossa su pannello di controllo in
cabina 6 (fig.D4) (in modalità F1).
PL
D4 - Wymienić wkład filtra po stronie
doprowadzenia obwodu główne-
go
Wkład znajduje się wewnątrz filtra “D6” i
aby go wymienić należy:
- Odkręcić korpus filtra 2 (rys. D4) za
pomocą klucza i wymontować go 3 (rys.
D4) z głowicy filtra 4 (rys. D4).
- Wyjąć wkład 1 (rys. D4) z głowicy filtra i
wymienić go na nowy 5 (rys. D4) (patrz:
„TABELA WKŁADÓW FILTRÓW I PASÓW”).
- Na końcu przykręcić dokładnie korpus
filtra 2 (rys. D6) do głowicy 4 (rys. D4) i
uruchomić wózek, aby sprawdzić, czy
nie ma wycieków. (Okresowo sprawdzać
sprawność filtra za pomocą wskaźnika 6
rys. D).
Filtr “D4” posiada czujnik 1 (rys. D4), który
wykrywa niedrożność wkładu filtra oleju.
Jeżeli filtr jest zatkany, zaświeca się czer-
wona kontrolka na panelu sterowania w
kabinie 6 (rys. D4) (w trybie F1).
648870 IT-EN-PL (04/05/2015)